• Thank you for visiting HeavyEquipmentForums.com! Our objective is to provide industry professionals a place to gather to exchange questions, answers and ideas. We welcome you to register using the "Register" icon at the top of the page. We'd appreciate any help you can offer in spreading the word of our new site. The more members that join, the bigger resource for all to enjoy. Thank you!

D8R + 463 scale 1/5,6

gulalastbilen

Active Member
Joined
Feb 6, 2010
Messages
39
Location
Sweden
Hi everyone!
Starting a new thread about my modeling for the last 8 years (not active all that time).

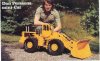
A lot of years ago I built a Cat 992 wheel loader, R/C in 1/10 scale. During the following years the modeling was mostly trains (yes, americans) but I always whanted to try a new big model again.
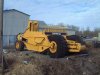
Well, 10 years ago I saw my friends Cat 988B, and this was the starting point for my new model. This model can be seen on Youtube on this link:
YouTube - Modell av Caterpillar hjullastare, i skala 1:6,5
CAT D8N was choosen, during the building it was changed to the D8R model instead. Nowdays there are both D8R seriesII and D8T, have not decided if I should go for the seriesII version, the T is out of question, don´t like the fenders!
Basicly difference between the 2 R models, seriesII has an track roller on upside of track frame (guess someone out there knows more about the difference).

About the scale, it´s 1 to 5.6 .
Why, because when planning for the model, I thought that there should be some comercial available track/chain that could be used. 1,5" pincenter on chain are a standard and when translated to pincenter on D8R , that´s where 1to5,6 comes from!
Well, ended up not finding anything that looked like the original so had to do them from scratch. Had already made drawing on the model so did stick to this scale.
Today I´m regretting this choise, have big problem to fit everthing inside that small car body.

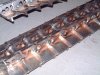
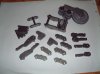
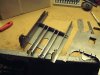
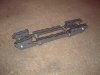
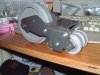
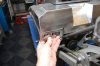
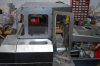
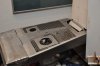
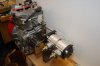
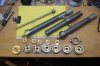
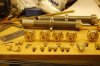
The track had to be drawn in computer, yes had to learn CAD first, all parts was spot welded togheter first and then brazed. This will give a strong track/plate design that will cope with the tractors pull (I hope).
If my calculation is right, the model will have a pull/push of aprox 500lbs (if ground condition allows).

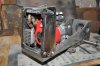
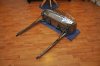
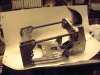
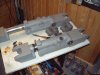
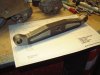
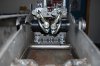
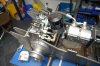
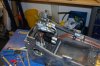
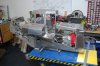
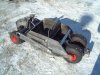
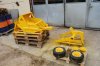
End of a lot of talk, here comes pics how it started!

I will post more pics during next days.

Keep up modeling!
Dan
 

Attachments

  • band2.JPG
    band2.JPG
    87.8 KB · Views: 4,243
  • delar i bandet.jpg
    delar i bandet.jpg
    39.2 KB · Views: 4,088

gulalastbilen

Active Member
Joined
Feb 6, 2010
Messages
39
Location
Sweden
Hi Per,
it will be a Honda G100 4-stroke engine. As can be seen on pic I had to adapt the inlet and will build a muffler as big as possible under the hood.

Have also included a pic of a very young me with the 992 during the build.
That was an electrical driven model with working hydraulics. Had almost no tools/machines at that time, the bucket was formed in a stair in my parents house, clamping down and bending it in small steps!

As said before I have made a lot of drawing in CAD, reason, it give the possibility to cut part with laser. It takes maybee the same amount of time to produce parts but I like using the technology of today. But the blade was built completely from sheet metal, same as 463, no laser parts on that!

Thanks for reading.
Dan
 

Attachments

  • DSC_0340.JPG
    DSC_0340.JPG
    135.7 KB · Views: 4,244
  • CAT992 dp 2.jpg
    CAT992 dp 2.jpg
    62.4 KB · Views: 4,028
  • Banddelar.jpg
    Banddelar.jpg
    63.9 KB · Views: 3,930
  • Schaktbladet.JPG
    Schaktbladet.JPG
    122.3 KB · Views: 3,932

dirtpusher9

Well-Known Member
Joined
Feb 13, 2009
Messages
120
Location
Texas
Occupation
blademan
Very impressive work Dan. This all looks so familiar for some reason. lol That is huge, you have a lot of steel in it. It will last for ever. Nice loader, btw.
 

JDOFMEMI

Senior Member
Joined
Jan 3, 2007
Messages
3,074
Location
SoCal
Dan

That is some good looking work you have done.
The engine is a tight fit in there, but it looks like you will have plenty of oomph to move some serious dirt.

I will be looking forward to your updates.

Thank you for sharing with us here at HEF
 

gulalastbilen

Active Member
Joined
Feb 6, 2010
Messages
39
Location
Sweden
Hi, here´s a pic of my model at a local show last year. First time shown here and got a lot of positive comments. Behind me is my Pete359, used to haul my historical equipment to shows. This year (I hope), I will have my Rogers lowboy trailer behind.

As mentioned above, i do some parts in CAD, here the result of some hours behind computer (sorry, didn´t have a jpeg on this only pdf) designing the ripper.

Dan
 

Attachments

  • rivaren under byggnation.JPG
    rivaren under byggnation.JPG
    146.3 KB · Views: 4,165
  • 090515 246.jpg
    090515 246.jpg
    85.7 KB · Views: 3,902
  • rivare komplett.PDF
    19.6 KB · Views: 208
  • DSCF4034.JPG
    DSCF4034.JPG
    140.4 KB · Views: 4,023

Speedpup

Senior Member
Joined
Jul 6, 2007
Messages
1,214
Location
New York
Occupation
President and all else that needs done!
Some amazing talent on this forum thanks for posting I am envious of the talent here.:drinkup:notworthy
 

gulalastbilen

Active Member
Joined
Feb 6, 2010
Messages
39
Location
Sweden
Hi, adding some more pics from my model.
Track frames was built with some laser cut items combined with hand made parts. The wheels to all boggies was made in solid steel, 12 in total.
Front beam between the track frame was also done in my milling machine, when connected to the frames, it can swing just like the real one.
There will be some rubber pads on the the 4 boggies on each side, guess the operator will have a smoth ride!

have a nice evening
Dan
 

Attachments

  • Bandram.JPG
    Bandram.JPG
    89.5 KB · Views: 3,726
  • Bandramar.JPG
    Bandramar.JPG
    146.2 KB · Views: 3,732
  • boggi och styrhjul.JPG
    boggi och styrhjul.JPG
    141.3 KB · Views: 3,732
  • Framaxel.JPG
    Framaxel.JPG
    118.7 KB · Views: 3,722

gulalastbilen

Active Member
Joined
Feb 6, 2010
Messages
39
Location
Sweden
Hi, some more photo´s showing the progress. Please note that those pics has been taken during some time, not showing my work last weeks only!
The hydralics is filling up inside space pretty good. Under the 2 pumps will be one oil tank, another will be what normaly (1:1) is used as fuel tank. I need as much oil as possible due to the hydrostatic drive line.
 

Attachments

  • DSC_0306s.jpg
    DSC_0306s.jpg
    97.6 KB · Views: 3,574
  • DSC_0318s.jpg
    DSC_0318s.jpg
    117.8 KB · Views: 3,815
  • DSC_0344S.jpg
    DSC_0344S.jpg
    117.7 KB · Views: 3,549

gulalastbilen

Active Member
Joined
Feb 6, 2010
Messages
39
Location
Sweden
More pics.

The cab and the other components was made by a friend :notworthy from my CAD drawings. As said before, what you put into CAD hours , you gain in time when fabricating parts. But, I do both ways, like my scraper and the blade are made only with hand tools.
Parts like the hood (over 650 holes) had been very time consuming to do manually and I couldn´t done it. Even the laser cutting took some time so price tag on this part was a hefty $200, but I think it was worth it, it will both be a part that has function ventilating the engine room and will atract wiewer.

Have a nice evening!
Dan
 

Attachments

  • DSC_0348s.jpg
    DSC_0348s.jpg
    124.1 KB · Views: 3,522
  • DSC_0353s.jpg
    DSC_0353s.jpg
    98.2 KB · Views: 3,527
  • DSC_0357s.jpg
    DSC_0357s.jpg
    95.9 KB · Views: 3,496
  • Huv.JPG
    Huv.JPG
    119.1 KB · Views: 3,505

gulalastbilen

Active Member
Joined
Feb 6, 2010
Messages
39
Location
Sweden
Hi everyone, as the title says, I´m also building a 463 to be hauled behind the D8R. This scraper is planned to be finished within 2 month, still has to do some smaller works on home made hydraulic cylinders (have had problems finding small nice connections, will make my own) and then some sandblasting and painting. The rims will be rebuilt later.
The D8R will have disconnectable hydraulic hoses to the ripper so I can run the scraper with same valves as ripper (planned to keep ripper on machine when using scraper). Incl also a pic from my friend Peter that has a D8R II with a 463.
You can see photos on his machine in action at this link.

http://www.classicmachinery.net/forum/scrapers-f49/scraper-job-in-stockholm-t3290.html

have a nice weekend
Dan
 

Attachments

  • DSCF4179liten.JPG
    DSCF4179liten.JPG
    191.1 KB · Views: 3,499
  • DSCF5219.jpg
    DSCF5219.jpg
    57.5 KB · Views: 3,736

Jeffksf

Well-Known Member
Joined
Oct 24, 2008
Messages
62
Location
Cleveland, OH.
Occupation
Mouse operator
Awesome! I will deffiently be following this thread, can't wait to see completed.
THat 988 loader video is impressive.
 

gulalastbilen

Active Member
Joined
Feb 6, 2010
Messages
39
Location
Sweden
Hi Scott,
I do use comercial available products if the look right (when seen outside machine), the pumps are 6litre/min at 1500rpm each( will not be seen). Had to change from a 3 pump system to new smaller 2 pump system during building, space inside machine was to small.
Cylinders that you can buy over disk do not look right, to bulky at ends. I do my own cylinder but use same tubing and rods that commercial producer use. The ends are designed to look like prototype. Shown here are cylinders for the 463, the long one for pusher plate in bowl and 2 shorter for higher-lower bowl. Still missing the cyl for apron. I use a cylindric head for these, origin was cable operated so prototype differ from scraper to scraper.
the other heads are for ripper and blade control at D8, the ripper has 2 cylinders with 8 side shaped heads and 2 with 6 side shaped heads. Those cylinders will look exact like the prototype.
There are smaller cylinders available from some German manufactors but they are rated for 10-13 bar pressure, that´s not enough for a 5,6 scale model. I will use about 50 bar pressure in my hydraulic system.
One step aside from looking like prototype is my quick coupling at the rear of machine. have found small samples (10mm in diameter) that has double shut off. Since I will use both ripper and scraper this is a compromice that I had to do to get reliable function.
Will post pics when cylinders are finished.
Nice weekend to You all!
Dan
 

Attachments

  • DSC_0404.jpg
    DSC_0404.jpg
    32.1 KB · Views: 1,868
  • DSC_0399.jpg
    DSC_0399.jpg
    46.3 KB · Views: 1,886

gulalastbilen

Active Member
Joined
Feb 6, 2010
Messages
39
Location
Sweden
Hi, some updates on the project.
Cylinders have taken much longer time than expected. Still has some parts to do but I can see the end in this.
First pics shows some connections that will be used, the Y-ones will be to ripper cylinders and they will be mounted on quick couplings (see in left corner, only 10mm in diameter and good for 35bar). The same coulings will be used for scraper, 2 double functions (apron connected to rear wall cylinder).

Second pics shows todays work, painting the main components of the 463. It´s painted in one of 3 different CAT colors I have, by the way, do anyone have correct paint code for CAT D8R 2004 model?
The front tires was removed from rims, the rims had to be cut down, was to wide. The rims edges has also been modified to simulate the heavier look that those rims have in full scale.

We have a local machinery show here in Stockholm within 2 weeks, trying to get as much as possible togheter to this exibition.

Have a nice weekend

Dan
 

Attachments

  • cylinder delar.jpg
    cylinder delar.jpg
    45.7 KB · Views: 1,729
  • CAT463 målad delar.jpg
    CAT463 målad delar.jpg
    121.2 KB · Views: 1,705
Top