• Thank you for visiting HeavyEquipmentForums.com! Our objective is to provide industry professionals a place to gather to exchange questions, answers and ideas. We welcome you to register using the "Register" icon at the top of the page. We'd appreciate any help you can offer in spreading the word of our new site. The more members that join, the bigger resource for all to enjoy. Thank you!

Cat 977L

Nige

Senior Member
Joined
Jun 22, 2011
Messages
29,224
Location
G..G..G..Granville.........!! Fetch your cloth.
Hello Nige, these stops are no longer available from Cat, "discontinued". I did find a few breakers in the States but they were unwilling to ship to the UK. Some in Jakarta, Indonesia, but price with carriage was out of this world.
Cheers Chris.
That’s strange. I have an account with a Cat dealer in the US and it shows both price & availability for both part numbers of stop - LH & RH. The prices make you wince though....
 

ChrisUK

Well-Known Member
Joined
Dec 23, 2020
Messages
132
Location
England
Out of interest Nige, what is the price and availability for these ? I approached dealer here and none were shown
I think I can get these finished off for not much more than my time and obviously cost of the 80mm plate. Chris
 

ChrisUK

Well-Known Member
Joined
Dec 23, 2020
Messages
132
Location
England
A few pics of progress with the recoil stops,
cheers Chris.
 

Attachments

  • 2B2710C1-FAD7-4AE4-84F6-D0FEDAA93A54.jpeg
    2B2710C1-FAD7-4AE4-84F6-D0FEDAA93A54.jpeg
    3.6 MB · Views: 106
  • C0B7441D-25F1-4336-8BD5-6CFA5080C7C9.jpeg
    C0B7441D-25F1-4336-8BD5-6CFA5080C7C9.jpeg
    3.6 MB · Views: 106
  • A05DF955-5944-4E83-B434-CCE716EE4B82.jpeg
    A05DF955-5944-4E83-B434-CCE716EE4B82.jpeg
    3.4 MB · Views: 101
  • A3DF73B9-45AC-4295-922C-4348C38986E2.jpeg
    A3DF73B9-45AC-4295-922C-4348C38986E2.jpeg
    3.7 MB · Views: 100

ChrisUK

Well-Known Member
Joined
Dec 23, 2020
Messages
132
Location
England
Nice looking work Chris! I'm sure your you putting a coffee can on the exhaust to keep the rain off. Now that I'm getting older and more forgetful I put a flapper on one of my coffee can machines that I use quite often. That machine of yours is real nice!
Also exhaust has had a makeover complete with rain flap
 

Attachments

  • 8EB59583-D6F7-4471-B4E7-2B970B7891EE.jpeg
    8EB59583-D6F7-4471-B4E7-2B970B7891EE.jpeg
    3.8 MB · Views: 55

Cat977

Senior Member
Joined
Feb 19, 2006
Messages
505
Location
Madison WI
Occupation
Machinist/Millwright
You're doing some first rate work on that machine Chris! There's no covering up the jealousy anymore.

The bolts for the spring stops look to be grade 5. In this place I would want to buy Cat bolts that are spec. as the same as the original bolts you took out, but of course longer. The Cat parts guy may not know about spec. for application. I've heard Cat bolts are all better than grade 8 with a taller head and heard that's not true. There are better than a grade 8 bolts. I think a B8 stud might be a good choice since the treads in the frame aren't 100%. Shear strength is very important in this application. You should torque the bolt or nut properly also.
Best of Luck
 
Last edited:

ChrisUK

Well-Known Member
Joined
Dec 23, 2020
Messages
132
Location
England
A few update pictures. Stops seem to fit quite well, also found a bucket, the wire brush will be worn out ! Cheers Chris.
 

Attachments

  • 232D1C15-386C-44E4-A8D9-C125AD26BFD1.jpeg
    232D1C15-386C-44E4-A8D9-C125AD26BFD1.jpeg
    3.3 MB · Views: 103
  • 291B58CE-44A2-4233-8E53-4764D6C8B9B4.jpeg
    291B58CE-44A2-4233-8E53-4764D6C8B9B4.jpeg
    3.4 MB · Views: 91
  • 52BB8613-8CB8-4CC9-AA15-C18280AB1D4D.jpeg
    52BB8613-8CB8-4CC9-AA15-C18280AB1D4D.jpeg
    3.1 MB · Views: 98

Cat977

Senior Member
Joined
Feb 19, 2006
Messages
505
Location
Madison WI
Occupation
Machinist/Millwright
Nice looking work Chris! A real good score on the bucket! Don't bother wire brushing or painting where the bucket has dirt rubbing by a lot. It'll get polished up just fine by working the dirt. On my 977L also has a 4in1 the dirt has worn down the sides that go down to the bottom of the bucket and teeth. I might be doing some reinforcing one of these days.
 
Last edited:

ChrisUK

Well-Known Member
Joined
Dec 23, 2020
Messages
132
Location
England
This looks like fun, was having a crawl round underneath and spotted some missing bits !
Any tips most welcome, these are the big bolts that attach the track frame to the main body underneath, I think they are 1-1/8 UNC.
Chris
 

Attachments

  • DABC3240-1861-48F7-8664-9762A52AF088.jpeg
    DABC3240-1861-48F7-8664-9762A52AF088.jpeg
    4.8 MB · Views: 87
  • F9259537-8177-4598-9485-E978635E93F4.jpeg
    F9259537-8177-4598-9485-E978635E93F4.jpeg
    3.9 MB · Views: 86

Cat977

Senior Member
Joined
Feb 19, 2006
Messages
505
Location
Madison WI
Occupation
Machinist/Millwright
Looks like (maybe) track frame connection bolts. If so you may haft to block up the body. But then if you could do one or two at a time maybe not. Start spraying them with penetrating oil every few days. Heat the bolt head a few times before trying to unscrew. You don't say where you're pointing the camera. Definitely looking at some fun Chris!
Shawn
 

ChrisUK

Well-Known Member
Joined
Dec 23, 2020
Messages
132
Location
England
Cheers, these are pictures of the rear track frame mounting bolts underneath that attach the frame to the rear casing. Challenge accepted !
Chris
 

ChrisUK

Well-Known Member
Joined
Dec 23, 2020
Messages
132
Location
England
Forgot to add these too
 

Attachments

  • D9D32BEE-7644-47FC-BA4D-7AF498C57B39.jpeg
    D9D32BEE-7644-47FC-BA4D-7AF498C57B39.jpeg
    4.8 MB · Views: 82
  • EDAA8174-ADC3-4E59-B952-E0CDB11827F1.jpeg
    EDAA8174-ADC3-4E59-B952-E0CDB11827F1.jpeg
    2.8 MB · Views: 83

Cat977

Senior Member
Joined
Feb 19, 2006
Messages
505
Location
Madison WI
Occupation
Machinist/Millwright
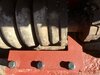
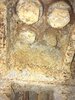
To get the bolt out that's broken off flush. Try drilling the threads out of a 1" nut. Then run a counter sink in about half way weld a rod to it to hold it.. If you can get an Extractalloy rod weld like you welding the nut on, stop at the chamfer let it cool, wack it a bit and the nut falls off. Then weld the nut on good, and let cool, more penetrating oil. Use a breaker bar and 3 pound hammer and wrap it gently back and forth. Work it free then drink some Beer!

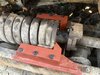
Scrape the frame flat where the washers go. Buy the cat bolts and washers. If you must use extra thick grade 8 Sae washers and bolts and lots of Neverseize or grease for rust prevention. Free all the bolts then replace and go one at a time on the Neverseize.

Best of Luck!
 
Last edited:

Cat977

Senior Member
Joined
Feb 19, 2006
Messages
505
Location
Madison WI
Occupation
Machinist/Millwright
Try using horse shoe shaped welding rods to the a joining bolt heads to hold the 1" nut in place. This way you can bang the nut in place and don't have to hold it. You may have to try several times but driving the heat into the stud will help loosen it.
 

Cat977

Senior Member
Joined
Feb 19, 2006
Messages
505
Location
Madison WI
Occupation
Machinist/Millwright
I was thinking of your bolt removal challenge. The number 1 priority is Don’t Break the Head Off. Impact guns work the best sometimes, because they use a lot of little hits. Of course definitely once it's free to spin it out. If you use too big an impact gun with the power turned up too high you can twist the head off before you know it. I like a Big Gun and turning it way down gives you a better feel for what you are doing. It has less hits but they are more powerful. Don' just back out, drive in to. The idea is to break the bolt free. Also taking a 3 pound or bigger hammer wack straight in on the head to break the rust free under the head. If you can get a hammer breaker wrench in there it may break it free. Beware most have a 12 point, and you don't want to screw up the bolt head, use 6 point sockets. Get the handle of your wrench as close to the frame/bolt head as possible. Use a 3/4" or 1" set it has less play and less flex. Cut off the end of a deep well socket to get it in tight. Weld the socket to bar stock and take out any looseness or flexing. Make it heavy to match that Big F**king Hammer!
Luck will set you Free!
 

ChrisUK

Well-Known Member
Joined
Dec 23, 2020
Messages
132
Location
England
A few more bits replaced. The coupling between the turbo and exhaust bend was leaking badly and must have been like that for many years as it had been spinning round in the turbo and bend housing and worn them away. Also every time the throttle was opened more smoke came from there than the exhaust.
Air filter housing going back on too after elements replaced. Slowly getting bits done !
 

Attachments

  • 392B02BB-A756-4DDC-A3C9-8CB87D6323D9.jpeg
    392B02BB-A756-4DDC-A3C9-8CB87D6323D9.jpeg
    2.8 MB · Views: 78
  • F5DEF67E-1EE3-4D6F-89D3-8BAFA9DC5F34.jpeg
    F5DEF67E-1EE3-4D6F-89D3-8BAFA9DC5F34.jpeg
    3.1 MB · Views: 77
  • 44044B30-3960-49EF-8C37-A12DA413ABA7.jpeg
    44044B30-3960-49EF-8C37-A12DA413ABA7.jpeg
    3.7 MB · Views: 77
Last edited:

ChrisUK

Well-Known Member
Joined
Dec 23, 2020
Messages
132
Location
England
Shiny parts are always nice.......
I hope you had the safety engaged while work was going on. Don't depend on the lift cylinders to hold the arms & bucket up.
Hi Nige, yes loader frame has been propped using the supports I made. It didn’t come with one so I made a pair myself, cheers Chris.
 

Attachments

  • 2C79B6B1-F6D1-4DFF-9119-27358CAED8C7.jpeg
    2C79B6B1-F6D1-4DFF-9119-27358CAED8C7.jpeg
    2.8 MB · Views: 73
  • 88A95562-C822-48D4-917B-183AD8AC95AD.jpeg
    88A95562-C822-48D4-917B-183AD8AC95AD.jpeg
    1.3 MB · Views: 75
Top