• Thank you for visiting HeavyEquipmentForums.com! Our objective is to provide industry professionals a place to gather to exchange questions, answers and ideas. We welcome you to register using the "Register" icon at the top of the page. We'd appreciate any help you can offer in spreading the word of our new site. The more members that join, the bigger resource for all to enjoy. Thank you!

Cat 977L

Nige

Senior Member
Joined
Jun 22, 2011
Messages
29,310
Location
G..G..G..Granville.........!! Fetch your cloth.
If the threads on the recoil assembly are rusted away then you are in a position where, in order to stay safe while disassembling, the spring really ought be cut with oxy-acetylene before attempting to take anything else apart. As DMiller said above those things are not known as Death Springs for nothing. It’s a shame really because the springs themselves don’t look to be in bad shape.
 

Bluox

Senior Member
Joined
Jun 19, 2010
Messages
1,960
Location
WA state
Hello Bob, no not welded to the frame. I will have to replace the strips too. Hopefully track split and recoil spring assembly out of the way next week.
Chris
I think I would put the spring stops in before I broke the track.
Are you going to replace the dowels on the spring stops?
Is the inside spring still in one piece?
How about a picture of the sprocket end of the spring.
Bob
 

ChrisUK

Well-Known Member
Joined
Dec 23, 2020
Messages
132
Location
England
I think I would put the spring stops in before I broke the track.
Are you going to replace the dowels on the spring stops?
Is the inside spring still in one piece?
How about a picture of the sprocket end of the spring.
Bob
Hello Bob, yes the spring is still in one piece as far as I can see. I cannot fit the RHS inner stop as the studs that hold it in place need drilling out and the small angled plate that slides in between the stop and track frame is covering the centre stud hole because it has all moved sideways slightly.
There are no dowels on these stops, just three mounting studs. Have attached picture of sprocket end of spring. I removed the LHS outer stop to use as a pattern for the RHS inner.
Cheers Chris.
 

Attachments

  • F991E60D-FF58-499C-B568-9C81B1D60E3F.jpeg
    F991E60D-FF58-499C-B568-9C81B1D60E3F.jpeg
    3.1 MB · Views: 67
  • 41948A03-CD83-4CC2-9DC3-26E03904D1C5.jpeg
    41948A03-CD83-4CC2-9DC3-26E03904D1C5.jpeg
    3.4 MB · Views: 64

Nige

Senior Member
Joined
Jun 22, 2011
Messages
29,310
Location
G..G..G..Granville.........!! Fetch your cloth.
There are no dowels on these stops, just three mounting studs. Cheers Chris.
That's strange, I thought all the stops on that type of setup had dowels between the stop and the frame but apparently not on the 48J. Machines with S/N above 48J2011 show an additional plate (28 in the diagram below) in between the stop and the track frame. Is that the plate you're talking about that has moved sideways.?

upload_2021-2-22_14-7-0.png

I don't know what anyone else thinks but I would suggest proceeding VERY carefully around that setup in the state that it is in right now. In fact I'd be very close to reaching for the gas axe and cutting the spring before proceeding any further.
 

ChrisUK

Well-Known Member
Joined
Dec 23, 2020
Messages
132
Location
England
2976F97A-BB95-4204-A4CC-97CE5EC001CF.jpeg
That's strange, I thought all the stops on that type of setup had dowels between the stop and the frame but apparently not on the 48J. Machines with S/N above 48J2011 show an additional plate (28 in the diagram below) in between the stop and the track frame. Is that the plate you're talking about that has moved sideways.?

View attachment 234424

I don't know what anyone else thinks but I would suggest proceeding VERY carefully around that setup in the state that it is in right now. In fact I'd be very close to reaching for the gas axe and cutting the spring before proceeding any further.
Thanks Nige, I appreciate your help and advice. Yes, item no 28 is just a strip welded to the track frame that the stops bolt down onto. Looking at it I will say all four will want replacing. The plate that has moved sideways is attached to the spring assembly, it is an angled piece, I have attached a picture to show the plate but this is a picture of the other side from when I removed the stop for a pattern.
 

Cat977

Senior Member
Joined
Feb 19, 2006
Messages
505
Location
Madison WI
Occupation
Machinist/Millwright
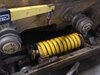
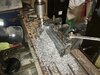
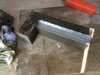
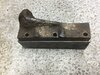
I agree on using lots of caution around that spring! The studs you have exposed should get Kroil, PB blaster, or your favorite penetrating oil sprayed on them. Doing so often over time does wonders. After the spring is made safe you can heat the stud up nice and red right on down close to the frame, without melting any of it. Let it cool to room temp. Cycle it several times if necessary. Use penetrating oil and a vise grip back and forth to loosen it up. If the bolt goes into the open frame too far it may have to be drilled out. The time is not wasted though, if it loosens up. Cut and grind flush, try to mark the center, drill it through or just past the depth of the frame is better, less work and the hole will hold your cutting oil. Use say 1/16" to 1/8" drill first. Then step up something less than the tap drill size. Push down pretty hard when drilling. Sometimes the drill will grab the stud and run it through or maybe you should stop after going in half way and free up the drill. The idea is not to wreck the threads. Maybe more later.
Best of Luck Chris
 

Nige

Senior Member
Joined
Jun 22, 2011
Messages
29,310
Location
G..G..G..Granville.........!! Fetch your cloth.
Has someone been getting a bit "creative" in there..?
I may be mistaken but what's shown in your photo ought to be part of the head. Yours though appears like it's a piece of angle iron welded on, maybe it's just because it is old & corroded it appears like an afterthought. The photo below isn't very good but this is what it's supposed to look like, taken from the disassembly manual.

upload_2021-2-22_16-10-8.png
 

Bluox

Senior Member
Joined
Jun 19, 2010
Messages
1,960
Location
WA state
Chris
If you would see if you can take the nut
Hello Bob, yes the spring is still in one piece as far as I can see. I cannot fit the RHS inner stop as the studs that hold it in place need drilling out and the small angled plate that slides in between the stop and track frame is covering the centre stud hole because it has all moved sideways slightly.
There are no dowels on these stops, just three mounting studs. Have attached picture of sprocket end of spring. I removed the LHS outer stop to use as a pattern for the RHS inner.
Cheers Chris.
Chris
If you would see if you can get that nut off and see what condition the threads are.
I see this tractor don't use dowels it has stops welded to the track frame.
If you PM me I will offer a suggestion on the spring removal .
Bob
 

Cat977

Senior Member
Joined
Feb 19, 2006
Messages
505
Location
Madison WI
Occupation
Machinist/Millwright
When I see lots of corrosion on small nuts/bolts, I will cherry red the nuts/heads 1-3 times before I try to loosen them. Also cut the stud flush next to the nut so you don't drag the corroded threads through the nut. It also makes the nut easier to remove saving (hopefully) the threads. Even if things are super corroded on the outside the threads may still be good inside. Heating with a rose bud is best. Change the torch tip to keep the flame size to stay on the nut or hub/flange, and not on the stud/shaft. Heating the outside of a nut or hub/flange as fast as possible without melting is best. Cutting the studs flush with the top of the spring stop, then remove the stop, is best, or use the above technique to save the threads.
Keep asking questions Chris!
 

RustedHeroes

Well-Known Member
Joined
Apr 27, 2016
Messages
171
Location
Bonnyville Alberta, Canada
I used the gas axe method to remove mine, can honestly say I haven't felt that kind of fear ever before working on a piece of equipment..
Making that first cut and the noise it makes when it let's go! Hahah I was trembling

Chaining it down made me feel better, not sure it accomplished anything
 

Attachments

  • IMG_1777.JPG
    IMG_1777.JPG
    1.1 MB · Views: 85
  • IMG_1779.JPG
    IMG_1779.JPG
    993.6 KB · Views: 82
  • IMG_1874.JPG
    IMG_1874.JPG
    1 MB · Views: 82

bunkclimber

Well-Known Member
Joined
Jul 29, 2009
Messages
116
Location
MD
looking at your first two photos of your 977L I have to say Ive never seen auxiliary hyd hoses to the front attachment plumbed that way.The hoses coming up from the swivel unions are a bit odd,was that a repair? usually they are hardlines off the swivel unions straight down the mast h-frame to the bucket pin area..was this something that was repaired,like the front aux circuit swivels went bad and were replumbed with hose??
BTW nice winch on your machine,hard to find one anymore in the US east coast
 

ChrisUK

Well-Known Member
Joined
Dec 23, 2020
Messages
132
Location
England
looking at your first two photos of your 977L I have to say Ive never seen auxiliary hyd hoses to the front attachment plumbed that way.The hoses coming up from the swivel unions are a bit odd,was that a repair? usually they are hardlines off the swivel unions straight down the mast h-frame to the bucket pin area..was this something that was repaired,like the front aux circuit swivels went bad and were replumbed with hose??
BTW nice winch on your machine,hard to find one anymore in the US east coast
Thanks Bunkclimber, I would say the hose joints are a repair from sometime in its previous life although the 3rd service kit was added to the machine in 1987 to run the timber grab. All the parts were bought from Cat at that time. The owner at the time must have spent a good amount between the 3rd service, timber grab and winch. Cheers Chris
 

ChrisUK

Well-Known Member
Joined
Dec 23, 2020
Messages
132
Location
England
Small amount of progress with the missing stop. Also found some pipe to get exhaust level with top of cab,
cheers Chris.
 

Attachments

  • 19B4F70D-1C53-42FD-BC3D-D356B0E7CB39.jpeg
    19B4F70D-1C53-42FD-BC3D-D356B0E7CB39.jpeg
    3.7 MB · Views: 79
  • 2A158B08-3008-4D43-AAE0-2774DA1825F3.jpeg
    2A158B08-3008-4D43-AAE0-2774DA1825F3.jpeg
    3.1 MB · Views: 77
  • F17BD1F9-A18B-4BFA-B79B-52941A1ACF3E.jpeg
    F17BD1F9-A18B-4BFA-B79B-52941A1ACF3E.jpeg
    2.8 MB · Views: 78
  • 722BBA0B-C452-46FB-81E7-3EA2DE16C97E.jpeg
    722BBA0B-C452-46FB-81E7-3EA2DE16C97E.jpeg
    290.7 KB · Views: 78

Cat977

Senior Member
Joined
Feb 19, 2006
Messages
505
Location
Madison WI
Occupation
Machinist/Millwright
Nice looking work Chris! I'm sure your you putting a coffee can on the exhaust to keep the rain off. Now that I'm getting older and more forgetful I put a flapper on one of my coffee can machines that I use quite often. That machine of yours is real nice!
 

ChrisUK

Well-Known Member
Joined
Dec 23, 2020
Messages
132
Location
England
Until I looked at the price of those stops in the Parts system I couldn't understand why you decided to make your own because availability is not an issue. Now I do.
Hello Nige, these stops are no longer available from Cat, "discontinued". I did find a few breakers in the States but they were unwilling to ship to the UK. Some in Jakarta, Indonesia, but price with carriage was out of this world.
Cheers Chris.
 
Top