donkey doctor
Senior Member
Don't know if you are subject to these regs or not but for your own safety it might be worth thinking about. Regards d.d. https://www.osha.gov/dts/hib/hib_data/hib19880520.html


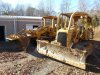
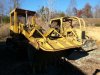
 The track pad change is finished. Today I started the job of repacking the lift cylinders. I have the bucket supported on some heavy duty jack stands. I am also using the blade of the D4E as back up support for the bucket while I am working on the lift cylinders. As a third safety measure I am using a chain from one lift arm, across the top of the hood, to the other lift arm.
Good spot Tony. Here's what the assembly should look like.Nitelite it might be worth a verb on the fact that the piston is back to front on the rod, the fibre ring needs to be at the nut end else damage will result, the coolant on the head is from the chamber seals most probably.
tctractors.
The machine deal included a new set of shoes. I have bought the new hardware. 312 new Cat bolts and nuts. She will look good in the new
shoes.
 Thanks tctractors and Nige! If not for your reply I would have put that piston in backwards. That was how it was when I removed the rod from the cylinder. I took pictures and put everything back exactly as it came apart. I did have the schematic but failed to pay attention to it and concentrated on putting things back in the same location and direction as they were removed. The cylinder had been rebuilt before as there were markings on the nut left by a pipe wrench. The seals were really rotten and came out in little chunks.
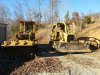
Would like to see a photo(s) of the D4E and 951 side by side. Very nice combo indeed. Good luck with them, hope you have hundreds of hours of enjoyment with each. Cheers LB