• Thank you for visiting HeavyEquipmentForums.com! Our objective is to provide industry professionals a place to gather to exchange questions, answers and ideas. We welcome you to register using the "Register" icon at the top of the page. We'd appreciate any help you can offer in spreading the word of our new site. The more members that join, the bigger resource for all to enjoy. Thank you!

Cat 426 Inframe Overhaul Advice

Rocket Man

Well-Known Member
Joined
Dec 10, 2020
Messages
199
Location
El Paso Texas
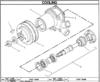
Hello all. Well i have made the decision to do an inframe overhaul on my Cat 426 Backhoe and have already run into a major stoppage. I started pulling off all the items i could get to before removing the head. The water pump is mounted on a base/housing that attaches to the head. There are 4 bolts that holds that part on. So you would think that one could just remove those 4 bolts and the head would be free to just remove it? Well no BC the water pump is mounted on that housing and there is one bolt INSIDE that housing that also holds the housing to the head and only way to get to it is remove the WP.
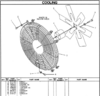
So had to take off the fan guard and thought i could unbolt the water pump from the housing and just lift the pump and fan out? Turns out that the fan will not go forward enough to let the pump impeller clear the housing, so now i can not get that last bolt out. It looks like there is no way to get the fan/pump combo out of the way without pulling the radiator?
So if anyone has ever done this and has a solution i would greatly appreciate any help on it.
Oh yes, i did think of that service manual thing but would have to float a loan to buy it. LOL
 

edgephoto

Senior Member
Joined
Aug 13, 2019
Messages
730
Location
Stafford, CT
Maybe this will help. Not sure what exactly you have without a serial number.
 

Attachments

  • Cylinder Head Assembly.pdf
    276.1 KB · Views: 13

Rocket Man

Well-Known Member
Joined
Dec 10, 2020
Messages
199
Location
El Paso Texas
Maybe this will help. Not sure what exactly you have without a serial number.
Thanks, this does cover my machine SN 7BC00580. I do need that info included in that attachment, it has everything i need to know such as torque specs etc. Much appreciated.
I really need info prior to where your attachment starts, ie how to remove the fan and water pump as a unit. Or at least get the fan off. Problem with that is the fan is too close to the radiator to get your hand and wrench in there to remove those bolts out that fan to the pump. The attachment shows the head removal and appears to have the water pump and housing still attached to it. But how did they get the fan off?
 

Rocket Man

Well-Known Member
Joined
Dec 10, 2020
Messages
199
Location
El Paso Texas
this should help.

Are you computer savvy, @Rocket Man ?
Very much so. Been in computers since early IBM 360 days. Univ of Wyoming 1969.
Thanks for the files. I am still in limbo BC i still can not figure how to get fan off. No room to get tool in front of it where the 4 bolts are that attach it to the water pump. Your pump removal illustration starts out with the fan already removed.
So, it looks like the illustration for removing the radiator is a prelude to getting the fan off the water pump. ? Guess that is my next task.
BTW, next item is how to replace the fan belt. LOL. Looks like one has to completely remove the Hydraulic Pump drive shaft.
 

Rocket Man

Well-Known Member
Joined
Dec 10, 2020
Messages
199
Location
El Paso Texas
I replaced my drive belt. I removed the rubber coupling.

@Rocket Man I sent you a PM
GREAT INFORMATION!! I never knew that was a rubber coupler, looks like metal four bolts on each end and close tolerance to boot. But since it is rubber it wont be so hard to do. It actually has a 2 belt capacity but has been running with one but i want to add the other belt along with the new alternator.
That water pump is my greatest headache right now.100_0551.JPG
 

edgephoto

Senior Member
Joined
Aug 13, 2019
Messages
730
Location
Stafford, CT
if you don't have A/C you only have one belt, the alternator. The other grooves on the crank and water pump are for the optional A/C compressor.

When I did my belt I replaced
the rubber coupler. I bought them aftermarket for much less. Looked identical to original.
 

Rocket Man

Well-Known Member
Joined
Dec 10, 2020
Messages
199
Location
El Paso Texas
if you don't have A/C you only have one belt, the alternator. The other grooves on the crank and water pump are for the optional A/C compressor.

When I did my belt I replaced
the rubber coupler. I bought them aftermarket for much less. Looked identical to original.
You are a wealth of good information. Your input is very much appreciated. Interesting about those belts. Mine does not have A/C but the alternator i just bought has a double pulley. I will have to work on this one.
Yes to aftermarket stuff, but only those things that can be accessed and replaced easily. The hard ones like the water pump, oil pump etc i will spend the extra money on them.
 

edgephoto

Senior Member
Joined
Aug 13, 2019
Messages
730
Location
Stafford, CT
If you can get both belts to line up I would put them on. V-Belts used to be sold in matched pairs for this type of installation. Been years since I owned anything with V-belt so not sure if you can buy them like that now or not. Certainly don't mix brands.

I am not big on aftermarket parts. For critical stuff I only use OEM stuff. If I can save 50% or more on aftermarket and it looks well made, fits and is in a non-critical area than why not? FWIW the coupler had the identical markings in it as the original. Probably made by the same vendor, just without the Cat markup.

I am far from an expert. I just have been working on and off on my Cat 426 and spent a ton of time studying pictures, manuals and the machine itself.
 

Rocket Man

Well-Known Member
Joined
Dec 10, 2020
Messages
199
Location
El Paso Texas
If you can get both belts to line up I would put them on. V-Belts used to be sold in matched pairs for this type of installation. Been years since I owned anything with V-belt so not sure if you can buy them like that now or not. Certainly don't mix brands.

I am not big on aftermarket parts. For critical stuff I only use OEM stuff. If I can save 50% or more on aftermarket and it looks well made, fits and is in a non-critical area than why not? FWIW the coupler had the identical markings in it as the original. Probably made by the same vendor, just without the Cat markup.

I am far from an expert. I just have been working on and off on my Cat 426 and spent a ton of time studying pictures, manuals and the machine itself.
Yes, i have seen some of your posts and i can tell you that you provide much needed information. I am going thru what you have already done, in most cases. I am determined to figure out how to get that fan and pump out as one piece. I am sure no manufacturer in their right mind would make something so difficult to replace/repair. So given that , there has to be a way to get it out.
The attached pics tell the story. The first one shows the fan blades are bottomed out on the radiator and second one shows the water pump wedged against the housing. It needs about 1/2 inch to clear!
Anyway, if you ever need to change the water pump this will give you some insight into it.
100_0558.JPG100_0559.JPG
 

56wrench

Senior Member
Joined
Dec 4, 2016
Messages
2,106
Location
alberta
With the water pump installed, you can usually get a combination wrench on one of the bolts to break it loose, then rotate to another opening between the blades and crack the next loose and so on. Usually fingers and knuckles are sliced by the radiator tubes but- no pain, no gain:). Once the bolts are backed out, the fan, with the bolts still inserted, but free from the pulley, can usually be manipulated out. Sometimes the shroud and fan may have to be removed together if the shroud is bolted to the rad. I'm not saying this will work but may be worth a try if there's enough room
 

Rocket Man

Well-Known Member
Joined
Dec 10, 2020
Messages
199
Location
El Paso Texas
With the water pump installed, you can usually get a combination wrench on one of the bolts to break it loose, then rotate to another opening between the blades and crack the next loose and so on. Usually fingers and knuckles are sliced by the radiator tubes but- no pain, no gain:). Once the bolts are backed out, the fan, with the bolts still inserted, but free from the pulley, can usually be manipulated out. Sometimes the shroud and fan may have to be removed together if the shroud is bolted to the rad. I'm not saying this will work but may be worth a try if there's enough room
Great idea and it would normally work out where the fan fits flush with the front of the pump. But if you will look at the pics you can see the pump actually fits into the fan recess of about 3 inches. So even if i got the bolts out the fan would not come out. lol
Gonna keep trying.
 

Rocket Man

Well-Known Member
Joined
Dec 10, 2020
Messages
199
Location
El Paso Texas
if you don't have A/C you only have one belt, the alternator. The other grooves on the crank and water pump are for the optional A/C compressor.

When I did my belt I replaced
the rubber coupler. I bought them aftermarket for much less. Looked identical to original.
Oh yes, i wanted to ask you if you took the whole assembly out? ie both rubber couplers or just one? Thos bolt look like they will be hard to get out.
 

56wrench

Senior Member
Joined
Dec 4, 2016
Messages
2,106
Location
alberta
If the shroud is bolted to the rad( i can't tell) unbolt the shroud and lay it back over the water pump. Then reach in through the side or top between the rad and the shroud to lift out the fan and then lift out the shroud. Usually there is a way unless you have to tip the whole rad assembly forward
 

edgephoto

Senior Member
Joined
Aug 13, 2019
Messages
730
Location
Stafford, CT
The shroud is a wire mesh two piece shroud and the left half is off. The fan blade is flat, then you have the spacer and then the pulley. The paint or corrosion might be holding the fan blade and spacer in place.

I would put the water pump back on and then remove the 4 bolts holding the blade to the pulley. Then you should be able to slide the fan blade and pulley out the side. Typically if I remove a fan of that style I would leave the V-Belt on to help hold the pulley so I could break the fan bolts free. Put a piece of cardboard over the radiator fins to protect them and your knuckles. The hold the pulley either have a helper hold it with a big pair of channel locks or put Vise Grips on the edge of the pulley so it will hit the water pump housing to lock it in place. You will have to move the fan for each bolt. If I still needed more clearance I would probably remove the radiator mounting bolts to get the extra clearance I need.

Here are pics from the parts manual.
 

Attachments

  • Screen Shot 2021-08-30 at 6.18.33 PM.png
    Screen Shot 2021-08-30 at 6.18.33 PM.png
    247.3 KB · Views: 9
  • Screen Shot 2021-08-30 at 6.20.42 PM.png
    Screen Shot 2021-08-30 at 6.20.42 PM.png
    188.9 KB · Views: 9

Rocket Man

Well-Known Member
Joined
Dec 10, 2020
Messages
199
Location
El Paso Texas
If the shroud is bolted to the rad( i can't tell) unbolt the shroud and lay it back over the water pump. Then reach in through the side or top between the rad and the shroud to lift out the fan and then lift out the shroud. Usually there is a way unless you have to tip the whole rad assembly forward
OK took it off and it did not help because the shroud bolts onto a raised lip on the radiator. I will bolt the pump back on and try that again. Edgephoto posted some diagrams that helped me see some things i can not see from here. The fan is actually composed of 3 parts , the fan, the pulley, and the spacer. At first i thought that it was all one piece making it impossible to get out without pulling radiator.
 

Rocket Man

Well-Known Member
Joined
Dec 10, 2020
Messages
199
Location
El Paso Texas
The shroud is a wire mesh two piece shroud and the left half is off. The fan blade is flat, then you have the spacer and then the pulley. The paint or corrosion might be holding the fan blade and spacer in place.

I would put the water pump back on and then remove the 4 bolts holding the blade to the pulley. Then you should be able to slide the fan blade and pulley out the side. Typically if I remove a fan of that style I would leave the V-Belt on to help hold the pulley so I could break the fan bolts free. Put a piece of cardboard over the radiator fins to protect them and your knuckles. The hold the pulley either have a helper hold it with a big pair of channel locks or put Vise Grips on the edge of the pulley so it will hit the water pump housing to lock it in place. You will have to move the fan for each bolt. If I still needed more clearance I would probably remove the radiator mounting bolts to get the extra clearance I need.

Here are pics from the parts manual.
OK. Thanks, my manual skipped class when these were handed out. Now i see that there are 3 parts to that fan thing. I will bolt the pump back on , put the cardboard in there ( i will still loose lots of skin and blood) and then take the fan loose. That may allow the fan to slide out the side and then i can break out the spacer and finally the pulley. I have to say its something i would never expect of a big company to screwup on. Big error in my opinion.
 

edgephoto

Senior Member
Joined
Aug 13, 2019
Messages
730
Location
Stafford, CT
I am not a heavy equipment specialist. I am a Field Service Engineer for a major car manufacturer. I have wrenched on vehicles professionally one way or another since 1985. Most of the same principles apply. Electricity is electricity, engines are engines. Just have to figure out how a manufacturer does things.

When I did the belt I replaced both of the rubber couplings. I removed the hex shaped metal piece first, then both coupler. (see the red circle in the photo). I then loosened the pinch bolt on the pump flange and moved it back and forth on the splines. Used a bit of Kroil on this. Then I installed the rubber couplers and finally I tightened the pinch bolt. It was not too bad to do. I have done worse jobs.


IMG_1139.JPG

Most stuff on this machine is metric. You may want, if you don't already own, get a set of Gearwrench ratcheting combination wrenches. I have the flat ones you flip over for reverse. I like these because they are smaller and fit in place the ones with reversing lever won't fit. I use a standard box end to break them free and then go to the Gearwrenches to remove the bolts.
 

Rocket Man

Well-Known Member
Joined
Dec 10, 2020
Messages
199
Location
El Paso Texas
I am not a heavy equipment specialist. I am a Field Service Engineer for a major car manufacturer. I have wrenched on vehicles professionally one way or another since 1985. Most of the same principles apply. Electricity is electricity, engines are engines. Just have to figure out how a manufacturer does things.

When I did the belt I replaced both of the rubber couplings. I removed the hex shaped metal piece first, then both coupler. (see the red circle in the photo). I then loosened the pinch bolt on the pump flange and moved it back and forth on the splines. Used a bit of Kroil on this. Then I installed the rubber couplers and finally I tightened the pinch bolt. It was not too bad to do. I have done worse jobs.


View attachment 244480

Most stuff on this machine is metric. You may want, if you don't already own, get a set of Gearwrench ratcheting combination wrenches. I have the flat ones you flip over for reverse. I like these because they are smaller and fit in place the ones with reversing lever won't fit. I use a standard box end to break them free and then go to the Gearwrenches to remove the bolts.
Now this the kind of detailed instructions i am talking about. With this i can just walk into it and gete'r done. When i first looked at this, all i saw was solid steel spacers and shuttered because they are hard to get in and out. OH yes, i do have just about every wrench that can be bought (but can never find them when i need them). I know to do the job you MUST have the right tools. BTW, my machine which is the 1987 426 is ALL SAE, no metric anywhere. Strange that yours is metric. Also, i am not a mechanic either. I am actually a retired Company Financial Controller that grew up on a cotton farm in New Mexico before running off to college. Why do i do these things? BC, dont wanna sit on my butt and die from boredom.
So today i removed all the head bolts and tried to pick up head and discovered i am no where near as strong as i would like to be, as in 10 years ago. That head weighs 90 lbs bare. It still has the pump housing and the exhaust manifold attached so it must weigh over 100 lbs. Will attack again tomorrow after i have my oatmeal. LOL
 
Top