Ok so I faced my demons and pulled out the right side slave cylinder. Working on these brakes is for me, extremely difficult because there is no easy access to the fasteners and very little room for wrenches or for wrenches to move/turn. Maybe I'm not using the right tools to make loosening and removing the fasteners on the the slave cylinder easy. I'm sure the commercial repair guys have this procedure down pat but I spent 4 hours just getting that slave cylinder out. With the hard hydraulic lines on the right side, there is even less access for fingers and sight than on the left side.
For the inside bolt on the right side cylinder, from the top, I used a 1/4" socket on a 1/4" U-joint, to a 1/4" extension to an impact driver.
For the outside bolt , from the top, I used a 4" long x 1/4" sliding socket bar to loosen the bolt, then the impact to do the rest.
Ive now got things back together loose.
But before I start tightening things up and have to undo/redo I'd like to ask you to look at these steps and the order, especially the air bleeding step, should that be done 1st to allow greater access?:
1. tighten down the two slave cyl bolts the brake line nut
2. tighten the ratchet bolt on the brake arm for the proper 0.375" of freeplay
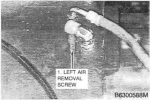
3. bleed the brakes, finish by tightening the air screw on the slave cylinder
4. attach the brake arm return spring
5. adjust the e-brake shaft connector link bolts
I know that bleeding the slave cylinder is going to be the a super pain, with limited access to the air screw and no visibility. Attaching a small wrench to open and close the screw AND a plastic hose to catch the fluid and see the bubbles may be a 2 person job.
Somewhere, someone posted that they were able to do any brake work on a Case 580se from underneath, maybe they would drop the entire brake housing first, still it seems to also be very difficult to access all the necessary fasteners from underneath. I hope I dont have to do this again !
Thanks.