
I've been attempting to get the Clutch Cutout switch on my Case 580D to work. It had not worked when I purchased the machine. I've been unsuccessful in getting either the floor or loader handle switch to work. My understanding is that with the machine in gear, when the button on the loader handle or floor is pressed the machine should essentially act as if it is in neutral (not move in either direction under an increase in throttle) and all power should be transferred to the hydraulics. When either button is currently pressed the machine acts as if nothing has changed.
Below is the testing that I have performed:
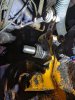
- Confirmed 12V is making it's way to the plug for the solenoid that goes into the shuttle.
- I've bench tested the solenoid with 12V's. This could be an issue as I am not sure what should happen. Currently when 12V is applied, the piston inside the solenoid retracts only if a gentle push is applied to the piston. When 12V is released the piston returns up towards the threads.
- I've applied direct 12V to the solenoid to bypass any potential switch issues. Machine is unaffected.
- On the shuttle side I have rigged zip ties to push the metal piston in. Again, I am unsure of which direction enables the clutch cut out. Pushing the piston in did not have any effect.
Potential Issues:
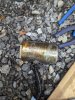
Fluid is leaking around the linkage bracket behind the solenoid, essentially inwards beyond where the solenoid threads onto shuttle. When the machine is running a steady flow of fluid flows from this area and down the side of the shuttle. The solenoid is/has been soaked in the fluid. I would not call the leak excessive but it is obviously not ideal.
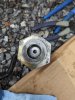
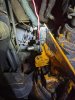
I've attached some pictures of the solenoid and shuttle. Any help is much appreciated.
Below is the testing that I have performed:
- Confirmed 12V is making it's way to the plug for the solenoid that goes into the shuttle.
- I've bench tested the solenoid with 12V's. This could be an issue as I am not sure what should happen. Currently when 12V is applied, the piston inside the solenoid retracts only if a gentle push is applied to the piston. When 12V is released the piston returns up towards the threads.
- I've applied direct 12V to the solenoid to bypass any potential switch issues. Machine is unaffected.
- On the shuttle side I have rigged zip ties to push the metal piston in. Again, I am unsure of which direction enables the clutch cut out. Pushing the piston in did not have any effect.
Potential Issues:
Fluid is leaking around the linkage bracket behind the solenoid, essentially inwards beyond where the solenoid threads onto shuttle. When the machine is running a steady flow of fluid flows from this area and down the side of the shuttle. The solenoid is/has been soaked in the fluid. I would not call the leak excessive but it is obviously not ideal.
I've attached some pictures of the solenoid and shuttle. Any help is much appreciated.

")
