
-
Thank you for visiting HeavyEquipmentForums.com! Our objective is to provide industry professionals a place to gather to exchange questions, answers and ideas. We welcome you to register using the "Register" icon at the top of the page. We'd appreciate any help you can offer in spreading the word of our new site. The more members that join, the bigger resource for all to enjoy. Thank you!
You are using an out of date browser. It may not display this or other websites correctly.
You should upgrade or use an alternative browser.
You should upgrade or use an alternative browser.
Building A Progressive Thumb
- Thread starter wolf44
- Start date
wolf44
Well-Known Member
Material Used
: just out of interst did you use mild steel for the link arms, i know Kubota use some kind of cast steel? Also what did you use for your pins, are they hardened or just mild, also have you got hardening equip?
All the parts are either T1 plate or 4140 heat treated. I will be showing the custom pins that I have made for this project soon. The main bucket pivot pin is made from S7 and heated treated to 55 -57 rockwell C all the other pins are 4140 heat treated to 50-52 rockwell C
wolf44
Well-Known Member
coopers
Senior Member
That looks really good! Any pics with it back on w/ paint?
wolf44
Well-Known Member
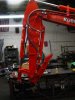
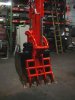
Reassembly
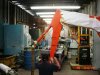
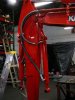
Still waiting on heat treat on the pins they will back in the morning. What I was able to get done today is get the hydraulics hooked up and tested. Got the lines made and the big win for today is moving the line on the right side of the boom to the left side to match up with the cylinder ports. Went to the local Kubota shop Mason Tractor yesterday and got new bushings for the bottom of the stick and new seals so I can have a fresh tight new install. Also picked up a little touch up paint to spruce up the under carriage.
Still waiting on heat treat on the pins they will back in the morning. What I was able to get done today is get the hydraulics hooked up and tested. Got the lines made and the big win for today is moving the line on the right side of the boom to the left side to match up with the cylinder ports. Went to the local Kubota shop Mason Tractor yesterday and got new bushings for the bottom of the stick and new seals so I can have a fresh tight new install. Also picked up a little touch up paint to spruce up the under carriage.
Attachments

Canadian_digger
Senior Member
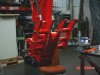
Our bobcat mini the Aux hydraulic line crosses on the top part of the boom so it does not obstruct your view. Thumb looks great. You sure do some excellent work.
Canadian_digger
Senior Member
wolf44
Well-Known Member
Our bobcat mini the Aux hydraulic line crosses on the top part of the boom so it does not obstruct your view. .
You might be right I did not see that till I posted the picture. I sometime get so involved I can't see the forest for the trees. I will try it as is for a while and if it's in the way I will change it. now that I have a better look at the assembly. Thanks for the help.
wolf44
Well-Known Member
Hendrik
Senior Member
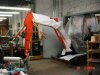
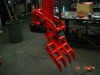
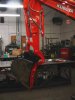
Looks good but the only thing I would suggest is to route a solid hydraulic feed pipe to the bottom of the thumb cylinder, if you get something stuck in the thumb and lift it up, it may damage the hose.
stock
Senior Member
Looks good but the only thing I would suggest is to route a solid hydraulic feed pipe to the bottom of the thumb cylinder, if you get something stuck in the thumb and lift it up, it may damage the hose.
Definitely agree with Hendrik on the steel pipe for the retract side of the cylinder but I would suggest an additional guard to protect it....or at least the bottom hydraulic fitting anyway..............
wolf44
Well-Known Member
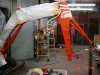
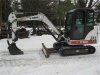
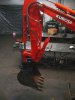
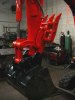
It's DONE!
Well it's been a lot of work and about a month in the making but at 5:24 this afternoon I finished the thumb project. I am going to do a recap of what I have spent money wise and the time I have invested in this project for your fun.
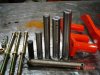
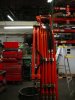
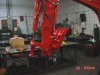
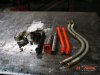
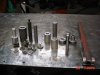
Here are the final pictures.
The first picture is the left over parts
Second picture is the tooling needed for the project
Well it's been a lot of work and about a month in the making but at 5:24 this afternoon I finished the thumb project. I am going to do a recap of what I have spent money wise and the time I have invested in this project for your fun.
Here are the final pictures.
The first picture is the left over parts
Second picture is the tooling needed for the project
Attachments
wolf44
Well-Known Member
Hendrik
Senior Member
Looks good, hate to think how much the total cost is, including labour.
Guess quality costs?
Do the sides of the thumb unbolt, so you can just have the center section?
Guess quality costs?
Do the sides of the thumb unbolt, so you can just have the center section?
wolf44
Well-Known Member
Recap
hydraulic cylinder $92.50 Design time 32 hrs
leader pin thumb $52.00 tooling time 16 hrs
leader pin y link $74.57 welding time 4 hrs
S7 bucket pin mat$28.00 machining time 32 hrs
heat treat $150.00 paint prep time 4 hrs
Touch up paint $24.00 assembly time 23 hrs
Paint and painter $ 258.00
4140 mat 1.25 dia. $25.00 Total time 107 hrs
4140 2.5 dia. $45.00
3/4 x 8 gr8 bolts $ 45.00
hydraulic lines $170.70
Bushing and seals $156.07
T1 laser but shapes $ 355.00
Materials total $-----$ 1475.00
Design time 32 hrs
tooling time 16 hrs
welding time 4 hrs
machining time 32 hrs
paint prep time 4 hrs
assembly time 23 hrs
Total time 107 hrs
It's been fun I am glad it's done. I got what I wanted.
thanks for all your input and watching my progress
:usa
wolf44
Well-Known Member
Looks good, hate to think how much the total cost is, including labour.
Guess quality costs?
Do the sides of the thumb unbolt, so you can just have the center section?
see the recap post for the costs
Yes the sides unbolt when I use my 12" bucket
wolf44
Well-Known Member
Test Report
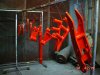
I got to put the thumb to the test in the boulder pile tonight. If anybody had any doubts about if the shape of the thumb picking up rocks or any thing else, fear not. This thing has exceeded my wildest hopes. Holly cow can you grab massive rocks, logs and trees any way you want. I am super pleased. Worth all the time I put in this project. The bolt on tines are rock solid. The machine as a hole is much better since I removed a lot of the slop in all the joints. A win in my book. I will modify my 312 for sure now
wolf44
:drinkup:usa
nobull1
Charter Member
It is nice when a project works as expected the first time around. I find
made from scratch projects usually need a few mods to a complete redesign before working as expected. Good planning and experience were a asset to your job.
made from scratch projects usually need a few mods to a complete redesign before working as expected. Good planning and experience were a asset to your job.
strott
Senior Member
- Joined
- Jan 10, 2009
- Messages
- 425
- Location
- Swindon, United Kingdom
- Occupation
- Mini Excavator and dumper operator
Looks brilliant whilst still being functional- well done.