• Thank you for visiting HeavyEquipmentForums.com! Our objective is to provide industry professionals a place to gather to exchange questions, answers and ideas. We welcome you to register using the "Register" icon at the top of the page. We'd appreciate any help you can offer in spreading the word of our new site. The more members that join, the bigger resource for all to enjoy. Thank you!

Bucket modification

Effinay

Well-Known Member
Joined
Dec 15, 2011
Messages
103
Location
Pelham, NH
Occupation
Getting organized with my own small business
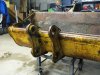
Picked up a grading bucket on Craigslist for a reasonable price. I thought I could make it fit my machine with a few minor modifications. You know, cut this, weld a couple new bores, patch it together somehow....I actually needed to change the distance between the ears, and the more I thought about it, the more sense it made to remove everything and start over. This my first real fabricating job so don't be afraid to poke fun at my torch cutting skills. Here's a couple pics:
 

Attachments

  • 001.JPG
    001.JPG
    186 KB · Views: 931
  • 006.JPG
    006.JPG
    160.9 KB · Views: 946

JBGASH

Senior Member
Joined
Jan 1, 2011
Messages
760
Location
Missouri
Occupation
Plumbing & Excavation Contractor / farmer
Looks like you are doing a great job with retrofitting it to me. Good Luck
 

TozziWelding

Well-Known Member
Joined
Apr 15, 2012
Messages
57
Location
Marlborough, MA
Occupation
Welder/Equipment Repair
Looks good to me, I do that for guys all the time. Just keep everything lined up, and take your time, you will be fine.
 

Effinay

Well-Known Member
Joined
Dec 15, 2011
Messages
103
Location
Pelham, NH
Occupation
Getting organized with my own small business
Thanks JB & Tozzi, I took my side plates and the new bores and mounted them on the dipper with the pins in place to make the alignments and tacked everything up. Having that done I lowered the "ears" to the bucket. Reassessed the alignment of the whole assembly and then tacked all this to the bucket. Operated everything through the whole range and it seemed to work well so I guess I got it right (or at least close enough to pass). To do the final welding I'm going to weld alternate sides to "stitch" it all together and minimize distortion, then go back and add a couple of cover passes for extra strength.
 

Effinay

Well-Known Member
Joined
Dec 15, 2011
Messages
103
Location
Pelham, NH
Occupation
Getting organized with my own small business
I finished welding it up and found that I had some distortion from doing my finish welding. I was able to get it on the dipper but had some trouble getting the curl link lined up. Took a bit of finagling, in and out of the cab about 20+ times lining it up, and a heavy hammer to get the pin through. Not sure what to do now. Live with it and hope it "wears in", or try to heat it and beat it till it works better. Any suggestions?
 

OzDozer

Senior Member
Joined
Jan 18, 2007
Messages
2,207
Location
Perth, Western Australia.
Occupation
Semi-Retired ..
Heat your welds to dull red heat, and that should release some of the weld stresses, and weld "pull" or distortion. Your workmanship looks pretty good to me.
It always pays to tack support brackets for alignment onto components that you're laying a heap of weld into - because this is nearly always going to create distortion or "pull", with the large amount of weld material applied.
 
Last edited:

Effinay

Well-Known Member
Joined
Dec 15, 2011
Messages
103
Location
Pelham, NH
Occupation
Getting organized with my own small business
Heat your welds to dull red heat, and that should release some of the weld stresses, and weld "pull" or distortion. Your workmanship looks pretty good to me.
It always pays to tack support brackets for alignment onto components that you're laying a heap of weld into - because this is nearly always going to create distortion or "pull", with the large amount of weld material applied.

Thanks OzDozer. I thought of tacking some sort of "bracket" or something seeing as there's nothing to keep them from doing whatever the heat directed 'em to do. I think I got a little impatient and just wanted to burn a couple handfuls of 7018. Should I heat the welds with it on the machine in hopes of it settling in to the alignment I was originally hoping for, or remove it and set up a jig to help do this?
 

OzDozer

Senior Member
Joined
Jan 18, 2007
Messages
2,207
Location
Perth, Western Australia.
Occupation
Semi-Retired ..
Yeah, it's easy to get carried away with pouring a heap of weld on, without constant checking for alignment.
I'd leave the bucket on the machine, now that it's in place, and maybe use a porta-power (if you have access to one) to assist with re-alignment, after you've heated the weld.
Even a small porta-power, say a 10 tonner, will help no end, to bring the lugs into better alignment. However, that all depends on the angle of push required, and whether you can set a porta-power cylinder into the right position.

If you use a porta-power, don't let the cylinder get too hot, or you'll fry the seals. You could tack some brackets on the bucket to push against.
If the porta-power is not an option, a block of hardwood against the lug, and swinging a big sledgehammer into it, will probably produce some satisfactory results. Use a big rosebud and keep even heat up to the weld.
 

Effinay

Well-Known Member
Joined
Dec 15, 2011
Messages
103
Location
Pelham, NH
Occupation
Getting organized with my own small business
We usually had our pieces align-bored if we had too much trouble getting things straight.

DIRTFAN
Probably be the best way to make for better alignment, but I don't have access to that type of service, and it's actually pretty close. A little heatin' and beatin' will probably do it.
 

Effinay

Well-Known Member
Joined
Dec 15, 2011
Messages
103
Location
Pelham, NH
Occupation
Getting organized with my own small business
Thanks for all the suggestions OzDozer. No porta-power but your ideas have got my wheels turning on how to make the adjustments.
 

OzDozer

Senior Member
Joined
Jan 18, 2007
Messages
2,207
Location
Perth, Western Australia.
Occupation
Semi-Retired ..
Why the hardwood?
Using a piece of hardwood to beat on with the sledgehammer, stops a whole lot of unsightly hammer-head dents appearing in the plate, and it spreads the impact of the hit.
The hardwood can also be used to protect the areas you don't want to accidentally damage, such as the pin boss. A miss-strike on a pin boss can put a dent in your whole day, as you spend more time trying to iron out the damage.
Use a longish piece of hardwood, and get a buddy, wearing gloves, to hold it flat against the plate. A piece of hardwood also prevents steel chunks or slivers from going flying.

Effinay - You could also use a truck bottle jack in place of a porta-power, provided you keep the pump on the lowest side.
 
Last edited:
Top