• Thank you for visiting HeavyEquipmentForums.com! Our objective is to provide industry professionals a place to gather to exchange questions, answers and ideas. We welcome you to register using the "Register" icon at the top of the page. We'd appreciate any help you can offer in spreading the word of our new site. The more members that join, the bigger resource for all to enjoy. Thank you!

1985 Case 1155D engine removal

Bobcat Crazy

Senior Member
Joined
Dec 28, 2017
Messages
372
Location
Raleigh, NC
Occupation
Environmental Services Director
I'm Glad to Hear of a Fellow that stays Positive as he Walks this Life +++. Good to hear you are getting a manual before Reassembly B-Crazy, I'll Try to help. You've been getting some Real Good Help!!! from some of these Great Guys on This Site!!!. So anyway While you are waiting for Parts.....I can Truly see how a damaged crank, with no counter weights and ground .020 under can easily break. But I Truly can't hold back from Any and All Reasonsones Why it Might Break, and what is the evidence for failure. I am out of my element on these machines!! So you Guys that Did earn your Stripes please forgive me!!!

Alinement!! Proper unstressed alignment is what kept my job easy over the years. Yeah getting all the sizes perfect or close was important, but it was alinement was what kept the machine running for the long hall. I was Spoiled, used computers and latter Lasers. The Problem I was thinking of is Soft Foot mainly. Easy check with a Dial Indicator. You can get somewhere with a feeler gage. No shims under the motor causes some concern. Unless it uses rubber Mounts.

B-Crazy I love Your attitude!!! I'm going to Run out in My Mind for a Little Bit, Please give me a little Grace and I'll settle back in my place Soon.

The Flex Plate is like the Flex Disc's couplings I used on High Speed Couplings (Those before me.. Faulk Gear Couplings). I used a Altra Flex where I could (they were much easier, cheaper, and more forgiving)( Those Before Woods). The Flex Disc was good in High RPM (with Great Balance) 5K, 7K ect.... They are soo Stiff They would about pull you into Horizontal Alignment before bolting down. They would Crack, Break, and Ruin your Equipment if They weren't Lined up Good.

Now for Soft Foot!!! Even for Big Heavy Machines the leverage of a Bolt can Twist a Gear Case so Bad as to pull the bearings, Gears, Crankshaft out of Alinement so Bad, You will Destroy it over Time. Even If Component to Component says the Alinement is Good. Say a Fresh Engine Rebuild is twisted in the frame so Bad it Wrecks the Center Crank Bearing and Nukes the Crank or over Heats it. Then you Add to that a stiff unforgiving Flex Plate.

One thing that sounds good is it was running when shut down. Also without injectors it turned over freely. Of course it did open up after the Crank Broke!

Can't say What Happened, But I sure Hate Fixing something Twice!!

Keep that Good Attitude B-Crazy


Hi Cat,

Yes I been getting great help from the Guys on this forum. The knowledge you all share is priceless to a shade tree like me!

I may or may not know more about engines than you do, that remains to be seen. But all of this soft foot and alinement stuff you are talking about, I can tell that I am not even close to being in your (Cat)egory (little play on words there) of knowledge base.

I am pretty good with a wrench or a ratchet but when it comes to the really technical stuff I can't even get to first base!

The engine and torq housing do have rubber cushioned mounts so I think I will be good on that part.

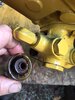
The bearings: with the exception of those which were on the #4 connecting rod (which was only rubble in the bottom of the pan), all mains and rods look really good. The thrust bearings look like they just came out of the box. I cannot believe how good they all look. If I had not taken these out myself knowing that the crank was broken into two pieces I would not have believed it. They must have stopped this engine as soon as it started making noise.

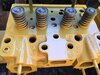
I pulled the sleeves today and they are in like new condition as well. I think I will have an awesome engine once I get the parts and get it back together.

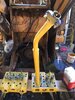
From the looks of everything in this engine I don't think it had many hours on it after the last rebuild until the crank broke. It did have enough hours on it to be caked with dirt, dust, grease and even some gravel! There was pieces of gravel even between the engine block and the injector pump. So it was run a good amount to be that nasty but compared to the relation of the total hours I feel it was minimal.

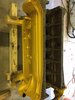
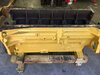
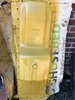
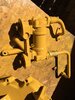
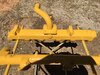
Anywho I have all of the parts and block washed and cleaned (it is amazing what a hot water power washer set on 200 degrees can do). I have even started the painting of the block getting it ready to jump on when the parts come in. A couple of pics below. Enjoy!

B-Crazy!

504 broken crank 2.JPG 504 broken crank 3 .JPG 504 clean and dry inside and out 1.JPG 504 clean and dry inside and out 2.JPG
 

Bobcat Crazy

Senior Member
Joined
Dec 28, 2017
Messages
372
Location
Raleigh, NC
Occupation
Environmental Services Director
It looks like Ebay has some service manuals for your machine.

Thanks Bam!
I looked on there some today and sent a few questions to the seller I liked the most but so far I have not heard back from them. So hopefully I will hear from them tomorrow and get this ordered and heading my way just the same as the parts.
 

Cat977

Senior Member
Joined
Feb 19, 2006
Messages
505
Location
Madison WI
Occupation
Machinist/Millwright
Hey B-Crazy what you Lack in experience you make up with in Shear Work Power!!! Hot water sure is a Working Machine. The Main Power Plant Was bought from the Hudson Motor Company and Reassembled complete with most of the old Coal handling equipment. At U.W. Madison. Mix that Coal Dust with the Oil and Grease and you Learn to Love HHot Water!!! You Have the Right Pressure Washer! Our 1st step Water/Condensate is 160 deg. and in the early days before the Hotsy I just ran that in an Old School Pressure Washer. They don't build them like That Any More!! But Hot Water is the Cats...... A** for getting the black stuff Off!!
Nice Looking Block you have There!!
 
Last edited:

Bobcat Crazy

Senior Member
Joined
Dec 28, 2017
Messages
372
Location
Raleigh, NC
Occupation
Environmental Services Director
Good afternoon Guys!
A little update and just a few pics. Most of my parts have been ordered, I am chasing down a few miscellaneous items, new flexplate and such but Dale with Tractorstuff http://e-backhoeparts.com/ is working on that!

I have everything (engine wise) cleaned and painted (see pics), I am winding down on the project for a few days. Waiting on parts and after this weekend I have to return to working for "THE MAN" so my progress will be much slower as I will revert back to just working on it a few hours each evening after work and on Saturday.

Yes I am still resting on the Lord's day (Sunday) but I will be hitting it hard other wise!

Check out the pics attached, it remains to be seen if I am talented enough to reassemble and make this engine run. :eek::eek: But hey if it never cranks one time I can look at it and say man that sure is pretty paint I put on it! :D:D:p

Enjoy the pics!
B-Crazy
 

Attachments

  • 504 painted parts 1.JPG
    504 painted parts 1.JPG
    56.5 KB · Views: 21
  • 504 painted parts 7.JPG
    504 painted parts 7.JPG
    112.9 KB · Views: 20
  • 504 painted parts 2.JPG
    504 painted parts 2.JPG
    64.4 KB · Views: 20
  • 504 painted parts 5.JPG
    504 painted parts 5.JPG
    73.3 KB · Views: 21

Bobcat Crazy

Senior Member
Joined
Dec 28, 2017
Messages
372
Location
Raleigh, NC
Occupation
Environmental Services Director
Few more pics! :p:D:cool:
 

Attachments

  • 504 painted parts 4.JPG
    504 painted parts 4.JPG
    69.8 KB · Views: 20
  • 504 painted parts 6.JPG
    504 painted parts 6.JPG
    140.5 KB · Views: 19
  • 504 painted parts 9.JPG
    504 painted parts 9.JPG
    67.6 KB · Views: 19

Bobcat Crazy

Senior Member
Joined
Dec 28, 2017
Messages
372
Location
Raleigh, NC
Occupation
Environmental Services Director
Just 2 more for now! :cool::)
 

Attachments

  • 504 painted parts 01.JPG
    504 painted parts 01.JPG
    171.8 KB · Views: 14
  • 504 painted parts 01.JPG
    504 painted parts 01.JPG
    171.8 KB · Views: 12

Cat977

Senior Member
Joined
Feb 19, 2006
Messages
505
Location
Madison WI
Occupation
Machinist/Millwright
Hey B-Crazy a couple thoughts beside just Wishing you Well!! Maybe look at what it takes to check the Alinement Engine to Torque Converter Since the Flex Plate was Cracked. Also Some of these old Radiators can get pretty Plugged, With that Hot Water and some Kind of Rod you May Prevent some Trouble.
Have a Good Weekend!
 

mekanik

Senior Member
Joined
Aug 20, 2015
Messages
957
Location
Canada's Northwest
B-Crazy all the open connections on the fuel pump need to be cleaned and covered. The same with the injectors
and the fuel lines. One speck of foreign material gets in there and you will have a problem. The spray holes in the injectors are less than 0.010".
The same with the oil passages in the block they need to be surgically clean.
The oil cooler needs to come apart as well. There may be bearing material in it.
If the oil cooler core has turbulators in the tubes you may be able to take them
out and clean the core or it may need to be replaced.
 

Bobcat Crazy

Senior Member
Joined
Dec 28, 2017
Messages
372
Location
Raleigh, NC
Occupation
Environmental Services Director
Hey B-Crazy a couple thoughts beside just Wishing you Well!! Maybe look at what it takes to check the Alinement Engine to Torque Converter Since the Flex Plate was Cracked. Also Some of these old Radiators can get pretty Plugged, With that Hot Water and some Kind of Rod you May Prevent some Trouble.
Have a Good Weekend!

I will see what I can find on the alinement and I had not thought about the radiator. Thanks Cat!
 

Bobcat Crazy

Senior Member
Joined
Dec 28, 2017
Messages
372
Location
Raleigh, NC
Occupation
Environmental Services Director
B-Crazy all the open connections on the fuel pump need to be cleaned and covered. The same with the injectors
and the fuel lines. One speck of foreign material gets in there and you will have a problem. The spray holes in the injectors are less than 0.010".
The same with the oil passages in the block they need to be surgically clean.
The oil cooler needs to come apart as well. There may be bearing material in it.
If the oil cooler core has turbulators in the tubes you may be able to take them
out and clean the core or it may need to be replaced.

Good evening Mek!
I have cleaned the oil passages in the block. A hot water pressure washer cleans the inside of the block including those passages so good you could eat off of it. And then plenty of high volume compressed air until there are all dry and it should be fine.

I plan to clean all of the openings/connection points tomorrow and scrape down all of the gasket mating surfaces.

The oil cooler was something I didn't know needed to come apart, I will disassemble it tomorrow and clean it as well.

Speaking of the fuel lines, pump etc. I found something that concerned me today. From day one when I went to look at this machine I was impressed at how good all of the pins and bushings looked. They all look tight with out anything that looks like they would be sloppy like most older machines are. Ever who ran this machine was good with a grease gun. You don't keep pins and bushings in the shape these are in with hit and miss greasing.

Unfortunately they did not take the same care with the fuel system. I removed the glass bowl and strainer from the hand primer today to clean it. It was totally full of dirt, rust, and other debris. When I say totally I mean full to the top of the bowl, it had not been cleaned out in years and was so solid I had to break it up with a screwdriver.

See pics below! :eek::eek::eek:
 

Attachments

  • Fuel screen-glass bowl.JPG
    Fuel screen-glass bowl.JPG
    57.7 KB · Views: 30
  • Fuel screen.JPG
    Fuel screen.JPG
    104.8 KB · Views: 30

Bobcat Crazy

Senior Member
Joined
Dec 28, 2017
Messages
372
Location
Raleigh, NC
Occupation
Environmental Services Director
Hey Guys I hope you are doing well!
I am waiting for parts to arrive so I am kind of at a holding point. I found one item that I need someone's help with. The tach drive assembly is one thing that I can't see how to remove. I have to remove it to get the cam out to replace the cam bushings. There is a threaded bolt hole beside it which could be used to tighten down a retainer fork (kind of like what used to hold the distributor on a car or truck engine).

However it does not look like the bolt hole has ever been used and I do not see any type of a retainer fork in the parts book. The off brand service manual I have (It is not a great version :() does not mention anything about how to remove the drive assembly.

See the pics below, 1 from outside and 1 from the inside of the block. If one of you help me with the proper way to remove this so that I do not destroy it taking it out that would be much appreciated!

Thanks Again Guys,
B-Crazy
 

Attachments

  • 504 tach drive assembly 2.JPG
    504 tach drive assembly 2.JPG
    45.5 KB · Views: 19
  • 504 tach drive assembly 1.JPG
    504 tach drive assembly 1.JPG
    50.5 KB · Views: 19

mekanik

Senior Member
Joined
Aug 20, 2015
Messages
957
Location
Canada's Northwest
Take a small pin punch and gently tap on the bushing beside the gear. I bet it
has an O-ring holding it in the bore.
SniM3AS.jpg
 

Tinkerer

Senior Member
Joined
May 21, 2009
Messages
9,374
Location
The shore of the illinois river USA
I made a puller for them by drilling the center out of an SAE bolt. I used the bolt in a piece of flat stock with 3 holes in it, and used two jack bolts to pop it out.
Don't damage it because a new is $405.00 + tax !
The image is a new one available thru a CNH dealer.driv.jpg
The proper size bolt should screw into the assembly. Unless yours is different from the smaller block Case engines I have worked on.
 

Bobcat Crazy

Senior Member
Joined
Dec 28, 2017
Messages
372
Location
Raleigh, NC
Occupation
Environmental Services Director
Hey Mek & Tink,
You Guys are so AWESOME! I think I can figure it out from there. I knew you Guys would have some experience and/or ideas on this! I also figured this piece could be expensive just as you stated above, I am certainly glad I asked. I would have never thought about drilling out the center of the bolt that is cool thinking!

Thanks again for the guidance! This thing is killing a stack of Bens already, so if I can save 4 or 5 of them by not breaking small expensive parts like this I may have enough left when I finish that I can buy at least one hamburger and FF meal. Even though I will have to split that meal between me and the wife!:D:D:D

B-Crazy!
 
Top