• Thank you for visiting HeavyEquipmentForums.com! Our objective is to provide industry professionals a place to gather to exchange questions, answers and ideas. We welcome you to register using the "Register" icon at the top of the page. We'd appreciate any help you can offer in spreading the word of our new site. The more members that join, the bigger resource for all to enjoy. Thank you!

580C stabilizer rebuild

DirtyHoe

Senior Member
Joined
Jun 18, 2016
Messages
290
Location
Albany, Oregon
Has anyone rebuilt the welded-in swivel bushing #7(part #D60803) on the frame where the stabilizer arm attaches? Are the welded on side plates machined with a partial sphere? I can't tell by the parts manual or with a flashlight looking at the worn-out mess.
This was a monster to get apart. I had to cut the pin with a cutoff wheel and pull the pin out. Then I blew a hole through the remainder of the short pin with a cutting torch. Had to use a hydraulic jack to press it out of the swivel bushing.
The upper bushing on the stabilizer is loose by .100". I plan on pad welding the egged-out hole where the bushing goes, them machining it for a press fit.
The cylinder rod was bent too.

Steve

Saw1.jpg Slop.jpg Stubborn.jpg Swivel.jpg
 

DirtyHoe

Senior Member
Joined
Jun 18, 2016
Messages
290
Location
Albany, Oregon
Also, I did not find spacer #11(D54013) in the stabilizer. Could this missing piece be part of the failure? Not sure what purpose it serves since the two bushings should be a press fit flush against the outside of the sabilizer.


Parts.JPG
 
Last edited:

Welder Dave

Senior Member
Joined
Oct 11, 2014
Messages
12,546
Location
Canada
You could probably manually weld and carefully grind the bore to fit a split tension bushing. They are more tolerant of a less than perfect bore and don't need to be welded in. They are also easier to install than a press fit bushing and normally don't require grease. I used them in addition to Loctite 660 to repair my swing post bushings. Had new pins made out of hyd. shafting at a good hyd. shop.

CONNEX - Spring Bushings & Pins (connexusa.com)
 

Tinkerer

Senior Member
Joined
May 21, 2009
Messages
9,376
Location
The shore of the illinois river USA
I had a similar situation also. I thought that since there such a small amount of rotation on those pins and bushings I simply brazed the bushings in place. I had new pins in them to maintain alignment before I welded them in the stabilizers.
After doing that I mounted the stabilizers on the backhoe frame and welded the new bushings into the frame.
I drilled the upper stabilizer and installed grease zerks on them.
Why Case designed many of those upper stabilizer pins with no way to grease them is a mystery to me.
 

DirtyHoe

Senior Member
Joined
Jun 18, 2016
Messages
290
Location
Albany, Oregon
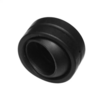
Dave and Tinkerer- I may have to look into a non-factory repair. Mostly what I'm stuck on is how this originally went together. Does the swivel have its own race like the picture? Or is the sphere trapped between the welded-on side plates? If I make it rigid I would give up the ability to adjust the angle of the stabilizer legs to the machine, but I don't see it as a big deal because no one ever uses them anyway. The bushings in the back adjustment hole are like brand new and never used on my machine.

Tinkerer- There are numerous places on the loader and backhoe that Case decided not to use grease fittings and/or bushings that are a big job to repair. I think I will drill/tap and cross drill the ends of the new stabilizer pins to get grease into these bushings.

Steve


upload_2021-7-24_7-57-38.png
 

Tinkerer

Senior Member
Joined
May 21, 2009
Messages
9,376
Location
The shore of the illinois river USA
I am well aware of the lack of grease zerks in many places on machines.
Make life easy on yourself and drill the stabilizer for the zerks.
Drilling those pins will be a BI. Cross drilling will weaken the pin somewhat.
I chose to braze mine because I was able to fill the void around the outside of the bushing with welding rod.
I preheated the stabilizer for over an hour with a propane weed burner.
The bushings did not crack while welding them or after they cooled.
 
Last edited:

DirtyHoe

Senior Member
Joined
Jun 18, 2016
Messages
290
Location
Albany, Oregon
Yes, cross-drilling could be a weak point. Did you cross-drill the stabilizer bushing to get the grease in?
I noticed two of the stabilizer bushings are cracked after a hot pressure washing. Lots of force to break these. I wonder if the stabilizer leg was out horizontal and it hit an immovable object like a big tree.


Steve
 
Last edited:

Tinkerer

Senior Member
Joined
May 21, 2009
Messages
9,376
Location
The shore of the illinois river USA
No, I did not drill the bushings. The grease travels very nicely from the center of the stabilizer to both bushings and oozes out both ends like I would expect it to.
I used the brazing method because of the slow heat rise on the bushings. And with plenty of flux I filled the void between the bushings and the worn holes they were setting in.
The result were stabilizers that are as tight and wriggle free as the day the machine was sold new.
I have put many hours on those stabilizers and they are as good as the day I repaired them.
Maybe someone did run into something with your stabilizer part way down.
I am guilty of doing it. But I never hit anything very hard !
 

Welder Dave

Senior Member
Joined
Oct 11, 2014
Messages
12,546
Location
Canada
You could use something like dry graphite spray on the pins but you'd have to occasionally have to take them out to reapply it. I know Case didn't put grease fittings on all the pins on 1845C skid steers. Cat also didn't on some dozers and used less greasing as one of benefits. Kind of odd.
 

DirtyHoe

Senior Member
Joined
Jun 18, 2016
Messages
290
Location
Albany, Oregon
I've been using the spray graphite on various parts. It works great.
The more I think about it and look at the egged bores and worn pins, I don't think a lack of grease is the problem. A lot of weight bears down on these areas from the weight of the machine plus the pressure of digging. There is just not enough surface area to lessen the pressure. The metal on the footpads is only about a half-inch wide it is yielding and spreading out from the weight. The bores are egged and widening where the pin rides.

Steve
 

DirtyHoe

Senior Member
Joined
Jun 18, 2016
Messages
290
Location
Albany, Oregon
I started boring the pads first. I was going to weld up the holes and then bore them, but I decided to try Welder Daves's suggestion of using Connex tension bushings. I called Connex tech support because of my concern about the bushing being only 1/2" wide. I don't want it to slide out under pressure due to the lack of surface area. They don't recommend welding on them, but Loctite might add extra insurance. I'm hoping since the bushing is hard it may slow down the yielding of the original metal. Time will tell. If it works it will be a quick and inexpensive solution at $5.00 a bushing. If it doesn't work I'm blaming Welder Dave..haha

A few pictures of the setup and boring on a milling machine. It was a lot faster since I didn't have to weld. The steel is probably like T-1. It was harder than mild steel. I enlarged the egged 1.5" hole to 1.750.

20210728_202722.jpg 20210730_183226.jpg 20210730_190815.jpg
 

S.A.E.

Active Member
Joined
Apr 27, 2021
Messages
37
Location
USA
Also, I did not find spacer #11(D54013) in the stabilizer. Could this missing piece be part of the failure? Not sure what purpose it serves since the two bushings should be a press fit flush against the outside of the sabilizer.


View attachment 242768
That spacer is required to keep the bushing fully "extended" against the "ears" of the mounting frame. Should they slip inward, then the geometry is kitty wampus and you'll wear them at a much faster rate. Oh yeah, and wear the outer portion of the swivel bushing -the carrier, 'cause it is now forced to rotate instead of the swivel center as it no longer has backing to sit "square" in the bore. ??
 

S.A.E.

Active Member
Joined
Apr 27, 2021
Messages
37
Location
USA
You could probably manually weld and carefully grind the bore to fit a split tension bushing. They are more tolerant of a less than perfect bore and don't need to be welded in. They are also easier to install than a press fit bushing and normally don't require grease. I used them in addition to Loctite 660 to repair my swing post bushings. Had new pins made out of hyd. shafting at a good hyd. shop.

CONNEX - Spring Bushings & Pins (connexusa.com)
"normally don't require grease". ?????? Oh boy! ever look at their machining? Specifically they REQUIRE grease! YMMV and may have been the reason for your Connex products in the first place ? ;-(
 

S.A.E.

Active Member
Joined
Apr 27, 2021
Messages
37
Location
USA
Dave and Tinkerer- I may have to look into a non-factory repair. Mostly what I'm stuck on is how this originally went together. Does the swivel have its own race like the picture? Or is the sphere trapped between the welded-on side plates? If I make it rigid I would give up the ability to adjust the angle of the stabilizer legs to the machine, but I don't see it as a big deal because no one ever uses them anyway. The bushings in the back adjustment hole are like brand new and never used on my machine.

Tinkerer- There are numerous places on the loader and backhoe that Case decided not to use grease fittings and/or bushings that are a big job to repair. I think I will drill/tap and cross drill the ends of the new stabilizer pins to get grease into these bushings.

Steve


View attachment 242819
The movement of the stabilizer is most necessary when full 90* to the trench or when using the hoe as a crane. Especially with the lockout option.
 

S.A.E.

Active Member
Joined
Apr 27, 2021
Messages
37
Location
USA
Yes, cross-drilling could be a weak point. Did you cross-drill the stabilizer bushing to get the grease in?
I noticed two of the stabilizer bushings are cracked after a hot pressure washing. Lots of force to break these. I wonder if the stabilizer leg was out horizontal and it hit an immovable object like a big tree.


Steve
OR,,,,,,,
Like the swing boom and bucket..........
 

Tinkerer

Senior Member
Joined
May 21, 2009
Messages
9,376
Location
The shore of the illinois river USA
I wonder why that (spacer) #11 is missing, isn't the pin in the cylinder extremely loose ?
Without it (#11) in place there would be a lot of stress on the bushings from the pounding they would get when using the backhoe.
It would be prudent to make a new one out of steel tubing.
 

Welder Dave

Senior Member
Joined
Oct 11, 2014
Messages
12,546
Location
Canada
"normally don't require grease". ?????? Oh boy! ever look at their machining? Specifically they REQUIRE grease! YMMV and may have been the reason for your Connex products in the first place ? ;-(

You can order split tension bushings with grease grooves but they are spring steel so normally don't require greasing. They are perfectly smooth and considered a wear part but reading some users experience they last way longer than standard bushings even without grease. I used them on my swing post and sprayed dry graphite on them mostly to stop the pins from rusting since my machine sits a lot.
When people are trying to help you it's not a good idea to insult them. I found spring tension bushings when looking to fix my swing post slop. So far they are working flawlessly. One of the best features of them is the bore they fit in doesn't have to be perfectly round. They're also a lot easier to install than press fit bushings.
 
Last edited:

DirtyHoe

Senior Member
Joined
Jun 18, 2016
Messages
290
Location
Albany, Oregon
I wonder why that (spacer) #11 is missing, isn't the pin in the cylinder extremely loose ?
Without it (#11) in place there would be a lot of stress on the bushings from the pounding they would get when using the backhoe.
It would be prudent to make a new one out of steel tubing.

Tinkerer,
I think Case made some changes along the way. The bushings are a press fit on either side of the stabilizer. My stabilizers have a welded tab inside each bore that I guess is there so you can't get the bushing in too far. If the bushing goes in too far it would get lost inside the stabilizer cavity.
I don't see the purpose of the spacer since both bushings have a heavy press fit(.004). They are pressed flush against the outside of the stabilizer. They should not move under normal operating conditions.

The print is hard to read as far as what parts go where. The cylinder mounts above the spacer with pin #15. The stabilizer uses pin #13 and it passes through the spacer. So nothing is loose or stressed with new parts.

Steve
 

Tinkerer

Senior Member
Joined
May 21, 2009
Messages
9,376
Location
The shore of the illinois river USA
I could see in your photos that the bushings are pressed in. Typical installation.
The only purpose of that spacer is allow using a smaller diameter pin in a bore that would otherwise require a bigger OD pin.
I was surprised there was a tubular bushing shown in the parts book.
I have seen Case stabilizers with no bushings in the the upper pin bores and sadly no way to grease them.
Very poor design, because that big tube will wear eventually wear quite badly.
 

DirtyHoe

Senior Member
Joined
Jun 18, 2016
Messages
290
Location
Albany, Oregon
Tinkerer,

I talked to Dale at Tractorstuff about spacer part #D54013(item #11 below). He said it isn't very substantial and looks like a piece of 1.75" exhaust pipe. He also mentioned he never understood why they went that way.
It does not slide into the bushings. It fits in between the two bushings inside the stabilizer. It's only about 5.5 inches long. The pin is about 13.5 inches long. In the parts picture below it says "if used". I'm going to leave it out. I'm pretty sure the tabs welded inside my bores would prevent this spacer from fitting anyway.
My guess is maybe it was used to keep dirt out of the bushings. I pressure washed at least 50 pounds of dirt out of the inside of the stabilizers. It's amazing how much dirt can accumulate in small holes over the decades!

Steve


Parts1.JPG
 
Last edited:
Top