• Thank you for visiting HeavyEquipmentForums.com! Our objective is to provide industry professionals a place to gather to exchange questions, answers and ideas. We welcome you to register using the "Register" icon at the top of the page. We'd appreciate any help you can offer in spreading the word of our new site. The more members that join, the bigger resource for all to enjoy. Thank you!

Snag on Semi-Major Repairs, JD 310C, Stripped Screw

MarcNH

Well-Known Member
Joined
Apr 18, 2021
Messages
68
Location
Mont Vernon, New Hampshire
Occupation
Engineer
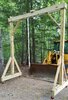
Need to replace Front Crankcase Seal. Need to get to it first, naturally.

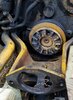
Got as far as removing the outer-half of the vibration dampener (two sided assembly with the rubber isolators). There are (4) 5/16 Flat-Head, Hex screws connecting the rear half of this assembly to the main pulley (in this case, a dual pulley). Got two out after some effort. The next one: thought it was loosening, but I was rounding the hole. The next one went similarly, even though I tried heating the crap out of it. The JD manual notes that Thread-Lock was supposed to be used, but I saw nothing on the two that did come out. I was using an impact-rated 5/16 Hex socket which appears intact.

Advice on modern Screw Extractors would be welcome. I have obtained a couple of possible options, but they seem to be pretty cheap, and many people note the tools snapping, possibly leaving hardened tool bits embedded inside the screw (making things worse). I have been spraying PBlaster on the screws twice a day or the past few days while waiting for some other extractors.

One screw is stripped more than the other. I was able to feel something of a bite with one remover, but now I am paranoid to actually do it. A set of Irwin Industrial extractors is on the way.

Tips on removing these? I could really use some advice. I was considering sacrificing the rear-half of the isolator casing if needed.
 

Spud_Monkey

Senior Member
Joined
Sep 15, 2018
Messages
6,519
Location
Your six
Occupation
Decommissioned
A description of what you are looking for and description of the parts in the picture with how many as I am sure there is more than (1) number 3 parts in there.
 

heymccall

Senior Member
Joined
Feb 19, 2007
Messages
5,376
Location
Western Pennsylvania
What I'm asking is, why do them little screws need pulled? Aren't they just for the subassembly? Can't the coupler come off as one piece?
 

MarcNH

Well-Known Member
Joined
Apr 18, 2021
Messages
68
Location
Mont Vernon, New Hampshire
Occupation
Engineer
Thank you for the responses!

There are four of those screws, listed as Part #3 holding the assembly on. They are flat-head 5/16 hex, and not too deep as a result. But they are not little screws, and they are what keeps the assembly from spinning. The service manual requires thread-lock for these. They absolutely resisted the impact wrench.

I do not see anything resembling Part # 1A or 1B, or they are not drawn to scale. There appears to be something behind Part #2 and the main pulley. You cannot get to the main pulley without removing these 4 screws first. I need to get all the way in back of the main pulley to get to the seal.

The entire engine mount is right in front of all of this. There is about a 6" circular part of the mount that becomes the main mount for the hydraulic pump. If I was taking the entire engine out, there would be more options, but this is well beyond my capabilities.

I have the paper manuals, but will try to post pics of the page where appropriate.

I will see about taking/posting a pic of the problem area; it will say a thousand words...
 

MarcNH

Well-Known Member
Joined
Apr 18, 2021
Messages
68
Location
Mont Vernon, New Hampshire
Occupation
Engineer
Welding a nut on the end does wonders of heating up and melting any thread locker along with something to wrench it off with.

This appears to be quite interesting. I have a baby MIG from HF. I might be able to figure this out. Quite possibly easier than drilling (though I have accumulated some Cobalt bits).
 

MarcNH

Well-Known Member
Joined
Apr 18, 2021
Messages
68
Location
Mont Vernon, New Hampshire
Occupation
Engineer
Drill the heads out, remove coupler, remove bolt shank with visegrips?
Probably a last resort. And this is why I am worried about snapping-off a hardened extractor bit in the screw. I generally use a lot of pipes for leverage torquing things, as I have a rebuilt right shoulder.
 

Spud_Monkey

Senior Member
Joined
Sep 15, 2018
Messages
6,519
Location
Your six
Occupation
Decommissioned
This appears to be quite interesting. I have a baby MIG from HF. I might be able to figure this out. Quite possibly easier than drilling (though I have accumulated some Cobalt bits).
I wouldn't use flux core if possible though if you had to, run it with Lincoln flux core it runs best in those machines.
 

MarcNH

Well-Known Member
Joined
Apr 18, 2021
Messages
68
Location
Mont Vernon, New Hampshire
Occupation
Engineer
I wouldn't use flux core if possible though if you had to, run it with Lincoln flux core it runs best in those machines.
I have a stick welder as well. But "filling" the nut looks to be tough using either, unless done in layers/cleaned along the way. I guess going all gas has benefits.
 

MarcNH

Well-Known Member
Joined
Apr 18, 2021
Messages
68
Location
Mont Vernon, New Hampshire
Occupation
Engineer
Here are a couple of pics. One is the Gantry that made this all possible. Then a good inside pic showing the motor mount, with the hydraulic pump and front-half of the dampener removed. The housing where the 4 screws bolt is made of aluminum. One removed screw, one loosened a bit, and the other two stuck as hell, along with the rounded and really rounded screws. Not much room!
 

Attachments

  • Gantry-CroppedReduced.jpg
    Gantry-CroppedReduced.jpg
    616.4 KB · Views: 38
  • Stripped-cropped.jpg
    Stripped-cropped.jpg
    959.5 KB · Views: 39

Jonas302

Senior Member
Joined
Jan 4, 2015
Messages
1,198
Location
mn
So they probably do have locktite on them do you have a cutting torch? heat the head until its red that will transfer enough heat into the hole to break the locktite it only takes about 400 degrees but with out access thats how its done that will also break the bond to the aluminum

The holes are probably pretty shot by now an air hammer can help a lot to walk screws like that out and it can close up the holes to get a socket on again Sometimes a torx bit hammered in might work

Price out the aluminum adapter smash it to bits and have the bolts sticking out to grab with vise grip or weld a nut on

Make darn sure it needs to come off to pull the balancer
 

MarcNH

Well-Known Member
Joined
Apr 18, 2021
Messages
68
Location
Mont Vernon, New Hampshire
Occupation
Engineer
So they probably do have locktite on them do you have a cutting torch? heat the head until its red that will transfer enough heat into the hole to break the locktite it only takes about 400 degrees but with out access thats how its done that will also break the bond to the aluminum

The holes are probably pretty shot by now an air hammer can help a lot to walk screws like that out and it can close up the holes to get a socket on again Sometimes a torx bit hammered in might work

Price out the aluminum adapter smash it to bits and have the bolts sticking out to grab with vise grip or weld a nut on

Make darn sure it needs to come off to pull the balancer

Man, I wish it did not have to come out. Smashing it apart is an option, but I was worried about messing-up the balancer/pulley assembly.

Map gas is all I have got. I will try heating it up as much as I can, and try one of the extractors first. It is just a lot of mass to heat-up.
 

Bluox

Senior Member
Joined
Jun 19, 2010
Messages
1,960
Location
WA state
Get a good drill bit one size bigger than the screw threads and drill the heads off, pull the pulley and deal with the stuck screws on the bench.
Bob
 

crane operator

Senior Member
Joined
Mar 27, 2009
Messages
8,315
Location
sw missouri
Personally, I find screw extractors a waste of time. I always feel like if I can get it drilled, then the screw extractor just swells it out when I'm trying to turn it out.

If you can get the pulley off, like bluox says, the bench is the place to deal with it.

I don't generally weld a nut to the cut off bolt either, I find it easier to weld a washer to the cut/broken off bolt, and then weld a nut to the washer. Sometimes it takes a couple tries. Its not really something for a rookie welder.

The way it is recessed in the pulley, I kind of like spud's idea of welding in a allen.

I think I'd a lot rather have jacks and blocks than your wooden gantry. Or a steel gantry. Or anything else really.
 

JLarson

Senior Member
Joined
Aug 23, 2020
Messages
656
Location
AZ
Occupation
Owner- civil and heavy repair/fab company
Yeah flat socket head cap screws suck, they're smaller hex then the same size socket head cap and the usually shallower it seems so they love to strip lol.

I'd combine some good heat along with rattling them with my air hammer and a drift bit then tap the best fitting spiral irwin/snapon extractor in and see if they move.
 

edgephoto

Senior Member
Joined
Aug 13, 2019
Messages
733
Location
Stafford, CT
I have had good luck using the Snap-On extractors. The short stubby ones. The long ones have never worked for me.

When removing these types of bolts you need to clean out the hole really good and make sure you are using the correct size Allen. Metric vs. SAE. if not, you will strip out the hex.

As was mentioned heat the bolt up to break any Loctite. Was there any sign of Loctite on either of the two bolts you removed?
 

Attachments

  • REX114A.jpg
    REX114A.jpg
    47.2 KB · Views: 7
Top