• Thank you for visiting HeavyEquipmentForums.com! Our objective is to provide industry professionals a place to gather to exchange questions, answers and ideas. We welcome you to register using the "Register" icon at the top of the page. We'd appreciate any help you can offer in spreading the word of our new site. The more members that join, the bigger resource for all to enjoy. Thank you!

Extending range of motion on hydraulic thumb

mutti_wilson

Well-Known Member
Joined
Jan 14, 2017
Messages
159
Location
Washington
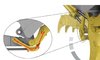
A progressive link thumb is designed to extend the thumb to the same line as the stick when fully extended. The direct connect thumbs usually gets you somewhere just over 90 degrees to the stick.

My direct connect weld on thumb has 134 degrees of rotation. I think that's pretty normal for most non progressive setups. An additional 22 degrees of rotation wouldn't be possible without a linkage but just wanted to show that the thumb doesn't look like it'd be into the coupler or bucket. I figured that the OP's thumb is only getting about 115 degrees of rotation from the stick.
 

John C.

Senior Member
Joined
Jun 11, 2007
Messages
12,870
Location
Northwest
Occupation
Machinery & Equipment Appraiser
I think you did a good job of that. You showed the limitations of the direct connect thumb through an illustration that makes perfect sense.
 

LCA078

Senior Member
Joined
Sep 29, 2019
Messages
292
Location
Austin, TX
My direct connect weld on thumb has 134 degrees of rotation. I think that's pretty normal for most non progressive setups. An additional 22 degrees of rotation wouldn't be possible without a linkage but just wanted to show that the thumb doesn't look like it'd be into the coupler or bucket. I figured that the OP's thumb is only getting about 115 degrees of rotation from the stick.

Agreed and appreciate the nice drawing. Definitely allows a visual understanding of the limitations.

I did find this setup when surfing the web a bit which is a unique type of progressive linkage. I show it because the thumb cylinder is lower than the bucket curl cylinder-- somewhat more similar to my setup. Also notice the thumb does not flush up against the stick with stowed- it's definitely taking up some space when not in use.
The pic is a screen shot at 11 seconds into this video


Attachments

  • Bucket and Thumb 4.JPG
    Bucket and Thumb 4.JPG
    48.3 KB · Views: 22

LCA078

Senior Member
Joined
Sep 29, 2019
Messages
292
Location
Austin, TX
whoops- just realized the thumbs in Lachou's pics also have a similar setup with the cylinder pin being slightly inward of the dogbone/h-bracket pin. cool video seeing the linkage in motion at least...
 

lantraxco

Senior Member
Joined
Jan 1, 2009
Messages
7,704
Location
Elsewhen
Interesting, they use a longer link arm to get more throw out of the cylinder stroke. I remember fighting the short stick issue where the butt end of the thumb cylinder would hit the boom if you mounted it too far back. Cool.
 

LCA078

Senior Member
Joined
Sep 29, 2019
Messages
292
Location
Austin, TX
I found a Cat brochure (attached) that shows the range of motion for the Cat Pro (direct mount) and Cat Pro Plus (progressive linkage) thumbs on page 3. My guess is the only difference between Cat Pro and Cat Pro Plus system is the Plus comes with the progressive linkages and the actual thumb is the same. Is someone has access to those assembly/part numbers and can verify, it would help.

As for my plan forward, I'm thinking it would be straight forward to use my existing setup and just fab up a similar progressive linkage (I'm afraid to ask Cat what the cost is for just the linkage...if I even knew what part numbers to ask for). Looking page 4 of the brochure, I should be able approximate the lengths and have them cut with a simple plasma table.

I think I'll need
1) a new pin for point A
2) two dogbones for AF
3) H-link for EF
4) two small pins for F and G.

Also, if anyone has the Cat installation instructions/specs for a Cat Pro Plus thumb for a 325B, I can see if my current cylinder setup fits within the window. My eyeball is saying yes by looking at the setups in the brochure but any actual documentation would help.

Thoughts?
 

Attachments

  • Cat Thumbs Brochure.pdf
    1 MB · Views: 14
  • Bucket and Thumb 5.JPG
    Bucket and Thumb 5.JPG
    61.5 KB · Views: 15
  • Bucket and Thumb 3.JPG
    Bucket and Thumb 3.JPG
    43 KB · Views: 14
Last edited:

joe--h

Senior Member
Joined
Jul 22, 2009
Messages
1,259
Location
Utah
[QUOTE="Tinkerer, post: 945219,
I am just getting parts together to convert my fixed thumb to hydraulically operated.
I am in the midst of figuring out how far I want the thumb to extend from fully retracted and then to how far I want the open bucket position.
Mine is on a T/L/B.[/QUOTE]
Tinker,
Have you got a thread going on your project? I think about it every time I use mine, but how to do it is a stumper. Think I'd have to cut the mount(s) off and start over. It's one of those Chinee cheap ones that have been discussed here before.

Joe H
 

joe--h

Senior Member
Joined
Jul 22, 2009
Messages
1,259
Location
Utah
Great, thanks. I missed that somehow.
Joe H
Damn, only the second picture in and I'm jealous already of the brand new tire.
Need a pair of 16.9x28 & wallet sez no.
 
Top