• Thank you for visiting HeavyEquipmentForums.com! Our objective is to provide industry professionals a place to gather to exchange questions, answers and ideas. We welcome you to register using the "Register" icon at the top of the page. We'd appreciate any help you can offer in spreading the word of our new site. The more members that join, the bigger resource for all to enjoy. Thank you!

Loader arm welding to pin

ilovetracks

Well-Known Member
Joined
Jun 21, 2017
Messages
80
Location
northeast GA
I don't know what steel cat used for arms, pins are annealed o1. Someone said use 7018 rod. To best of my reading was preheat to roughly 1500 cool to roughly 930, weld and quench in oil for awhile. Concerned about cracking at weld and wish to harden pins. Thanks for any help.
 

Attachments

  • 15882825976891168330005494911875.jpg
    15882825976891168330005494911875.jpg
    2 MB · Views: 65
  • 15882826839062933587546473134609.jpg
    15882826839062933587546473134609.jpg
    2 MB · Views: 65

Welder Dave

Senior Member
Joined
Oct 11, 2014
Messages
12,533
Location
Canada
If it's off a Cat and is welded Cat will have a procedure. I'd guess just weld it with 7018 but should be easy to check with Cat or post what machine it's for and one of the people with access to SIS may be able to post the welding procedure.
 

Theweldor

Senior Member
Joined
Feb 17, 2018
Messages
556
Location
Western, NY
Occupation
The Village Idiot
I agree with the bucket linkage cylinders. If there is clearance why not weld bosses to those plates and make slightly longer pins with thru holes. More support on the pins and then the pins can be hardened.
 

ilovetracks

Well-Known Member
Joined
Jun 21, 2017
Messages
80
Location
northeast GA
939c piece of junk front engine loader (943 fan, but it needs final bearings and this is all I could get as a spare). Way too much movement in arms. I'm assuming Cat welded as there isn't much clearance between side panels and arms. No wonder they stopped making these fronts, doesn't make a good loader.
 

Bls repair

Senior Member
Joined
Jan 21, 2017
Messages
1,612
Location
S E Pa
Occupation
Equipment operator,mechanic
Seems to me that hardening the pin and the arm would make a brittle weld . You need some ductility.
 

Welder Dave

Senior Member
Joined
Oct 11, 2014
Messages
12,533
Location
Canada
I think the pins would just get welded in. Don't think Cat would weld them in and then harden them.
 

ilovetracks

Well-Known Member
Joined
Jun 21, 2017
Messages
80
Location
northeast GA
5xk38441
Yes I suppose brittle comes with hardening, just don't know how annealed o1 would hold up, but would be easier to weld and be done
 

Nige

Senior Member
Joined
Jun 22, 2011
Messages
29,364
Location
G..G..G..Granville.........!! Fetch your cloth.
That's the engine Serial Number. The machine is 6DS01814.

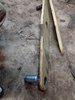
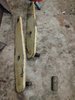
I'm assuming that you are trying to replace the pins in the 108-5672 Lever As, Item 10 in the illustration below, correct..?
For a kickoff the plate will be nothing super-special, probably no more than a good-quality 28mPa yield strength structural steel. Neither will the original pins be case-hardened for that size of a machine, unless I am mistaken. They will simply have been manufactured from a good-quality steel for manufacturing pins.
What material did you use to manufacture the replacement pins.?

So I'm going to defer to Welder Dave & the weldor as regards detailed welding technique, but IMHO E7018 should be fine for this job. It's probably what the factory welded it with in the first place although they would've probably used wire.
Something like an 8-12mm (3/8"-1/2") 45-degree chamfer on both ends of the hole in the plate then fillet weld the pin to the plate on both sides would be my thought. I'll see if I can't knock up some sort of sketch to give you an idea.
Pre-heat ought to be no more than 60-70 DegC, just enough to keep the moisture out, then to maintain a maximum interpass temperature of possibly 120-130 DegC during the process.
The complicated part will be to grind the inside surface so that the weld ends up smooth and the finished repair will not rub on the tilt cylinder rod end or on the tilt lever when everything is assembled.

upload_2020-5-1_17-22-2.png
 
Last edited:

Nige

Senior Member
Joined
Jun 22, 2011
Messages
29,364
Location
G..G..G..Granville.........!! Fetch your cloth.
Here's the sketch. Sorry my drawing skills are not that great
This is a section through the joint where the pin installs in the end of the plate. RH side is as it is right now, LH side as you want to make it.
The pin should be a tight fit in the hole. TBH if you had to heat the plate a hair to install the pin it wouldn't be the end of the world.
Chamfer the plate as shown on the left side at 45-deg. all the way round both inside & outside.
You could also chamfer the end of the pin at 45-deg to give you a v-groove on the outside.
Weld up to the red line. Don't start all the weld beads in the same place. Stagger the stops & starts around 360 degrees of the hole.
For stress-relief a needle peening giun after each weld pass would be the best idea.
Depending on what material was used I wouldn't have though any surface hardening of the pins would be necessary

upload_2020-5-1_17-32-28.png
 

Welder Dave

Senior Member
Joined
Oct 11, 2014
Messages
12,533
Location
Canada
Looks like the pin is already chamfered a bit and if you set the pin in from the edge of the plate about a 1/4"-5/16" would make for a good deep penetration fillet weld. You wouldn't have to chamfer the plate this way but could if you preferred. Pins that have a bolt on retainer are often done this way. I wouldn't weld the pin inside the arm. Warm it up to drive any moisture out and 7018 should be good to go. How the pin is secured on the other arm might be the deciding factor on how far the pin extends into the arm where it's welded. Personally I would add a shim/washer on the loose plate (if required to take up slop) and have a fillet weld rather than have the pin flush for welding. The most important thing is to have a good sound weld so hire a welder if need be.
 
Last edited:

Nige

Senior Member
Joined
Jun 22, 2011
Messages
29,364
Location
G..G..G..Granville.........!! Fetch your cloth.
Dave, there are all sorts of shims, washers, etc in that assembly. I just didn't include them in the snip I posted above.
I'm not too sure how much space there is on the outside of the assembly to let the pin protrude and fillet weld it 100% externally.

I think the critical thing is the fit of the pin into the plate. To me it ought to be either a press or a shrink fit. That would significantly reduce the bending stresses in whatever weld was used.
 

Welder Dave

Senior Member
Joined
Oct 11, 2014
Messages
12,533
Location
Canada
I was saying to have the pin recessed a little in the plate for a fillet weld that would end up flush with the plate when finished. In your diagram above, imagine the pin is the plate you show beveled and the blue line is edge of the plate. Move the chamfered pin a 1/4" to the left and recess it in the plate for a fillet weld with a groove for deeper penetration. I'd run a hot 5/32" 7018 in there.

The pin wasn't welded on the inside from the factory. The one pic. shows a bunch of shims and stuff. Adding another shim on the outside to take up slop I don't think would be problem and it would allow for a better weld. I think it's important those pins be kept greased so there is never a lot of stress on the welds. I wish my machine was close, I'd take a look as I think it's similar.
 
Top