• Thank you for visiting HeavyEquipmentForums.com! Our objective is to provide industry professionals a place to gather to exchange questions, answers and ideas. We welcome you to register using the "Register" icon at the top of the page. We'd appreciate any help you can offer in spreading the word of our new site. The more members that join, the bigger resource for all to enjoy. Thank you!

287b xps how to connect and use aux attachment fittings

steve1108

Member
Joined
Jun 17, 2019
Messages
11
Location
suffolk va
bought a 287b that needed work, got it fixed. want to get some attachments but I have no idea what or how to hook them up to the aux hydo fittings. called local cat, they cant tell me. every video shows a c or d series. they don't have the same toggle switches. can anyone help or explain how to do this. will post pics of the switches I have. thanks.
 

steve1108

Member
Joined
Jun 17, 2019
Messages
11
Location
suffolk va
Do you have a manual for your machine..? That would be a good start. They cost about $45 to download.
Post a Serial Number.
yes have the owners operation manual. but when I wen to cat to buy a used dozer blade and brush cutter they were telling me I had to but more stuff to run them. they didn't even know what switch's or how to run high flow or standard on that series.
 

ianjoub

Senior Member
Joined
Jun 22, 2018
Messages
1,468
Location
Homosassa, FL USA
bought a 287b that needed work, got it fixed. want to get some attachments but I have no idea what or how to hook them up to the aux hydo fittings. called local cat, they cant tell me. every video shows a c or d series. they don't have the same toggle switches. can anyone help or explain how to do this. will post pics of the switches I have. thanks.
The 2 largest fittings on the boom are for high flow. You will need a 3rd, a case drain hooked up as well for high flow. The next smaller 2 are for regular flow, no case drain needed. You can use the high flow lines for normal flow if you do not activate the high flow inside the machine.

To use the high flow, you need to have a jumper plug in the electrical connector by the hydraulic line connectors. It is $120 from CAT. OR you could find which 2 wires to jump and jury rig it. Once connected, put the high flow rocker to on, start the flow with thumbwheel/continuous flow button, and go to town!

There is a post on here somewhere with a diagram of the hyd connectors and which is which, but I was unable to find it in a search.
 

steve1108

Member
Joined
Jun 17, 2019
Messages
11
Location
suffolk va
thanks, that helps. where does the jumper plug into after its plugged into the electrical connector by the hydraulic line connectors. is that the 8 to 14 pin one? not sure which is the high flow button in the cab. that's my main problem. not a read and do , more a got to see it then a understand person. here's my fittings
 

Attachments

  • hyd.jpg
    hyd.jpg
    397.3 KB · Views: 23

steve1108

Member
Joined
Jun 17, 2019
Messages
11
Location
suffolk va
The 2 largest fittings on the boom are for high flow. You will need a 3rd, a case drain hooked up as well for high flow. The next smaller 2 are for regular flow, no case drain needed. You can use the high flow lines for normal flow if you do not activate the high flow inside the machine.

To use the high flow, you need to have a jumper plug in the electrical connector by the hydraulic line connectors. It is $120 from CAT. OR you could find which 2 wires to jump and jury rig it. Once connected, put the high flow rocker to on, start the flow with thumbwheel/continuous flow button, and go to town!

There is a post on here somewhere with a diagram of the hyd connectors and which is which, but I was unable to find it in a search.

thanks, that helps. where does the jumper plug into after its plugged into the electrical connector by the hydraulic line connectors. is that the 8 to 14 pin one? not sure which is the high flow button in the cab. that's my main problem. not a read and do , more a got to see it then a understand person. here's my fittings
 

Attachments

  • hyd.jpg
    hyd.jpg
    397.3 KB · Views: 9

Nige

Senior Member
Joined
Jun 22, 2011
Messages
29,365
Location
G..G..G..Granville.........!! Fetch your cloth.
Thanks for the S/N. I just wanted to make sure how your particular machine is configured and whether or not it left the factory with the High Flow option installed.

Regarding activating High Flow, it depends whether or not the attachment you plan on installing requires an electrical connection or not, so you have two potential scenarios: -

1. The attachment does NOT require an electrical connection. In that case a "jumper plug" has to be installed into the 7-pin plug in the top centre of your photo. The jumper plug has an internal connection between Pin F and Pin G of the connector. That electrical connection effectively tells the machine ECM to activate the High Flow.
2. The attachment requires an electrical connection. In this case there will be a harness connecting the plug in your photo to the attachment. Inside the plug at the machine end of that harness will be the same "Pin F to Pin G" jumper to command the ECM to give High Flow.

Are you planning on using Cat or non-Cat attachments...?
 

ianjoub

Senior Member
Joined
Jun 22, 2018
Messages
1,468
Location
Homosassa, FL USA
thanks, that helps.
I have my operators manual at work. I am not sure, but I think I have it on PDF. If so, I will try to post it here tomorrow or get your email and send it to you. I printed a copy and keep it in my machine. It is a good reference. It shows what all the joystick controls, buttons, and rocker switches do among other things.
 

steve1108

Member
Joined
Jun 17, 2019
Messages
11
Location
suffolk va
Thanks for the S/N. I just wanted to make sure how your particular machine is configured and whether or not it left the factory with the High Flow option installed.

Regarding activating High Flow, it depends whether or not the attachment you plan on installing requires an electrical connection or not, so you have two potential scenarios: -

1. The attachment does NOT require an electrical connection. In that case a "jumper plug" has to be installed into the 7-pin plug in the top center of your photo. The jumper plug has an internal connection between Pin F and Pin G of the connector. That electrical connection effectively tells the machine ECM to activate the High Flow.
2. The attachment requires an electrical connection. In this case there will be a harness connecting the plug in your photo to the attachment. Inside the plug at the machine end of that harness will be the same "Pin F to Pin G" jumper to command the ECM to give High Flow.

Are you planning on using Cat or non-Cat attachments...?

I was planning on using cat stuff, but even the used equipment isn't cat brand they have. I looked at a brush cuter from Carolina Attachments it doesn't require a case drain since it a direct drive and according to them no electrical connection required for a jumper on my machine. now I have to decide between a blade, land plane or box grader to level out my pastures. I still not quite sure about operating the standard flow/ high flow. was hoping cat could come help , but they don't seem to know . I know you said the bigger ones are high flow & the smaller ones are regular. this is what my manual has for operating the aux hyd
 

Attachments

  • aux hyd.PNG
    aux hyd.PNG
    78.8 KB · Views: 30
  • cont flow.PNG
    cont flow.PNG
    76.4 KB · Views: 26
  • controls.PNG
    controls.PNG
    68.3 KB · Views: 32
  • switches.PNG
    switches.PNG
    110.8 KB · Views: 30

ianjoub

Senior Member
Joined
Jun 22, 2018
Messages
1,468
Location
Homosassa, FL USA
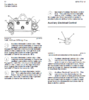
Rocker 12: "Aux hydraulic control" is the high flow switch in mine.

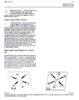
In the 1st pic, K and J are for regular flow, K1 and J1 are for high flow and the bottom one of the 3 small connectors is the case drain. The reference to 1 and 2 (Hydraulic control A1 and A2) is up and down on the thumbwheel on the right joystick. Up flows the fluid in one direction, down in the other. This allows you to reverse the tool direction without moving couplers/lines.

If you have the electrical jumper installed for a high flow tool, hook the hydraulic lines to K1, J1, and case drain, put #12 toggle switch to the on position, roll the thumbwheel up (or down if you have the hydraulic lines reversed) and hit the lower left button on the left joystick, then release it and the thumbwheel simultaneously for continuous high flow. Move the thumbwheel momentarily or hit the lower left button again to stop flow.
 

steve1108

Member
Joined
Jun 17, 2019
Messages
11
Location
suffolk va
I'm so glad your willing to help and I found this site. so what's the two connections for in the middle of attached. is there a rocker for std flow if #12 is high flow. so if I don't have or need a electrical jumper installed for a high flow tool, you still hook the hydraulic lines to K1, J1, and case drain (if it needs a case drain), put #12 toggle switch to the on position, roll the thumbwheel up (or down if you have the hydraulic lines reversed) and hit the lower left button on the left joystick, then release it and the thumbwheel simultaneously for continuous high flow. Move the thumbwheel momentarily or hit the lower left button again to stop flow.
 

Attachments

  • hyd.jpg
    hyd.jpg
    497.8 KB · Views: 6

ianjoub

Senior Member
Joined
Jun 22, 2018
Messages
1,468
Location
Homosassa, FL USA
I'm so glad your willing to help and I found this site. so what's the two connections for in the middle of attached. is there a rocker for std flow if #12 is high flow. so if I don't have or need a electrical jumper installed for a high flow tool, you still hook the hydraulic lines to K1, J1, and case drain (if it needs a case drain), put #12 toggle switch to the on position, roll the thumbwheel up (or down if you have the hydraulic lines reversed) and hit the lower left button on the left joystick, then release it and the thumbwheel simultaneously for continuous high flow. Move the thumbwheel momentarily or hit the lower left button again to stop flow.
The 2 other middle hyd connectors are for secondary functions on some work tools. They are controlled by the two buttons on your right joystick.

The off position of the high flow rocker is standard flow by default. You leave it in the off position and roll the thumbwheel to start fluid flow to the aux connectors.

You can use K and J OR K1 and J1 for standard flow. They are different size flat face connectors. I would only use the larger connectors on a high flow work tool (for K1 and J1) for safety reasons. If you inadvertently put high flow to a regular flow hyd motor, you will blow all the seals at the very least. When you purchase low flow tools, buy the smaller flat face connectors to fit K and J.

You need an electrical connector on the high flow work tool OR a jumper or the machine will not allow you to engage high flow.

You will only have a case drain if you have a high flow hydraulic motor on your attachment.
 

steve1108

Member
Joined
Jun 17, 2019
Messages
11
Location
suffolk va
The 2 other middle hyd connectors are for secondary functions on some work tools. They are controlled by the two buttons on your right joystick.

The off position of the high flow rocker is standard flow by default. You leave it in the off position and roll the thumbwheel to start fluid flow to the aux connectors.

You can use K and J OR K1 and J1 for standard flow. They are different size flat face connectors. I would only use the larger connectors on a high flow work tool (for K1 and J1) for safety reasons. If you inadvertently put high flow to a regular flow hyd motor, you will blow all the seals at the very least. When you purchase low flow tools, buy the smaller flat face connectors to fit K and J.

You need an electrical connector on the high flow work tool OR a jumper or the machine will not allow you to engage high flow.

You will only have a case drain if you have a high flow hydraulic motor on your attachment.


those 2 buttons on the right joystick, are they the ones to control like a 6 way dozer blade movement or a laser grade attachment. the smaller attachment face connectors to fit K and J you mentioned should come with the attachment correct that i buy. do you need to release the hyd pressure when connecting or disconnecting the hoses somewhere on the machine. this really helps I understand better with this and looking at the manual. I think ill label the connectors like in the pic I sent so I don't get confused. than very much for your help.
 

ianjoub

Senior Member
Joined
Jun 22, 2018
Messages
1,468
Location
Homosassa, FL USA
Pic 4 that you posted has rocker #1 labeled as Auxiliary hydraulic pressure release. Use that if you have pressure on the aux lines making it difficult to undo the connectors. Hold it for 4 or 5 seconds. I rarely have to do that though. As an aside, when you disconnect an attachment, plug the 2 couplers on the attachment together. That will allow the hyd pressure in the attachment to equalize and will also keep the couplers clean.

The 2 buttons will control a secondary hydraulic function on an attachment. I don't have any attachments that I need them for.

One often needs to buy flat face connectors separately. They don't always come with an attachment. Measure yours so you know which ones to buy separately or which ones to request if they are included with a new attachment.
 

steve1108

Member
Joined
Jun 17, 2019
Messages
11
Location
suffolk va
Pic 4 that you posted has rocker #1 labeled as Auxiliary hydraulic pressure release. Use that if you have pressure on the aux lines making it difficult to undo the connectors. Hold it for 4 or 5 seconds. I rarely have to do that though. As an aside, when you disconnect an attachment, plug the 2 couplers on the attachment together. That will allow the hyd pressure in the attachment to equalize and will also keep the couplers clean.

The 2 buttons will control a secondary hydraulic function on an attachment. I don't have any attachments that I need them for.

One often needs to buy flat face connectors separately. They don't always come with an attachment. Measure yours so you know which ones to buy separately or which ones to request if they are included with a new attachment.


once again thanks for the information. I'm ordering my brush cutter this week. you've been very helpfull
 
Top