Here is a long winded story that may provide some food for thought for those who own/operate the D20/21's and have problems with the steering/braking on them.
I purchased a D21-6a around 2007 from a neighboring state. I had a company truck it for me. Started using it to level 72 dump truck loads of dirt. I had never run a dozer before, so I had nothing to compare it to. It seemed to be fine, but was a little tricky to steer.
After a while it got harder to steer. I was starting to look like Popeye from having to pull so hard on the steering levers to get it to turn. Finally took it to a Komatsu shop. They said drive clutches were shot and we had them rebuild it.
After that it ran great. We used it off and on for 3 years and then I got relocated for three years so it sat in the machine shed, not being used.
I moved back and we used it to move some rock piles on the line fence. After that it sat for another year without being used.
Started running it this last summer and it worked great, however the steering started to get bad. It finally got so bad that I would push in the inching clutch, pull the lever in the direction I wanted to turn, and then let out the clutch slowly to get it to turn! Otherwise it would never turn. It got really bad, so I decided it was time to tear into it again. I spent a lot of time online trying to determine what would be wrong, finally figuring that all those years of just sitting around and not being used caused the clutch bands in the steering to rust again and stop working.
I trailered it home, drove it onto railroad ties, and started checking fluids. I started with the transmission fluid and filter. The fluid was at the correct level, but I had never cleaned the screen. I removed the oil, and then the screen. It was clean so I reinstalled it. This was tricky trying to get the o-ring back in place... Ask me if you need a way to put it back together.
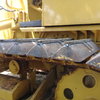
I then got ready to change the fluid in the final drives. I removed the filler plug, and oil SHOT out of the hole. Yes, it was definitely the filler hole. I put the plug back in after a 1-2 cups of oil had escaped. I then went to the other side. The same thing occurred!. I then removed the oval inspection cover for the center pinion gear case, and it was full. So, Where was the extra oil in the final drives coming from? I checked all of the other fluid levels, and they were where they should be.
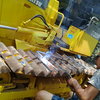
I then looked at some youtube videos, and saw that on most of the D21s, there are about 8 bolt holes on the back of each steering clutch case. In the videos, these holes are empty. Mine had shiny bolts installed in them with silicon. I opened up the brake adjustment covers and found the steering cases full of oil. Since I had not added this oil, it had to have been installed by the shop. So, maybe they made an error by making the dry clutch system a wet clutch system, but it worked! All of those years when this unit sat unused, it should have rusted the clutches and the drums. Often the brake adjusters will rust as well. On mine, I removed the access panels to adjust the brake bands and I was able to adjust them with my fingers, no wrenches needed. So, I tightened them both both until snug and then backed them off 1/4 turn and put it all back together.
That was all it needed. Turns with 1/2 pull per lever, dead stops with both levers fully pulled. Hard turn with one side fully pulled, etc.
I did run this all by Darrin of DMM, telling him what I found. He stated that they were indeed dry clutches...
So, will this work for you? I don't know. What I do know is that I don't use this dozer often or at least run it every month or so, but I'm not worried about doing that since it can't rust out the clutches with all of the oil. Timeline wise, that oil has been in there for at least 9 years.
Good luck!


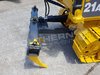
 You can test pressures at steering valve block. There is threaded ports for each side for a gauge