• Thank you for visiting HeavyEquipmentForums.com! Our objective is to provide industry professionals a place to gather to exchange questions, answers and ideas. We welcome you to register using the "Register" icon at the top of the page. We'd appreciate any help you can offer in spreading the word of our new site. The more members that join, the bigger resource for all to enjoy. Thank you!

Case 680G backhoe project: squad

squad_1881

Well-Known Member
Joined
Aug 21, 2017
Messages
59
Location
Australia
Occupation
Architect
Your engine oil pressure sender is #25. That is where you should source any oil pressure gauge / indicator. I would prefer a mechanical gauge.
View attachment 179532
Yes i did check this diagram as well, though i can not see where the sender is attaching itself to, there are only two outlets for the compressor hoses on this side of the engine block or am i missing something? The foto is taken where the old and new senders are atm?
 

Attachments

  • 30875996-0B00-4CB9-8268-7F2E32F5B831.jpeg
    30875996-0B00-4CB9-8268-7F2E32F5B831.jpeg
    611.3 KB · Views: 34

Tinkerer

Senior Member
Joined
May 21, 2009
Messages
9,367
Location
The shore of the illinois river USA
That is the correct way that Case connected the oil pressure sender and the compressor supply that is shown in your photo.
But, that surely isn't your new sender on it there is it ?? Also it is hard to see, but it appears the tab for the gauge wire is pinched.
 

squad_1881

Well-Known Member
Joined
Aug 21, 2017
Messages
59
Location
Australia
Occupation
Architect
That is the correct way that Case connected the oil pressure sender and the compressor supply that is shown in your photo.
But, that surely isn't your new sender on it there is it ?? Also it is hard to see, but it appears the tab for the gauge wire is pinched.
This is a photo of the old sender which i have replaced for now as i did not have up to date photos from there. As i know by default this model does not have pressure gauge and had only the dummy light therefore my guess is either the supply to sender is designed to be somewhat constant, the new sender is faulty or then the engine has blocked oil passages, any other suggestions?
 

squad_1881

Well-Known Member
Joined
Aug 21, 2017
Messages
59
Location
Australia
Occupation
Architect
The sending unit may not be the right one of it is defective.
Get a clean grease gun hose and a air pressure gauge. Remove the sending unit from the block and screw the grease gun hose and air pressure gauge in its place. See what you have with that set up.
Thank you for the advice Tinkerer, that is a creative approach for sure lol hence effective and simple, will keep the results posted.
 

squad_1881

Well-Known Member
Joined
Aug 21, 2017
Messages
59
Location
Australia
Occupation
Architect
hooked up the air pressure gauge as suggested and got the same reading, minimum of 50psi at idle and up to 60psi at higher rpm. Not sure what to think of that, engine starts and runs well thinking of leaving as it is and see how does it behaves. also i am using 40 weight oil instead of 30 as i got some of that in stock but surely that should not make any difference or should it?
 

Delmer

Senior Member
Joined
Jan 3, 2013
Messages
8,887
Location
WI
minimum of 50psi at idle and up to 60psi at higher rpm.

Sounds good to me. All engines have an oil pressure regulating valve that prevents damage on cold starts. Your oil system is in good enough shape that the valve is always regulating the pressure, not the pump output vs bearing clearances.
 

squad_1881

Well-Known Member
Joined
Aug 21, 2017
Messages
59
Location
Australia
Occupation
Architect
lifted off the rops canopy to sandblast it and to give it a new coat of paint at some point of time. Also i am preparing things for the small brake line overhaul and wondering is there any reason to stick to OEM brands such as bendix and midland or are generic manufacturers fine to use as well, i mean like valves, brake chambers and etc? have to say brake components are looking reasonably priced compared to some other backhoe parts as most of those are common truck parts and easily interchangeable. here are some photos about the rest of the progress.
 

Attachments

  • 1CB80DA5-E50C-4345-ADDD-513DD7A23CF6.jpeg
    1CB80DA5-E50C-4345-ADDD-513DD7A23CF6.jpeg
    4.2 MB · Views: 30
  • 11153289-21F1-40CF-AB3E-C562DAC9CA76.jpeg
    11153289-21F1-40CF-AB3E-C562DAC9CA76.jpeg
    5.7 MB · Views: 30
  • 76533808-CE3D-4875-93FD-EADC4DCFD1FE.jpeg
    76533808-CE3D-4875-93FD-EADC4DCFD1FE.jpeg
    4.5 MB · Views: 33

squad_1881

Well-Known Member
Joined
Aug 21, 2017
Messages
59
Location
Australia
Occupation
Architect
Sounds good to me. All engines have an oil pressure regulating valve that prevents damage on cold starts. Your oil system is in good enough shape that the valve is always regulating the pressure, not the pump output vs bearing clearances.
good to hear that and thank you for the reassurance Delmer
 

squad_1881

Well-Known Member
Joined
Aug 21, 2017
Messages
59
Location
Australia
Occupation
Architect
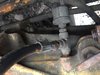
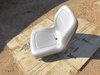
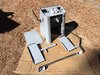
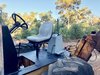
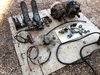
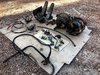
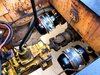
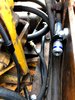
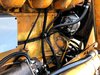
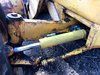
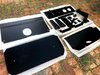
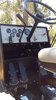
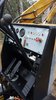
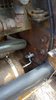
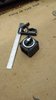
Time for another progress update, probably the most noticeable change is that the backhoe has brakes after a decent overhaul of the airline system, managed to replace most of the valves and hoses. Apart from just installing the new parts i decided to add anti-compounding to the system as well and it worked out great, two extra hoses and one additional double check valve to the system. Also scrapped clutch cut-out feature and some switches which did not had much purpose now or before. I used the Tinkerers idea to add nitto air-fitting into the line and it works great, useful feature it is. Also steering cylinders got repacked along with added new hoses from the cylinders to the steering rack. In addition finished off the backhoe control tower and dashboard with minor detailing and elements. The battery switch will be also added to the plus side, i take continuous 300A and max 900A current rating should be fine for that system, bought the Blue Sea System m-series 6006 on-off switch for that, their product quality is excellent imho. Next things in the list are to patch-up, sandblast and paint some of the remaining body parts, get new set of tyres and to overlook the boom/dipper/bucket hoses and pipes as the previous work has not been done as it should had.
 

squad_1881

Well-Known Member
Joined
Aug 21, 2017
Messages
59
Location
Australia
Occupation
Architect
shots 1
 

Attachments

  • IMG_2009.jpg
    IMG_2009.jpg
    514.6 KB · Views: 33
  • IMG_2010.jpg
    IMG_2010.jpg
    539.4 KB · Views: 31
  • IMG_2621.jpg
    IMG_2621.jpg
    423.5 KB · Views: 30
  • IMG_2934.jpg
    IMG_2934.jpg
    365.1 KB · Views: 31

squad_1881

Well-Known Member
Joined
Aug 21, 2017
Messages
59
Location
Australia
Occupation
Architect
shots 2
 

Attachments

  • IMG_2938.jpg
    IMG_2938.jpg
    158.3 KB · Views: 26
  • IMG_2939.jpg
    IMG_2939.jpg
    302.7 KB · Views: 26
  • IMG_2960.jpg
    IMG_2960.jpg
    357.2 KB · Views: 27
  • IMG_3904.jpg
    IMG_3904.jpg
    259.4 KB · Views: 25

squad_1881

Well-Known Member
Joined
Aug 21, 2017
Messages
59
Location
Australia
Occupation
Architect
shots 3
 

Attachments

  • IMG_20180909_124526.jpg
    IMG_20180909_124526.jpg
    123.2 KB · Views: 27
  • IMG_20180911_132226.jpg
    IMG_20180911_132226.jpg
    121.5 KB · Views: 26
  • IMG_20180909_124455.jpg
    IMG_20180909_124455.jpg
    67.5 KB · Views: 28
  • IMG_20180909_124601.jpg
    IMG_20180909_124601.jpg
    553.4 KB · Views: 27

squad_1881

Well-Known Member
Joined
Aug 21, 2017
Messages
59
Location
Australia
Occupation
Architect
shots 4
 

Attachments

  • IMG_20180909_124428.jpg
    IMG_20180909_124428.jpg
    81.2 KB · Views: 29
  • IMG_20180911_132051.jpg
    IMG_20180911_132051.jpg
    110.7 KB · Views: 26
  • IMG_20180911_132129.jpg
    IMG_20180911_132129.jpg
    85.6 KB · Views: 26

squad_1881

Well-Known Member
Joined
Aug 21, 2017
Messages
59
Location
Australia
Occupation
Architect
For the record here is the parts list i managed to cross reference with the originals, hopefully it is useful if someone would do the same type of overhaul, though some parts are hard to find.

d-2 governor no: 275508N bendix
ref: 275491
e-3 treadle pedal no: 283927 bendix
ref: 101482 pacific
e-3 foot valve no: 277863 bendix
air chamber: 24/30
st-4 safety valve 150psi no: 284142 bendix
qr-1c quick release valve no: 289714 bendix
ref: ABC289714 pacific
dc-4 double check valve no: 278614 bendix
ref: ABC278614 pacific
sc-3 one way valve no: 800372 bendix
ref: ABC5003980 pacific
pp-1 air brake valve no: 101439 bendix
lp-3 parking brake pressure light switch no: BE13240 haldex
pr-2 pressure protection valve no: 277147 bendix
r-374 pressure reducer valve no: R374-02AP parker watts
cd-1 drain valve no: 103385
ref: ABF123 pacific
 

Tinkerer

Senior Member
Joined
May 21, 2009
Messages
9,367
Location
The shore of the illinois river USA
Looking good, Squad ! Nice high quality work.
Keep those photos coming !!!
I drilled a hole in the side of my cab so I could get access to the pins at the bottom of the foot pedals. Removing the pedals makes it 10 times easier to get at the mounting bolts in front of the pedal.
 

squad_1881

Well-Known Member
Joined
Aug 21, 2017
Messages
59
Location
Australia
Occupation
Architect
Looking good, Squad ! Nice high quality work.
Keep those photos coming !!!
I drilled a hole in the side of my cab so I could get access to the pins at the bottom of the foot pedals. Removing the pedals makes it 10 times easier to get at the mounting bolts in front of the pedal.

Thanks Tinkerer, will try to keep the photos coming as it goes and yes i know what do you mean about the foot pedals, as the mounting bolts can not be removed without removing the pins and pins will not come out unless pedals are unmounted lol
 

squad_1881

Well-Known Member
Joined
Aug 21, 2017
Messages
59
Location
Australia
Occupation
Architect
Started to change gear oils today and encountered a situation where gearbox was full of water, i mean completely full, from top to bottom, without much of oil in it at all. When I opened the fill plug there was like 3L before it dropped to the fill level and another 3L to the bottom plug from there. I take the rain has got into the gearbox over time and pushed the oil out from the top breather valve though could there be another explanation for that, it would be great if anyone can share their thoughts. Also I am wondering is it fine to put fresh oil in right away or should i look the way how to get rid of the remaining drops of water in the gearbox. Oil in central differential and planetaries was fine, shuttle had a red ATF which looked very old and dirty but not too much mixed with water. I got a 20L bucket of THC fluid from the local dealer, should be enough to let some of it drain through and then to do the final refill.
 

Tinkerer

Senior Member
Joined
May 21, 2009
Messages
9,367
Location
The shore of the illinois river USA
The boot on the gear shift lever is the only way for water to enter.
Pull the drain plug and let it sit for a few days if you can let it sit that long. Fill the box with diesel fuel. Raise the rear wheels off the ground and put it in 3rd gear and run it a couple of minutes. Then drain it. let it drain completely again, then fill it with 80-90 gear oil.
Hopefully there is access to a drain plug on the torque convertor.
Otherwise you will only be able to drain part of the shuttle oil.
 

squad_1881

Well-Known Member
Joined
Aug 21, 2017
Messages
59
Location
Australia
Occupation
Architect
The boot on the gear shift lever is the only way for water to enter.
Pull the drain plug and let it sit for a few days if you can let it sit that long. Fill the box with diesel fuel. Raise the rear wheels off the ground and put it in 3rd gear and run it a couple of minutes. Then drain it. let it drain completely again, then fill it with 80-90 gear oil.
Hopefully there is access to a drain plug on the torque convertor.
Otherwise you will only be able to drain part of the shuttle oil.

Thanks for that, cleaning up the gearbox in that way sounds like a plan and yeah I am aware it is not easy to flush the torque converter, thinking of doing more frequent drain and fills.
 
Top