
Garauld
New Member
I bought a used KX-41-3V a couple years ago to do minor work around the yard. I knew it was a bit sloppy at the time and thought I could live with it, but finally I gave up and decided to replace the swing or slewing bearing. It wasn't too difficult, I just took my time. Here's how I basically did it without removing the seat. It took about 25 hrs work time due to my being cautious with no instructions. I hope these notes will be useful to another owner. If I were to do it again, I think I could do it all in about 8 hrs.
Here's a photo of the homemade special tools I needed to reach the upper bearing bolts under the seat. I was amazed the Kobalt swivel wrench held up under the 90+ ft-# of torque I put on it to loosen the bolts. I also suggest buying an extra M12 x 1.25 bolt at least 30 mm long.

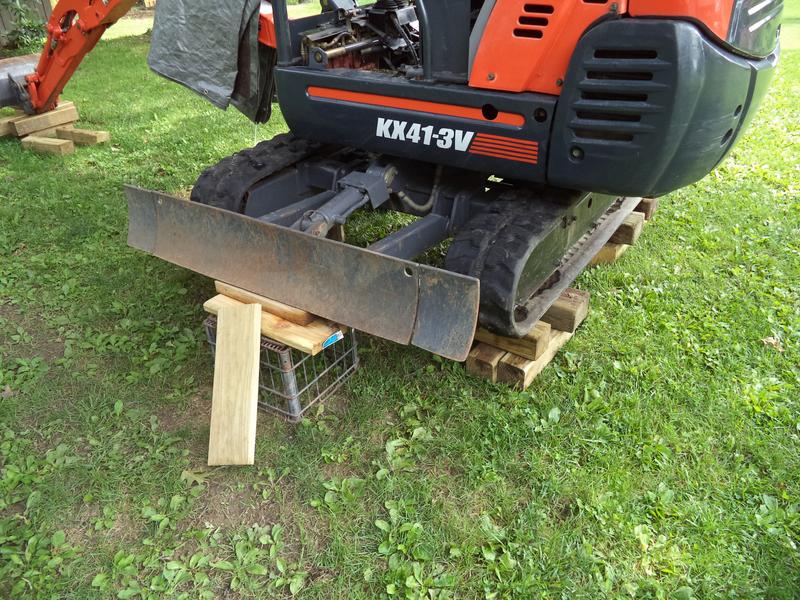
Step 1: lift the entire machine at least seven inches and crib it. I used two rows of 4x4s to support it. The seven inches allowed me enough room to crawl under and remove the lower bearing bolts and skid plate. I also turned the house 90 degrees to the side.
Step 2: remove cab floor mat and covers
Step 3: pressure wash everything real good where hoses lie and areas under the bearing.
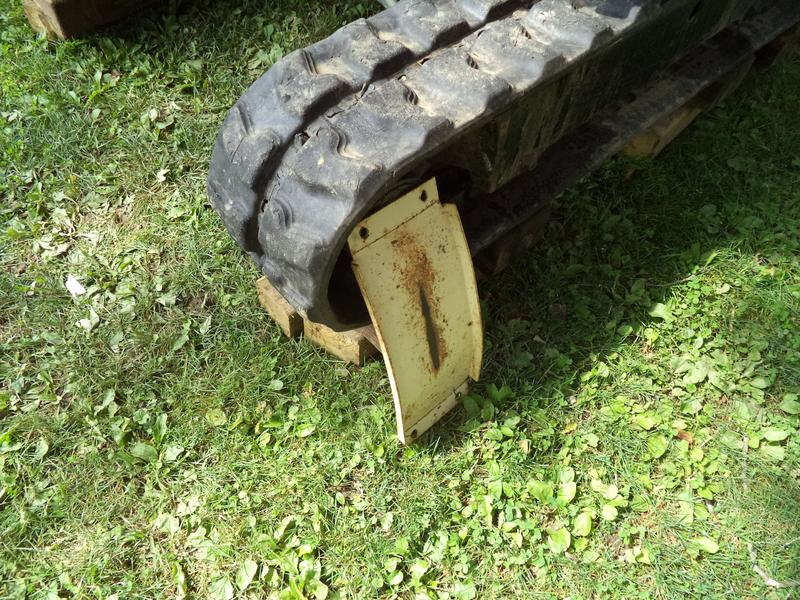
Step 4: remove the skid plate [14mm socket].
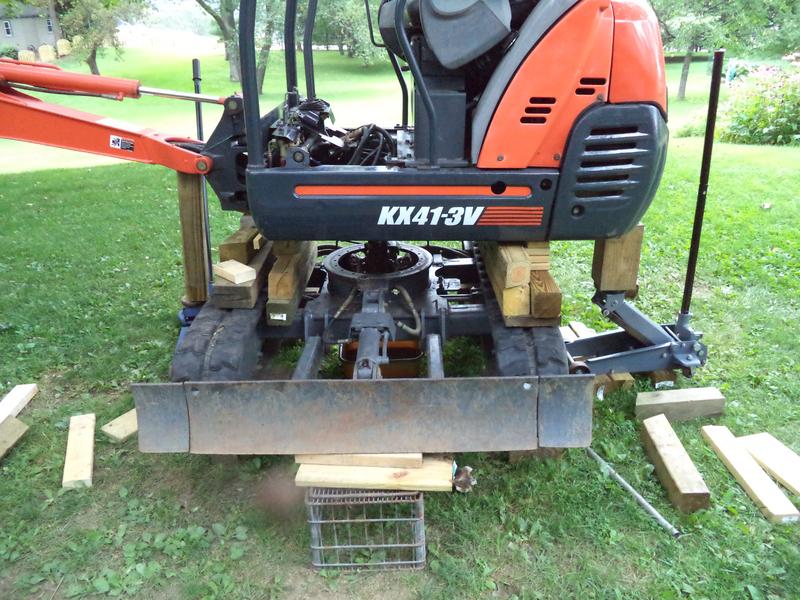
Step 5: I used two floor jacks to support each side of the house. Add cribbing under the house for stability.
Step 6: remove the (18) lower bearing bolts [17mm socket].
Step 7: using a rope or tie-down, restrain the hoses running over but not connected to the swivel joint.

Step 8: label all hoses running to swivel joint and swivel drive motor - mark lettering on hose routing sheet. I used masking tape and a Sharpie which held up well.


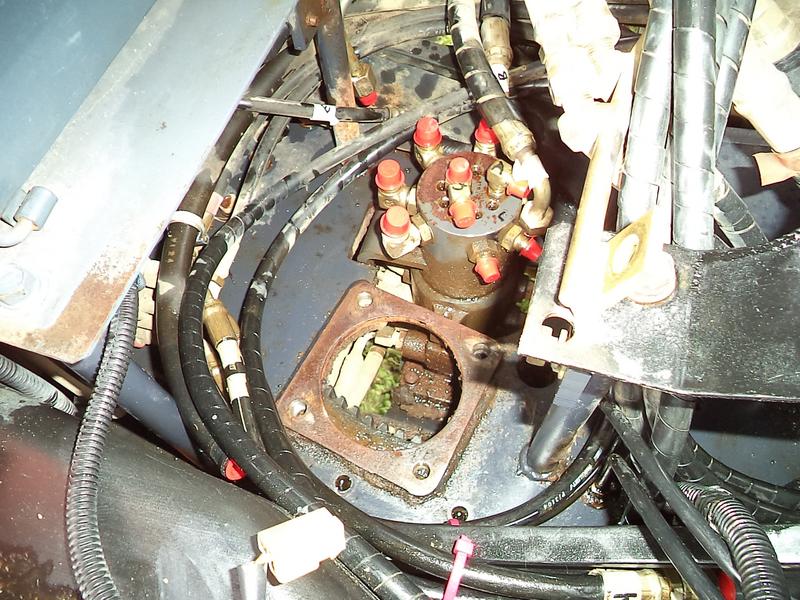
Step 9: place a large pan under machine and remove all (10) hoses connected to top of swivel joint. Use caplugs or similar to protect hoses from contamination. Expect about a gallon of oil to come out of the return line (one held on by hose clamp). Just let it dribble into pan.
Step 10: disconnect the two grease lines to the bearing area. Remove the tubing fitting screwed into the bearing and plug the hole.
Step 11: disconnect the three hoses connected to the swing drive motor unit. Be sure the pan is still under the machine as another quart will dribble into it mostly from the return line. Remove the drive motor.
Step 12: remove (17) of the (19) top bearing bolts [17mm socket]. Some of the bolts located under the seat area are tough to reach, but I was able to remove them using the shortened wrenches. The 1/2" pipe with a connector nut welded on it allowed me to gain leverage on the wrench using a socket/extension/breaker bar combination. A couple of hoses connected to the large front control valve block need to be disconnected in order to remove two of the forward left side bolts. Leave the (2) remaining bolts (needed to hold up the bearing) loosened a little and within easy reach.
Step 13: I jacked the house up 1" on one side at a time then adding cribbing to keep everything stable. It needs to go up about 8" until there is 1/2" of clearance showing between the underside of the bearing and the top of the swivel joint fittings.
Step 14: add some cribbing under the bearing so it doesn't fall down when the two remaining bolts are removed. Remove the bolts and slide out the bearing.

Step 15: clean and lightly grease the upper and lower surfaces where the bearing will seat. Grease the teeth and place the new bearing into position on the track frame while ensuring the 'S' soft zone mark is positioned opposite the ball inlet.


Step 16: Reinstall the (18) lower bearing bolts.
Step 17: Lower the house one side at a time keeping an eye on the clearance between the swivel joint hose fittings and the house base frame. I tried to keep the grease fitting hole in the upper race as a target centered thru the hole in the house base plate. When the house gets close to the bearing, align one of the bearing holes to the hole in the house baseplate and insert the long spare M12 bolt you bought. You may need to use a pry bar to push the house around a bit to get another hole to line up so another bolt can be installed.
Step 18: with the house setting on the bearing, install the remaining bolts.
Step 19: install the swing drive motor and reconnect the hoses to it.
Step 20: install the bearing grease fitting and reconnect the two grease lines.
Step 21: reconnect all the remaining hoses.
Step 22: wash the house and track frame to remove the oil residue.
Step 23: top off hydraulic oil reservoir.
Step 24: start engine and operate all functions while looking for leaks.
Step 25: reinstall floor covers and mat
Step 26: reinstall skid plate
Step 27: lower machine to ground and enjoy a beer or 2.

Here's a photo of the homemade special tools I needed to reach the upper bearing bolts under the seat. I was amazed the Kobalt swivel wrench held up under the 90+ ft-# of torque I put on it to loosen the bolts. I also suggest buying an extra M12 x 1.25 bolt at least 30 mm long.
Step 1: lift the entire machine at least seven inches and crib it. I used two rows of 4x4s to support it. The seven inches allowed me enough room to crawl under and remove the lower bearing bolts and skid plate. I also turned the house 90 degrees to the side.
Step 2: remove cab floor mat and covers
Step 3: pressure wash everything real good where hoses lie and areas under the bearing.
Step 4: remove the skid plate [14mm socket].
Step 5: I used two floor jacks to support each side of the house. Add cribbing under the house for stability.
Step 6: remove the (18) lower bearing bolts [17mm socket].
Step 7: using a rope or tie-down, restrain the hoses running over but not connected to the swivel joint.
Step 8: label all hoses running to swivel joint and swivel drive motor - mark lettering on hose routing sheet. I used masking tape and a Sharpie which held up well.
Step 9: place a large pan under machine and remove all (10) hoses connected to top of swivel joint. Use caplugs or similar to protect hoses from contamination. Expect about a gallon of oil to come out of the return line (one held on by hose clamp). Just let it dribble into pan.
Step 10: disconnect the two grease lines to the bearing area. Remove the tubing fitting screwed into the bearing and plug the hole.
Step 11: disconnect the three hoses connected to the swing drive motor unit. Be sure the pan is still under the machine as another quart will dribble into it mostly from the return line. Remove the drive motor.
Step 12: remove (17) of the (19) top bearing bolts [17mm socket]. Some of the bolts located under the seat area are tough to reach, but I was able to remove them using the shortened wrenches. The 1/2" pipe with a connector nut welded on it allowed me to gain leverage on the wrench using a socket/extension/breaker bar combination. A couple of hoses connected to the large front control valve block need to be disconnected in order to remove two of the forward left side bolts. Leave the (2) remaining bolts (needed to hold up the bearing) loosened a little and within easy reach.
Step 13: I jacked the house up 1" on one side at a time then adding cribbing to keep everything stable. It needs to go up about 8" until there is 1/2" of clearance showing between the underside of the bearing and the top of the swivel joint fittings.
Step 14: add some cribbing under the bearing so it doesn't fall down when the two remaining bolts are removed. Remove the bolts and slide out the bearing.
Step 15: clean and lightly grease the upper and lower surfaces where the bearing will seat. Grease the teeth and place the new bearing into position on the track frame while ensuring the 'S' soft zone mark is positioned opposite the ball inlet.
Step 16: Reinstall the (18) lower bearing bolts.
Step 17: Lower the house one side at a time keeping an eye on the clearance between the swivel joint hose fittings and the house base frame. I tried to keep the grease fitting hole in the upper race as a target centered thru the hole in the house base plate. When the house gets close to the bearing, align one of the bearing holes to the hole in the house baseplate and insert the long spare M12 bolt you bought. You may need to use a pry bar to push the house around a bit to get another hole to line up so another bolt can be installed.
Step 18: with the house setting on the bearing, install the remaining bolts.
Step 19: install the swing drive motor and reconnect the hoses to it.
Step 20: install the bearing grease fitting and reconnect the two grease lines.
Step 21: reconnect all the remaining hoses.
Step 22: wash the house and track frame to remove the oil residue.
Step 23: top off hydraulic oil reservoir.
Step 24: start engine and operate all functions while looking for leaks.
Step 25: reinstall floor covers and mat
Step 26: reinstall skid plate
Step 27: lower machine to ground and enjoy a beer or 2.