• Thank you for visiting HeavyEquipmentForums.com! Our objective is to provide industry professionals a place to gather to exchange questions, answers and ideas. We welcome you to register using the "Register" icon at the top of the page. We'd appreciate any help you can offer in spreading the word of our new site. The more members that join, the bigger resource for all to enjoy. Thank you!

Going to see the Sandman

Randy Krieg

Senior Member
Joined
Nov 1, 2007
Messages
260
Location
Arizona
Occupation
Test Pilot/Operator @ Caterpillar's Tucson Proving
After 23,000 hours it got a new engine, new transmission, new hyd. pump about a dozen new hoses, line bored the hitch and now it's off to see the sand blaster and then some new epoxy paint. Then she'll be good for another 20,000 plus hours!
 

Attachments

  • DSCF3094 (Small).JPG
    DSCF3094 (Small).JPG
    57.4 KB · Views: 2,435
  • DSCF3093 (Small).JPG
    DSCF3093 (Small).JPG
    64.6 KB · Views: 2,411

1970Cat16

Well-Known Member
Joined
Sep 29, 2011
Messages
74
Location
Texas
what sixe tires do you have on your blade and how do you like the tread in your states working conditons, they look like the clean out good and pull???
 

Randy Krieg

Senior Member
Joined
Nov 1, 2007
Messages
260
Location
Arizona
Occupation
Test Pilot/Operator @ Caterpillar's Tucson Proving
14H Tires

The tires presently on the 14H are the Bridgestone V-Steel M-Traction (VMT) 20.5 R25 E3 mounted on 17x25 multi piece rims. This is a non direction tire which I prefer for Civil Operations. For Civil Construction work here in Alaska we deal mostly in alluvial material or shot rock so we don’t really need a directional tire. For all of our graders we have two complete sets of radial tires since these same machines are used for Iceroad construction in the winter. For winter operations we run the Bridgestone V-Steel Snow Wedge (VSW); on the 160Hs we run 14.00R24 VSW G2, on the 14H we run 16.00R25 VSW G2 and on the 16M we run 23.5R25 VSW E2/L2. In just a few days the dirt tires will all get changed out on the machines.

I have run several of the Michelin XHA and X-Snoplus and they are excellent tires. Unfortunately Michelin does not have a strong dealer presence here. The last set of Michelins that I bought for my own machine I had to buy directly from the factory since there was no Michelin dealer in this area at the time. Michelin did pay the freight to ship the tires to Alaska but no dealers up here wanted to mount the tires or service them since I purchase them direct. Whether its tires or iron many times it’s the dealer support which determines the sale or the brand you run.
Regards, Randy
 

Attachments

  • DCP_0004 (Small).JPG
    DCP_0004 (Small).JPG
    64.3 KB · Views: 2,301
  • Second Tour in Badami 018 (Small).jpg
    Second Tour in Badami 018 (Small).jpg
    27.6 KB · Views: 2,312

norite

Senior Member
Joined
Jul 31, 2010
Messages
483
Location
Sudbury, Ontario, Canada
Looks like you took good care of that grader, if you keep that up they are never going to buy you a new one! :)

I like that float tractor and trailer as well, sharp looking unit.
 

Gavin84w

Senior Member
Joined
Mar 29, 2007
Messages
554
Location
Australia
After 23,000 hours it got a new engine, new transmission, new hyd. pump about a dozen new hoses, line bored the hitch and now it's off to see the sand blaster and then some new epoxy paint. Then she'll be good for another 20,000 plus hours!

Reckon an M will see those sort of hours Randy?
 

Randy Krieg

Senior Member
Joined
Nov 1, 2007
Messages
260
Location
Arizona
Occupation
Test Pilot/Operator @ Caterpillar's Tucson Proving
Gavin
A great question, but only time will tell. Our 16M has about 8000 hours right now. I really don’t see how the M could last as long thinking about just the engine, there’s about twice as many moving parts inside. It’s a simple two valve flat tappet engine verses a 4 valve, dual overhead cam, ATAAC, demand fan, etc. etc……. Too many moving parts now! I love technology and all the new stuff, but along with the new trick stuff come the new trick problems….LOL

Sometimes it seems we are just chasing our tail! I use to get a lot of work done with those old G models.
Regards, Randy
 

Randy Krieg

Senior Member
Joined
Nov 1, 2007
Messages
260
Location
Arizona
Occupation
Test Pilot/Operator @ Caterpillar's Tucson Proving
Fresh Out of the Paint Booth

A new coat of Epoxy. :)1402 after repaint 2 (Small).jpg
 

alco

Senior Member
Joined
Apr 7, 2006
Messages
1,289
Location
here
Looks great Randy! Can't wait to see her all decaled up.
 

Randy Krieg

Senior Member
Joined
Nov 1, 2007
Messages
260
Location
Arizona
Occupation
Test Pilot/Operator @ Caterpillar's Tucson Proving
Getting Closer

alco
here's some pictures of it with most of the decals on it. I did this the same as the 160H with custom reflective logos. I shut down early today to go pack; my better half and I are headed to the National Drag Races in Vegas for the weekend! Can't wait to smell the Nitro!!!!!:D
Regards, Randy
 

Attachments

  • 1402 Decals 3 (Small).jpg
    1402 Decals 3 (Small).jpg
    52.1 KB · Views: 1,750
  • 1402 Decals (Small).jpg
    1402 Decals (Small).jpg
    66.3 KB · Views: 1,749
  • 1402 Decals 2 (Small).jpg
    1402 Decals 2 (Small).jpg
    54.5 KB · Views: 1,744
  • 1402 Decals 4 (Small).jpg
    1402 Decals 4 (Small).jpg
    61.6 KB · Views: 1,753

FnS

Member
Joined
Oct 19, 2011
Messages
21
Location
Arizona & Alaska
Occupation
finish blade hand
She's a pretty BEAST!! Too cool!! I hope to own a blade some day (like you) instead of leasing. Must be fun. I envy you man!
-Tyler Polk
 

Cat is ALL

Well-Known Member
Joined
Jul 1, 2008
Messages
88
Location
Canada
Possibly something to do with air shut off for the oilfield? It's a slick looking grader, pretty clever with those reflector decals and I really like the accented red handrails they are very sharp.
 

Randy Krieg

Senior Member
Joined
Nov 1, 2007
Messages
260
Location
Arizona
Occupation
Test Pilot/Operator @ Caterpillar's Tucson Proving
Warm Air/Cold Air Intake

Cat is All is correct; that is a warm air intake system. One of the biggest problems we have on the North Slope with the standard dust ejector system is snow plugging up the air-filters (see photo). The Donaldson Precleaner Strata Tube System does an outstanding job of ejecting dust, but it doesn’t work well with snow. The setup pictured here has an air intake from a Kenworth Truck (built by A&R Metal Industries in Canada) mounted on top of the Donaldson Pre-cleaner. It has a lever controlled flapper in the top so you can shut of the outside intake and draw warm/dry air from under the hood via the louvers in the hood which are over the muffler. The first thing we had to do was find out the required CFMs for the 3306 engine, which was around 936 CFMs at rated speed, then we had to calculated how many CFMs could flow through the present louvers on the hood, which was around 1100 CFMs. This way we could be sure the engine wasn’t being restricted when it was drawings from under the hood. Then we had to calculate the height of the box to be sure it wasn’t causing any restriction. At one time just to be sure there wasn’t a problem we even had a restriction gauge mounted in the vertical tube behind the dust ejector; the operator could see the gauge from inside the cab. Since running this setup the machine has never plugged a filter and it has had to work in some horrible weather. You just have to make sure the flapper is completely closed when it’s blowing snow.
I originally designed that setup when I was working at Cat. We put it on a few Field Follow machines back in 1997 and it did well.
Regards, Randy
 

Attachments

  • Picture 028 (Small).jpg
    Picture 028 (Small).jpg
    51.5 KB · Views: 1,552
  • Picture 030 (Small).jpg
    Picture 030 (Small).jpg
    46.6 KB · Views: 1,568
  • Picture 029 (Small).jpg
    Picture 029 (Small).jpg
    42.4 KB · Views: 1,558
  • 16M Airfilter (Small).JPG
    16M Airfilter (Small).JPG
    52 KB · Views: 1,563

ovrszd

Senior Member
Joined
Apr 1, 2008
Messages
1,523
Location
Missouri
Occupation
Retired Army
Nice looking machine Randy. Great write-up as usual. I agree with you about technology, it's great, but comes with a price as it develops.

Very interested in your breather modifications. Even down here in the Midwest I've plugged air filters with snow. The factory dust ejectors just can't keep snow dust out. Your idea looks like it would solve that problem. Our D model Deere had grated openings in the top of the hood that could have been incorporated into that design. Our G model has none. It would require a hole cut into the hood and the intake tube fastened directly to that hole which would be doable.

I've saw some old machines around here with extended intake tubes sticking clear up above the cab which seemed to help a little. Usually it's the snow dust kicked up by the machine that's a problem here. For you and your extreme temperatures you probably have significant dust in the air at times.

Thanks again for the write-up. I always enjoy your comments and pictures. You have a photogenic eye. An example is the pic of the snow tire and blower in the background!!!
 

JDOFMEMI

Senior Member
Joined
Jan 3, 2007
Messages
3,074
Location
SoCal
Randy

Great information as usual. Your 14 is looking good. I think the H model will be known as the best of the best for a long time to come. Like you said, too many things to go wrong with the M, and probably anything on further down the line as well. In the field, and especially in extreme conditions, simple is better.

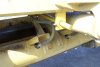
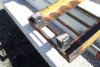
On the 14, have you had to skin the moldboard yet? just wondering. My G has around 23,000 hrs, +/-, (dont know exactly, meter has been changed) and the moldboard has worn through on each end. I think it starts out at 1", or maybe 11/4" thick, and it had a hole in each end, and was thin all the way accross, mainly in the lower 1/3 section, where the wear is heaviest.
It just got a 1/2" skin of AR plate, and is now good for another lifetime.
 

Randy Krieg

Senior Member
Joined
Nov 1, 2007
Messages
260
Location
Arizona
Occupation
Test Pilot/Operator @ Caterpillar's Tucson Proving
Lining the Moldboard and some other issues.

Jerry
Thanks for that compliment. Wait until you see :eek: what I’m working on right now and have been for the last three years; should have it completed in about another 6 months if all goes well.

In regards to our 14H’s moldboard; we put a new 16 ft moldboard on this machine four years ago. This machine was originally owned by the city of Valdez, had a 14 ft. moldboard and was used exclusively for plowing snow; it still had paint on the front of the moldboard when we got it since all it had ever done was plow snow in the city. When we were getting the machine ready to start on the Palmer Airport Runway Project I convinced Dave we needed a 16 ft board and not a 2 ft. extension for the 14 footer. So in regards to dirt moving hours on the present board it’s probably only got about 6000 hrs on it since the other half of the year this machine works on the ice road. We are planning to put a liner on the machine before it starts the next big earthmoving job as I hate to let it wear thin before fixing the problem.

This machine is in really good shape still and has been well cared for. We have done some other really neat tricks to make this machine match passes with the slope control. I pulled the lift cylinder mounting yokes out and had Alaska Roteq Corporation (http://www.akroteq.com/) turn them down and build them back up with Nickel Chrome Alloy; after installing new bearing in the linkage arm I measured the inside of the new bearings I.D. with a micrometer; I then had Roteq machine & polish the yokes back down so there was .004 clearance. I test fitted the yokes without the cylinder to be sure there was no binding. I also installed zerk fitting between the front and rear bearing. For the moldboard tip pins I had Palmer Machinery custom build some new pins from a new piece of 65mm 4140 Chromalloy. I basically used the same procedure for these tip pins; I installed new bearings in both the blade-beams and the tip carriage then measure the I.D. then had the 4140 pins machined for .004 clearance. On the hose tray we cut off the ¾” rods and install new 1” rods to prevent flexing during moldboard rotation. We also add four cross braces to the bottom. Where the rods go through the guides in the back of the circle I bore these holes to fit the larger rods and install zerk fittings. On the front of the hose tray we cut off the factory 1/2 “ thick taps and install new taps made from 1” thick key-stock; we then line bore the new pin holes to exactly 1.001”. This gives only .001” clearance for the new pin which is made from 4130. We remove the swivel valve, bore out the pin hole on a Bridgeport, install brass bearings at each end, hone the bearings for .001” clearance and install a zerk fitting between the bearings. This gets rid of all the free-play in the hose tray/swivel valve connection so the rotation sensor is truly reading the proper moldboard angle at all times. Every operator who has ever run this machine always comments on how tight it is.:D It will match passes!
If you have a machine that won’t match passes I can guarantee this procedure will solve the problem;)
Regards, Randy
 

Attachments

  • Install 1 Inch Rod (Small).JPG
    Install 1 Inch Rod (Small).JPG
    57.8 KB · Views: 1,440
  • Grease Fitting in rod mount (Small).JPG
    Grease Fitting in rod mount (Small).JPG
    41.8 KB · Views: 1,435
  • Line Bore Swivel Valve (Small).JPG
    Line Bore Swivel Valve (Small).JPG
    50.8 KB · Views: 1,448
  • Line Bore New Mounts (Small).JPG
    Line Bore New Mounts (Small).JPG
    55.7 KB · Views: 1,426
Last edited:

JDOFMEMI

Senior Member
Joined
Jan 3, 2007
Messages
3,074
Location
SoCal
Randy

You just get better and better.

Many thanks. One day I hope to have the time and $$ to have things done up first class like you do. In the present economy here, I just have to use what I have to survive till better times.

I can hardly wait to see your new project. Any hints as to what it is? Knowing the detail you put into things, I am sure it will be incredible.
 

akpolaris

Active Member
Joined
Jul 18, 2011
Messages
38
Location
Seward, Ak
Randy it is good to see that there is still some of your companies equip here at home. If the television can be believed almost your entire operation has moved down to ND. thanks for staying home
 

Cat is ALL

Well-Known Member
Joined
Jul 1, 2008
Messages
88
Location
Canada
Have you got pictures of the finished product outside your shop. Been waiting for a pic of the whole machine all done up nice.
 
Top