• Thank you for visiting HeavyEquipmentForums.com! Our objective is to provide industry professionals a place to gather to exchange questions, answers and ideas. We welcome you to register using the "Register" icon at the top of the page. We'd appreciate any help you can offer in spreading the word of our new site. The more members that join, the bigger resource for all to enjoy. Thank you!

D3 brake band modification

Dave the pool guy

Active Member
Joined
Mar 9, 2024
Messages
31
Location
Tennessee
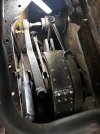
Hello everyone so I have a 1979-ish D3 dozer that would require you to remove the steering clutches to replace the linings
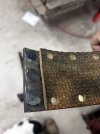
What I did is two pads back from the adjuster. I cut the band and modified a bracket with three bolts to separate the brake band in the 2/2 you can pull it out, replace your linings, put it back bolt it back together no need for deconstructing the vehicle so to speak.
The reason I started this endeavor is because when I first started watching YouTube videos about how to put linings on most of the old dozers were made in section so that you could get that off. This is an experiment because I don’t have anything wrong with my clutches, and according to the service manual, it is quite an ordeal to take them out and put them back in, so I decided to go this route and can let you know details if you want them. I have tons of pictures on how I did it. It’s absolutely ridiculous to me that you would have to take the steering clutches out to do this regular maintenance item.
Wish me luck
 

Cliffy

Well-Known Member
Joined
Oct 14, 2023
Messages
59
Location
Qld
Good job. I always enjoy modifying equipment from standard to make it more serviceable or operational.
I think more then just me would be interested in photos…..
 

Dave the pool guy

Active Member
Joined
Mar 9, 2024
Messages
31
Location
Tennessee
The brakes were shot which I kind of knew when I tried to adjust one and it was already bottomed out and it didn’t work. I found parts of the brakes in the bottom of the Cavern. I was researching how to rivet the pads on and saw that the older models had a segmented brake band and decided to take the chance.
 

Dave the pool guy

Active Member
Joined
Mar 9, 2024
Messages
31
Location
Tennessee
I’m gonna take the covers back off and look and make sure everything still good I have a clutch pressure issue. I’ve had the valve body out several times and found this plastic little filter in the orifice and I took a couple shims out and it worked great when I first got it going and now I’m back to no pressure in the clutch packs again, gonna try to find a post relating to that but if you guys know of one, I’d appreciate a heads up
 

OzDozer

Senior Member
Joined
Jan 18, 2007
Messages
2,207
Location
Perth, Western Australia.
Occupation
Semi-Retired ..
That's good work. I think I'd simplify the design by using socket head bolts with threads tapped into the band - thus eliminating nuts, and having to weld the bolts in place.
There seems to be enough thickness in the band material for threads - it looks about the same thickness as the nut width. Some threadlock would ensure the fastener security.
The join plate could be welded to one side of the band, and that would reduce the number of fasteners required, to half what you've used.
 

Welder Dave

Senior Member
Joined
Oct 11, 2014
Messages
12,615
Location
Canada
Jam nuts could be tacked on too. A couple small tacks 180 deg's. apart is all you need to stop them from turning.
That's good work. I think I'd simplify the design by using socket head bolts with threads tapped into the band - thus eliminating nuts, and having to weld the bolts in place.
There seems to be enough thickness in the band material for threads - it looks about the same thickness as the nut width. Some threadlock would ensure the fastener security.
The join plate could be welded to one side of the band, and that would reduce the number of fasteners required, to half what you've used.
 

Cliffy

Well-Known Member
Joined
Oct 14, 2023
Messages
59
Location
Qld
I worked for a very smart man who was the master of innovation. He would come up with an idea and my job was to make it work. We had a lot a failures and a couple of successes.
 

Dave the pool guy

Active Member
Joined
Mar 9, 2024
Messages
31
Location
Tennessee
That's good work. I think I'd simplify the design by using socket head bolts with threads tapped into the band - thus eliminating nuts, and having to weld the bolts in place.
There seems to be enough thickness in the band material for threads - it looks about the same thickness as the nut width. Some threadlock would ensure the fastener security.
The join plate could be welded to one side of the band, and that would reduce the number of fasteners required, to half what you've used.
Thank you that means a lot. I did tap and thread the other side. I was just going to weld it but then I decided I should have bolts in there and I did use thread locker actually.
 

Dave the pool guy

Active Member
Joined
Mar 9, 2024
Messages
31
Location
Tennessee
I worked for a very smart man who was the master of innovation. He would come up with an idea and my job was to make it work. We had a lot a failures and a couple of successes.
I’ve had some ideas I thought were great in the past and turned out to be not so great but I’ve learned you just have to accept that sometimes you may have to start over. I figured it should work since that’s the way others were done and if it didn’t I’d be buying some new bands
 

Dave the pool guy

Active Member
Joined
Mar 9, 2024
Messages
31
Location
Tennessee
I got the linings from Boise Idaho and they send 7-7 rivets, the cat rivets are too short.
A forstner bit was the best way to drill the countersink holes so you don’t go too deep.
1. Drill rivet/pilot through band
2. Note to self-leave clamps on till done
3 Use a Kreg jig bit to get deep enough to start a 3/8 forstner bit
4. Drill slowly with forstner bit till desired depth (very controllable)
5. Use a regular drill slightly smaller than 3/8 with a 20 degree grind and drill very lightly to put a slight taper in your hole (the forstner bit leaves a flat gnarly hole).
6. To Rivet I used a drill bit in a steel block for the anvil and a homemade punch (made from a tapered punch) to set rivets.
I’ll try to remember to post some pictures
 
Top