• Thank you for visiting HeavyEquipmentForums.com! Our objective is to provide industry professionals a place to gather to exchange questions, answers and ideas. We welcome you to register using the "Register" icon at the top of the page. We'd appreciate any help you can offer in spreading the word of our new site. The more members that join, the bigger resource for all to enjoy. Thank you!

D8K or D9N need advice!

nicky 68a

Senior Member
Joined
Apr 14, 2013
Messages
1,164
Location
england
Things are worn in that croc clip unfortunately.
To give it a chance,I’d clean everything up absolutely spotless,clean threads up and buy 4 new genuine Cat master bolts.Make sure your grouser pad is spotless too.
I like abit of anti sieze on the bolt shanks too for good measure.Torque them down as per the book in sequence.Some of the lads on here will advise better than me how any oil or anti seize will affect the torque settings.
I suspect,you’ve one last chance at getting things right here.
Hygein is your friend here.
Good luck and I’m glad your tractor is up and working.
 

dust eater

Well-Known Member
Joined
Sep 18, 2010
Messages
70
Location
illinios
I would consider no anti seize it can make for some obvious problems later but on a marginal master link we have had some good luck going that route, also that half turn after torque is very important
 

bcole4

Well-Known Member
Joined
May 6, 2020
Messages
122
Location
Hilo, HI
Thanks for all the input everyone.

I have a few questions,

1) there is debate on whether or not to use anti seize, any more info on this?

2) is threadlock an option to help hold or is that not even a consideration

3) what about welding the bolt heads to the pad? Just to help keep them from backing out?
 

Nige

Senior Member
Joined
Jun 22, 2011
Messages
29,348
Location
G..G..G..Granville.........!! Fetch your cloth.
1) there is debate on whether or not to use anti seize, any more info on this?
No debate as far as I'm concerned. The specification calls for it on the threads and under the bolt heads.
Many people also apply anti-seize to the shank of the bolt. Some would also touch up the surface of the master shoe around the bolt holes with a grinder so that there are no ragged edges for the bolt heads to get hung up on when tightening. (This is actually included as a step in the track connection procedure on newer machines)

I don't know if anyone mentioned it but using a blow gun to clean out all the dirt and then running a plug tap down the bolt holes in the master link is also essential IMO to ensure that the bolts tighten correctly.
 

dust eater

Well-Known Member
Joined
Sep 18, 2010
Messages
70
Location
illinios
Trust Nige, I've done it on some 977h's that sat more than ran and obviously are not developing the kind of torque your tractor is. If you get to the point that your buying a new link and pad try it before you do
 

bcole4

Well-Known Member
Joined
May 6, 2020
Messages
122
Location
Hilo, HI
Well guys better late than never I guess….

here’s an update on my track.

the bolt holes were too stripped when I tried to reassemble so I ended up tapping them to a 1” hole and used grade 8 bolts in there

The only welder I could get on site was my wire feed hooked up to a couple paralleled generators, I welded the clip very marginally at best, but it held for a while.

finished a few jobs with it and had it back at my place doing some ripping and clearing when I of course busted it again. 2 of the bolts came out and the other were only about 1/2 inch into the bottom of the alligator clip and they stripped that part out

so I’ve got everything lined back up and bolted together, going to weld it up proper tomorrow and hope I don’t keep doing this to myself…

just wanted to give an update and hope you guys are all doing well!
 

bcole4

Well-Known Member
Joined
May 6, 2020
Messages
122
Location
Hilo, HI
Hi everyone,

D8 has been running pretty good and earning her keep.

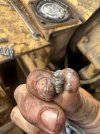
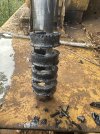
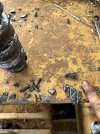
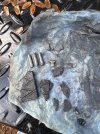
Had quite a bit of water accumulate in the trans oil so I changed it. When I changed the filter I checked the magnet and found some debris… pictures attached. Looks like 2 rollers from a bearing and possibly a few clutch chunks, and a brass rivet?

I saved the filters so I can cut them open.

I’m wondering it it’s possible that these are old pieces from when my previous transmission was going out that were stuck somewhere in the system and just worked there way to the magnet or if this has to be from the new one?

Also my left steering clutch has recently started working much less. I have to pull and hold it to get engagement when going forward, but in reverse it works just fine, thoughts?
 

Nige

Senior Member
Joined
Jun 22, 2011
Messages
29,348
Location
G..G..G..Granville.........!! Fetch your cloth.
Clean the screen & magnets thoroughly.
Clean & re-photo all the material above. It is hard to identify some of it because of the covering of oil.
Then keep it all for reference (there are what appears to be a couple of lumps of friction material in that lot).
Then run the tractor for a month, pull the screen again and see what's in it.

It's worth remembering at this point that you stuck the replacement transmission straight into the tractor with no attempt to set the pinion contact or backlash.
 

Nige

Senior Member
Joined
Jun 22, 2011
Messages
29,348
Location
G..G..G..Granville.........!! Fetch your cloth.
That bronze-coloured piece looks like a rivet. From a steering brake band friction lining maybe.? I'm not 100% sure if it could migrate from that compartment into the transmission.?
Provided all the grey bits are non-magnetic I would say they are clutch facing material.
IMO the three rollers are from a planetary gear needle bearing.
 

bcole4

Well-Known Member
Joined
May 6, 2020
Messages
122
Location
Hilo, HI
And I cut open one of the filters, there’s some very small flakes of shiny metal but not much12A9015F-93B3-4DEF-8004-053D76BD95C5.jpeg04AC7A15-45E5-42C6-A11E-FDEDA9C06119.jpeg
 

bcole4

Well-Known Member
Joined
May 6, 2020
Messages
122
Location
Hilo, HI
That bronze-coloured piece looks like a rivet. From a steering brake band friction lining maybe.? I'm not 100% sure if it could migrate from that compartment into the transmission.?
Provided all the grey bits are non-magnetic I would say they are clutch facing material.
IMO the three rollers are from a planetary gear needle bearing.
Ok so then this could be part of the reason why my left steering is minimal right now.

Is there a reason why the steering clutch/brake would work good in reverse but not forward?

I had the same thought on the bearing pieces based on what I found on the last transmission, is it possible that there are from the previous trans and were somewhere in the system but only now worked there way to the magnet?
 

bcole4

Well-Known Member
Joined
May 6, 2020
Messages
122
Location
Hilo, HI
That's a plus.
Did you clean out the magnetic screen/filter during the installation of the transmission that is in there now or is this the first time it's been cleaned in a while.?
I cleaned the magnet pretty good but I don’t believe I thoroughly cleaned the screen when I swapped the trans
 

tctractors

Senior Member
Joined
Oct 9, 2007
Messages
2,412
Location
Worc U.K.
Yep that is what they do due to the wrapping of the band in reverse, the bands when fitted from Exchange Parts are often deformed and should not be fitted but sent back faulty, the band needs to fit on the drum easy and be sprung open naturally so when closing around the drum they form a perfect shape, when released they should spring open from the drum.
 

bcole4

Well-Known Member
Joined
May 6, 2020
Messages
122
Location
Hilo, HI
Yep that is what they do due to the wrapping of the band in reverse, the bands when fitted from Exchange Parts are often deformed and should not be fitted but sent back faulty, the band needs to fit on the drum easy and be sprung open naturally so when closing around the drum they form a perfect shape, when released they should spring open from the drum.
Thanks for that info. So it would seem the band that’s in there has reached the end of its life most likely and needs to be replaced.

Is this a somewhat straightforward procedure or fairly advanced?
 

Check Break

Senior Member
Joined
Jan 21, 2012
Messages
469
Location
USA
Tilt the sweeps forward and the ROPS back. Pull the fuel tank and steering clutch covers. That will give you access to the brake bands. You should do both sides. If I was doing this, I'd pull the ROPS because there's always something else to work on and it helps to have the back plate out of the way. You might want to run her another 50 to 100 hours to see if you're gathering more material in your screens and filters. If you are, you'll be removing the T/C and transmission, and maybe the cross shaft outboard through the duocones. The brakes will become just another component along the way. If your transmission is coming apart, I'd get in there long before catestrophic failure. It will save you some time and money.
Thanks for that info. So it would seem the band that’s in there has reached the end of its life most likely and needs to be replaced.

Is this a somewhat straightforward procedure or fairly advanced?
 

Georgia Iron

Senior Member
Joined
May 6, 2012
Messages
873
Location
USA - Georgia
Occupation
Concrete building slab and grading contractor
Do you have a cab stop bracket like the one in this picture (below the left rear ROPS post) on your machine. You can tilt the ROPS or EROPS back and it will bottom out on this stop. Enables you to access the transmission and the brake covers. I don't remember doing a transmission without opening up the entire bevel gear compartment. Pull the fuel tank (clean it out while it's on the ground) and steering clutch covers. It's time to check the cross shaft, replace the brakes and probably pull the pinions and replace the duocone seals. A whole lot easier now when she's opened up. This also allows you to clean out the bevel gear compartment if there's more scrap iron (I like Tony's definition) in there.
I noticed you suggested the brakes the first go round.
 
Top