• Thank you for visiting HeavyEquipmentForums.com! Our objective is to provide industry professionals a place to gather to exchange questions, answers and ideas. We welcome you to register using the "Register" icon at the top of the page. We'd appreciate any help you can offer in spreading the word of our new site. The more members that join, the bigger resource for all to enjoy. Thank you!

1973 Case 350(g) bulldozer!!! New to me I love this machine

Fourtencustoms

Well-Known Member
Joined
May 2, 2019
Messages
136
Location
North Idaho
Update! Alternator not charging, no biggie new alt is $85 Checked all wires, voltage at various rmp, putting out 11V
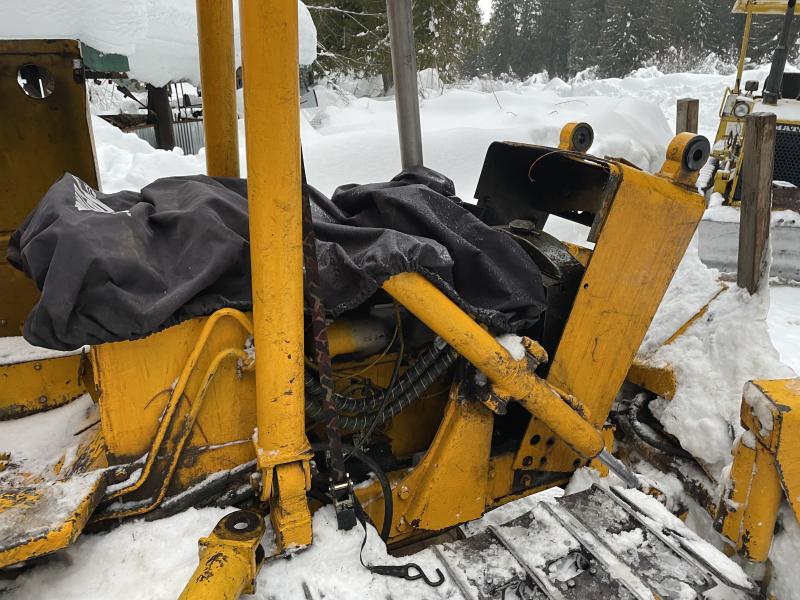
One of our rams has a good leak, hydro fluid streaming out from the O rings... planning to rebuild the cylinder myself.
Anyone know what O rings/packing/seals I need to order so I rebuild this monster?

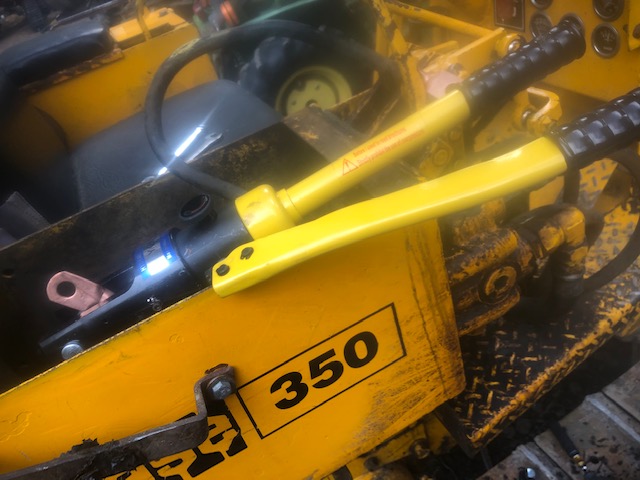
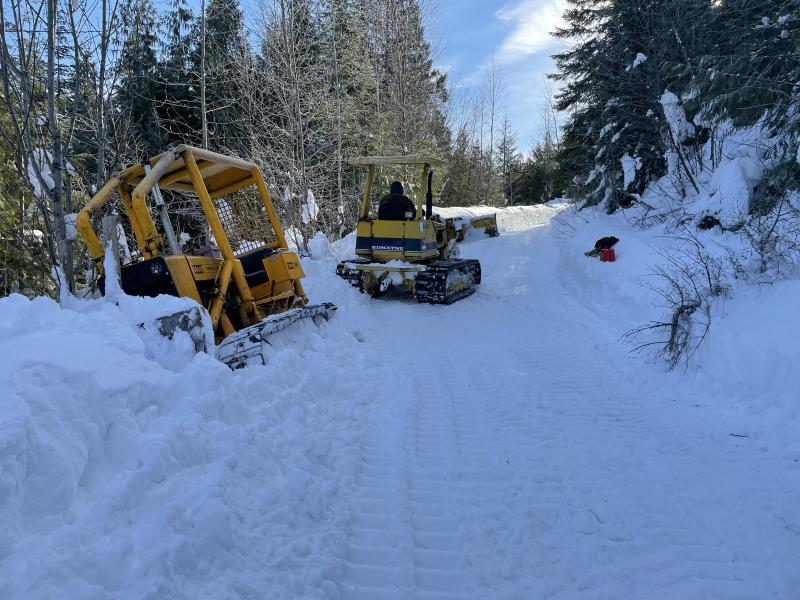
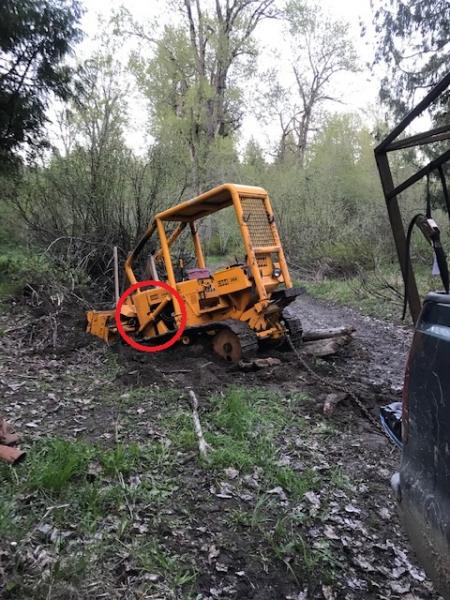
Its the big ram that raises and lowers the blade, this one:
171_121141_340000000.jpg


leaking from the dust seal area above the shaft....of course
 

alrman

Senior Member
Joined
Jun 20, 2009
Messages
3,308
Location
QLD Australia
Occupation
Diesel Fitter;Small Business Owner;Cleaner
There are different piston configurations inside the cylinder - one piece & 2 piece - so to order the correct seal kit you need the part number of the cylinder, usually found on the gland.
If you have a hydraulic seal supply company nearby, you could dismantle the cylinder to use the old seals as samples.
 

Fourtencustoms

Well-Known Member
Joined
May 2, 2019
Messages
136
Location
North Idaho
I went to the place in town yesterday and they told me exactly what you said. If it has been rebuilt before it can be very hard to get the right parts the first time, so measurements are key OR bring in the old parts.
My plan is to disassemble it so we can go get the correct parts. I need a longer cheater bar........

I have been educating myself about rebuilding these rams...enough to know what the gland is even!
what did we ever do before the information age? Use books right? LOL thank goodness for Youtube

Thanks guys! I have a plan now......will keep you posted.
 

Fourtencustoms

Well-Known Member
Joined
May 2, 2019
Messages
136
Location
North Idaho
Winter came and went, snow is melting
I have removed one ram from the machine, the long one that lifts the blade, drivers side. Seals leaking like a fountain. I have one more ram to remove , one of the shorter ones that turns blade left to right, is also leaking like a sieve. I plan to take both rams in to have repacked............
Dozer did great in the snow, it really helped us keep our road passable.....
Looking forward to some upgrades and undercarriage work on the case this spring
 

Fourtencustoms

Well-Known Member
Joined
May 2, 2019
Messages
136
Location
North Idaho
Two rams sucessfully rebuilt at local machine shop. one of the long "lift" rams was bent and leaking. They were actually able to bend it back straight and repack it, working great now. The other short ram (side to side) for the 6 way blade was BENT pretty good = we pushed it too hard. This one they had to replace the ram itself, replace the packing and seals and weld on end pieces with new bearings. Just under $700 so far....
Now to turn my attention to the undercarriage, we have a few rollers that need attention and a couple of links in the track could be replaced. Otherwise the dozer is ready to go! She sure runs nice

I will get some pics as I put her back together......I wish I had more $$$ I would replace all the hydraulic hoses. She needs a new alternator and a couple of batteries.
Not bad for a 47 year old machine (born same year as me)
 

Fourtencustoms

Well-Known Member
Joined
May 2, 2019
Messages
136
Location
North Idaho
Allright we got the machine all put back together yesterday I am very pleased! She is leak free for the first time since I have owned it.
Topped off all fluids, tensioned the tracks, greased the chassis, clean the battery terminals and she is good to go! I plan to extend the exhaust a bit up past the cage, right now I get to breath alot of diesel.
I plan to change the engine oil again, and then change all of the filters. I see the fuel filter is a glass bowl canister style, oil filter and hydraulic filters, air filter, all easy enough to access. Anything Im missing?

Thanks fellas! Hoping to push some dirt around in 2020! We have much road maintenance to do this season
 

Fourtencustoms

Well-Known Member
Joined
May 2, 2019
Messages
136
Location
North Idaho
okay well almost leak free, still some seepage from one small ram, the one that tilts the blade....slight leak past the seals. Will keep an eye on it.

yesterday when installing a new battery and converting the battery cables to use lugs I noticed something that slipped past me before. The OEM sticker is still partially visible on the underside of the battery compartment lid
If you look closely you can see it still calls out the correct fluid types for this machine.

171_151126_300000000.jpg


the sticker
171_151126_420000000.jpg

171_151126_310000004.jpg


171_151126_300000001.jpg
 

Fourtencustoms

Well-Known Member
Joined
May 2, 2019
Messages
136
Location
North Idaho
Here we are 2022
Dozer is lifeblood in winter deep snow storms, it is the only machine that can keep our road open

however we did get her stuck in the soft stuff
Luckily neighbor has a small kohmatsu and was able to remove some snow abs eventually pull me back onto the road
Coolant leak developed
Top radiator mounts came loose, radiator
Moved around and I think a bolt went between fan and the tank
Now I have a large coolant leak
Limped her back home
Now working to pull the 48 year old radiator for repair
Pita to get at the bottom nuts! I have removed most of the front of the machine, she is sitting outside in the snow

Good time for oil change and air filter maintenance
Need to get her back on the road, after 4’ of snow plus we have now had two days of rain….. ouch

171_121050_540000000.jpg


171_121050_540000001.jpg

171_121050_550000002.jpg
 
Last edited:

Fourtencustoms

Well-Known Member
Joined
May 2, 2019
Messages
136
Location
North Idaho
Ha! See that’s where you gotta flip the script, this is fun! This is living!
Running around on atv’s and tracks with family and neighbors, trying to beat these challenges is what it is all about. Sitting at a desk designing elevators for 25+ years, well this is the kind of thing dreams are made of!

One word
Perseverance


with some help later today I should have the radiator tank free from the dozer and I can take it to town for repair/ rebuild. I wrenched my back pretty good digging snow last week so having some help to remove the heavy dozer bits will be nice!
Found the power wire to headlights melted. I needed those Lights last week, I was actually driving the dozer at night using my cell phone to see… she was my ride home after the utv threw a belt.
These suckers move pretty good in 2nd and 3rd gear

I plan to replace the halogens with some
Led pods this time around.

Anyone have any tips for getting at the bottom two radiator nuts? Do you remove the belly pan or? I have the service manual it just says to take the radiator out the front from behind the grill, I assume with the belly pan off they would be easy access.
I did not want to lay under her any longer then I needed in the snow

man and machine vs the forest
The forest fights back
 
Last edited:

maineplower

Well-Known Member
Joined
Mar 17, 2012
Messages
48
Location
maine
When I took mine out I took the skid plate off. The worst part of it was the 2 hydraulic cooler lines for the torque converter, I had to heat one of the fittings up to break it loose.
 

Fourtencustoms

Well-Known Member
Joined
May 2, 2019
Messages
136
Location
North Idaho
Removing that sucker was easier then I thought. I had tried to get the nose cone skid plate off the other day removing all the bolts and prying on it did not seem to budge
Well today with the “rad support” out of the way I was able to get a better pry on it and the nose piece came off of its mounting plates. After that easy access to the lower rad bolts and cooler lines. So the tank is out and ready to go in for repair! Good time To clean out a bunch of goo and forest debris from the underbelly
The whole radiator support and headlight piece was loose which is likely what led to the rad mounts coming loose. Good to have it all apart for repair and cleaning

hopefully the repair/rebuild can happen quickly at least before the next big snow

171_132125_070000000.jpg


Converter cooler lines came right off
Luckily for me, oil leaks likely kept fittings fresh
171_132125_080000001.jpg

171_132125_090000002.jpg


171_132125_110000003.jpg
 
Last edited:

Fourtencustoms

Well-Known Member
Joined
May 2, 2019
Messages
136
Location
North Idaho
Thanks fellas
Sure I could have put the dozer in the garage to work on it but man oh man that would be a lot of snow melt to deal with!! Temps have been in the 20-30 nice and warm for this time of year, in fact I find Idaho winters are pretty “warm” compared to 9000’ where I come from… no sideways wind!
The shop has floor drains, guess what?
They have never worked for me
In the spring maybe I can get the drains open so I can melt machines to work on , it is on the list of things to do hahahahahha
 

Fourtencustoms

Well-Known Member
Joined
May 2, 2019
Messages
136
Location
North Idaho
Okay radiator is getting a new core
Prices suck these days over $600 for a new core sheesh
Will be done early next week

In the meantime I am trying to buy new upper and lower hoses and a radiator cap
I can find the cap online, the lower hose is like 5” long and straight that I can source… I am having a hard time finding the upper hose??

171_151044_480000000.jpg


anyone have good source for these parts?

help! ;)
 
Last edited:

Lumberjack Matt

Well-Known Member
Joined
May 14, 2021
Messages
96
Location
Oregon
You can also get flexible radiator hoses that you can bend into any shape you want. Car part stores should have them, or you can find them easily online. Just match up the inner diameter.
 
Top