• Thank you for visiting HeavyEquipmentForums.com! Our objective is to provide industry professionals a place to gather to exchange questions, answers and ideas. We welcome you to register using the "Register" icon at the top of the page. We'd appreciate any help you can offer in spreading the word of our new site. The more members that join, the bigger resource for all to enjoy. Thank you!

1835c tandem pump

Joe Mahlik

Member
Joined
Sep 1, 2021
Messages
20
Location
Mazomanie WI
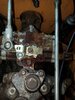
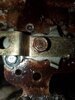
I have an 1835c with roughly 3000 hours that has been issue after issue since I purchased it about 5 months ago. This morning I noticed the RH side drive was very slow to respond. As the day carried on it got worse and worse to the point where I would have to push the right stick full forward about a second before the left stick to get it up to speed. I ended up having to limp the machine into the garage as the right side was hardly responding at all. I am admittedly very ignorant when it comes to tandem pumps and hydrostatic drives, but this seemed like a flow restriction to me. Low and be hold I dove into the service manual and it pointed me towards the orifice on top of the tandem pump as the first point of interest. I removed the plug on the rear tandem pump to access the metering orifice and found it to be loose in its bore. It is supposed to be threaded into the bore. I pulled it out to find the threads on the orifice body completely gone(see photo). I pulled the orifice on the front pump for reference and I could not start it into the bore of the rear pump. The internal threads are damaged. Unfortunately I can not see them because the bore is a bit deep and continues to fill up with fluid. Does anyone know if the internal threads are tapped or a heli coil? Orifice has an unusual thread pitch. My thread pitch gauge shows .9 by maybe 7 or 8 mm. Has anyone ever ran into this and repaired the threads successfully? Does anyone know the exact size and thread pitch of the orifice? I should be able to aquire a new orifice but It won't do much good if I can not thread it in. Does it make sense that this could be my drive issue? My theory is the orifice body final worked itself loose and was resting against the bottom of the plug above it, blocking flow. Any thoughts? Advice? Thanks.
 

Attachments

  • 20211016_173250.jpg
    20211016_173250.jpg
    1.6 MB · Views: 20

hookedondiesel

Senior Member
Joined
Jan 24, 2013
Messages
503
Location
Sault Ste Marie Ont. Case 1835C
I wish I could help Joe, but unfortunately, I just purchased one of these identical machines. Would it be possible to remove the pump? Possibly bring it to a hydraulic dealer or machine shop and have them have a look.
 

Joe Mahlik

Member
Joined
Sep 1, 2021
Messages
20
Location
Mazomanie WI
I have determined the threads for the orifice body are 5/16-27uns threads. I have ordered a new orifice and the correct bottoming tap to repair the threads in the bore. Hoping once I have a correctly installed orifice that will fix my issue. Should have everything by the end of the week. Hoping I can repair the threads and then quickly suck out the surrounding fluid in an attempt to get any metal slivers out of the pump for I start it. Will post results.
 

Tones

Senior Member
Joined
Mar 15, 2009
Messages
3,085
Location
Ubique
Occupation
Ex land clearing contractor, part-time retired
I'm not familiar with your machine so can only comment in general terms. There is no way I be doing any metal on a pump case that couldn't guarantee 100% removal of any debris that will enter the pump. Running a tap of the same as the existing hole won't work, all the meat required has gone. You need to find the next size up fitting then drill and tap the hole to that size . The metering orifice can then be fitted into that even if it's a little further any from the pump. Removal and disassembly of the pump is required unfortunately and if not done you have real risk of buggering the pump and hydraulic motor, kinda like stacking sh*t on sh*t.
 

Joe Mahlik

Member
Joined
Sep 1, 2021
Messages
20
Location
Mazomanie WI
Tones the existing threads are still there, just damaged. If I try and thread the undamaged orifice from the front pump in, it starts, and then stops, telling me I still have some meat to work with. If I tore down the pump to proceed as you recommended, I have no idea how I would source the same part, just a larger diameter orifice body.
 

Tones

Senior Member
Joined
Mar 15, 2009
Messages
3,085
Location
Ubique
Occupation
Ex land clearing contractor, part-time retired
Can you post some photos of the pump? I may be able to help further then.
My experience with hydraulics is that an quick easy fix isn't always the best and regret lasts a long time especially when it lightens your pocket. The best mistake to learn from is others mistakes.
 

Joe Mahlik

Member
Joined
Sep 1, 2021
Messages
20
Location
Mazomanie WI
Here are photos of the pump. I don't see a data tag or markings anywhere with S/N, revision number etc... but the parts break out gives a pump assy. p/n. The orifice that needs to be replaced is item 6. Original p/N N14000 which has been superceded by p/n H435773 which I have already ordered. I have not checked charge pressures or pulled relief valves or anything like that yet. I started with the orifices and ran into this right away. Thanks for the help!
 

Attachments

  • 20211018_162559.jpg
    20211018_162559.jpg
    1.9 MB · Views: 22
  • 20211018_162614.jpg
    20211018_162614.jpg
    1.9 MB · Views: 22
  • 20211018_162637.jpg
    20211018_162637.jpg
    1.7 MB · Views: 21
  • 20211018_163110.jpg
    20211018_163110.jpg
    1.9 MB · Views: 21

Tones

Senior Member
Joined
Mar 15, 2009
Messages
3,085
Location
Ubique
Occupation
Ex land clearing contractor, part-time retired
Thanks for the photos.
Where that orifice goes looks to me like it's on the top of the charge pump and getting any contamination in there isn't good. My earlier recommendation stands.
Pumps are not overly complicated so removing the rotating group and charge pump isn't the biggie as you may think. Like most things take note of how they come apart and don't rush. Work area hygiene is the most important factor as lubing with oil when assembling and filling the pump with oil after fitting but before cranking.
BTW that pump looks very much like a Sunstrand now Danfoss transmission pump
 

Joe Mahlik

Member
Joined
Sep 1, 2021
Messages
20
Location
Mazomanie WI
Tones thank you for the advice. I am in total agreement with you on the risk of attempting this repair while pump is installed. I will probably end up removing the pump, atleast then I will be able to have a look at the other components. If I run into other damaged/worn parts, do you know of a good vendor to order specific internals for the pump? Finding just the orifice wasn't the easiest thing.
 

Tones

Senior Member
Joined
Mar 15, 2009
Messages
3,085
Location
Ubique
Occupation
Ex land clearing contractor, part-time retired
Joe I'm in Australia so don't know anyone in your area that I can recommend. Going off the photos you posted here a good hydraulic shop should be able to identify the pump or checkout the various pump manufacturers like Danfoss, Rexroth Eaton etc. Dealer locations are available there also.
If you have any doubts about what you will be looking at post here first. There's good folk here with plenty more knowledge than I have.
 
Last edited:

Joe Mahlik

Member
Joined
Sep 1, 2021
Messages
20
Location
Mazomanie WI
Ok... so I thought long and hard about how to proceed with my issue. Against your advice Tones and maybe my own best judgment I decided to proceed with the repair as originally planned. Prior to making the repair I placed a rag over the servo inlet port and bumped the starter. A LOT of debris came out in including pieces of metal, grit, and flakes of what appears to be a coating of some sort. I repeated this 3 or 4 times until clean fluid came out. I then gently ran a bottoming tap through threads to clean them up, didn't take much. Then I cleaned the port out with q tips and bumped the starter to flush some more fluid out. Installed new orifice and put everything back together. The machine works as it shouId. I have full response on the right side. Judging by the amount of debris that I got out of the servo inlet, I'm assuming the inside of the whole assembly is pretty contaminated and I won't be surprised if further issues arise in the future. Winter is almost here and I need the machine to plow, so I'm going to call it good for now and hope to make it through the season issue free.
 

Tones

Senior Member
Joined
Mar 15, 2009
Messages
3,085
Location
Ubique
Occupation
Ex land clearing contractor, part-time retired
Glad it works for you but having that much debris in there I doubt it will last the winter. Something is self destructing.
BTW I'm not a gloom merchant, just had my fair share of short cuts bite me. :)
 

Midnightmoon

Senior Member
Joined
Nov 9, 2013
Messages
445
Location
Ny
Well on a pump I wouldnt use the grease method I would remove pump and disassemble. But if you were to take the risk use grease. I didn't want to imply it was a proper fix and have the pump get metal in it
 
Top