• Thank you for visiting HeavyEquipmentForums.com! Our objective is to provide industry professionals a place to gather to exchange questions, answers and ideas. We welcome you to register using the "Register" icon at the top of the page. We'd appreciate any help you can offer in spreading the word of our new site. The more members that join, the bigger resource for all to enjoy. Thank you!

EX120 -> Torn Bucket Repair (Pics)

Egetebee

Well-Known Member
Joined
Jul 2, 2019
Messages
110
Location
New England
Hello Everyone,
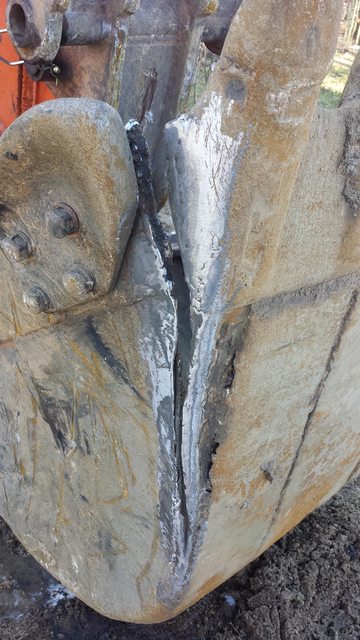
I've torn the bucket on our EX120. It was previously welded along this same edge with a small strapping and held for quite some time but finally gave up.
I can reweld it but am not sure how to reinforce the area.
OjtXitQl.jpg


hRwpFiSl.jpg

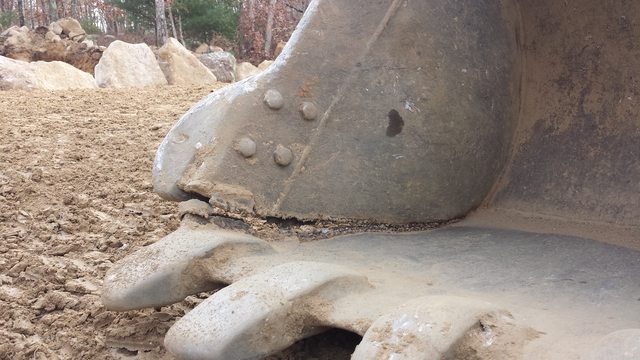
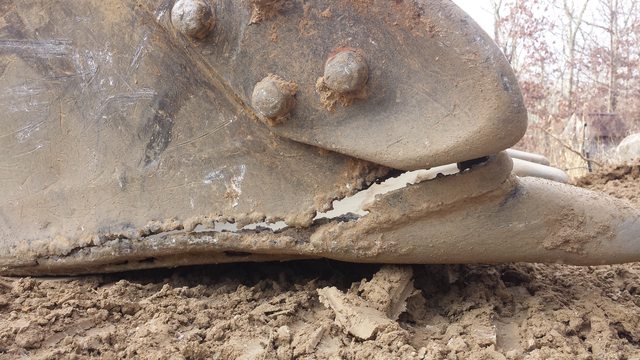
Based on the posted pictures, does anyone have advice for repair?

Thank you,
E
 

ianjoub

Senior Member
Joined
Jun 22, 2018
Messages
1,468
Location
Homosassa, FL USA
Looks like whoever did the last weld didn't get the penetration needed for best strength. If it lasted a while, then just grind down, V out as mentioned, and weld with a few more amps.
 

Egetebee

Well-Known Member
Joined
Jul 2, 2019
Messages
110
Location
New England
Looks like whoever did the last weld didn't get the penetration needed for best strength. If it lasted a while, then just grind down, V out as mentioned, and weld with a few more amps.

Using a Lincoln AC225 Tombstone Buzz Box (Old, but runs great).
1/8" 7018 stick and running @ 160amps. Sound about right?

I do have a Harbor Freight 170 (250/50A) Mig but don't feel that would dig in as deep as the stick...

As DMiller suggested, I most likely should incorporate strapping in as well.
Maybe pieces of flat stock 12"x5"x1/4" which would run up the sides and along the bottom edge for 6" or so.
Thank you Ianjoub & DMiller
 
Last edited:

Egetebee

Well-Known Member
Joined
Jul 2, 2019
Messages
110
Location
New England
A suggestion to avoid the possibility of defects in the weld at an open end where cracks are likely to start, tack runout tabs on the edge of the structure and run the weld out beyond the part. Grind the tabs off afterwards.
View attachment 206337

So extending the weld Past the edge and then grinding back is the means for strengthening the edge against cracks. Got it, makes good sense & Thank you.

E
 
Last edited:

Nige

Senior Member
Joined
Jun 22, 2011
Messages
29,346
Location
G..G..G..Granville.........!! Fetch your cloth.
The fact is that the arc/filler metal pool is at its most unstable at the point where the arc is being struck and at the point where the electrode is being pulled away from the workpiece. Any defects in these zones could cause stress risers that will encourage a crack to start. So the solution is start and terminate the weld on runout tabs that will be cut off afterwards thus removing the potential high-risk areas of the weld.

Another suggestion is to stress relieve the weld using a needle peening gun at the end of every pass. Not only does it beat the bejasus out of the weld to reduce residual stresses as it cools but it cleans the slag off at the same time.
 

DMiller

Senior Member
Joined
Feb 21, 2010
Messages
16,571
Location
Hermann, Missouri
Occupation
Cheap "old" Geezer
Have used both
Proper prep and good technique with either will give a long life result
 

LCA078

Senior Member
Joined
Sep 29, 2019
Messages
292
Location
Austin, TX
Pre-heating the area with a rosebud really helps with penetration. It’s a trick when you don’t have a big enough welder. Doesn’t need to be cherry red but even getting it up to where you feel good heat radiating off of it helps in my experience. Test this on a piece of scrap- you’ll be surprised. Might even help with stress relief as the weld cools slower over a larger area instead of a fast thin line.

Best advice has already been given: vee it out, grind it clean, and do 3-4 passes. First pass fills the bottom of the vee and holds it steady. Next passes are heavy basket weaving back and forth across the first fill. Build it up- the weld material is usually stronger than the baee material but you need penetration to get the strong bond between filler and the base.
 

Tugger2

Senior Member
Joined
Mar 22, 2018
Messages
1,379
Location
British Columbia
I would leave the bucket on to start that repair if i was doing it. You will need the the machine to push the crack shut to start with.Once you have a couple of passes in you could take the bucket off and position it to for flat welding if you like. Take the side bit off to,so you can bevel the whole crack properly . As recomended above bevel it out well ,good preheat ,7018 and run stringer beads instead of big weaves .
160 amps sounds hot for 1/8 but buzz boxes do vary on output . A rule of thumb to start with is decimal equivilant of rod size = heat setting . 1/8 is .125" = 125 amps ,then adjust a bit to suit material thickness and welding position .Keep the mig/hard wire away from repairs like this. Flux cored wire with co 2 is good to use if you have a big enough machine to push it.
 

Egetebee

Well-Known Member
Joined
Jul 2, 2019
Messages
110
Location
New England
Thank you all for the continued input & support.
The weld that held for a while was done cold (outdoors) with 7018AC. It did hold long enough to actually get the majority of the really hard landscaping done on this project (BIG Rocks and lots of them). Now that it's done, for the most part, I'm going to do a much better repair.

As you've instructed, I've begun cleaning the area much better than before and have V'd the length of the tear in preparation for a better weld. There's more prep to do but it's a better start than before.
Today, I'm removing the bucket (not done before) and getting it into a garage area to both warm it and do the extended site prep.
Going to have to get the side cutter off which looks like a job for a torch or plasma cutter.
Turn-buckles & chains to close the gap.

Going with the root and fillet passes which will be extended past edges, peened & ground back as you've instructed. After which there will be support plates welded along the side edge connecting the bottom edge and provide extra strength.

If I can get another couple of years out of this bucket, will be keeping an eye out for its replacement.
bSBGHxyl.jpg
 

Egetebee

Well-Known Member
Joined
Jul 2, 2019
Messages
110
Location
New England
I would leave the bucket on to start that repair if i was doing it. You will need the the machine to push the crack shut to start with.Once you have a couple of passes in you could take the bucket off and position it to for flat welding if you like. Take the side bit off to,so you can bevel the whole crack properly . As recomended above bevel it out well ,good preheat ,7018 and run stringer beads instead of big weaves .
160 amps sounds hot for 1/8 but buzz boxes do vary on output . A rule of thumb to start with is decimal equivilant of rod size = heat setting . 1/8 is .125" = 125 amps ,then adjust a bit to suit material thickness and welding position .Keep the mig/hard wire away from repairs like this. Flux cored wire with co 2 is good to use if you have a big enough machine to push it.

This is great advice.
I've reached out to the person helping me today about closing the gap with either turn-buckles or leaving it on and pressing it closed as you've instructed. Will see what he says too, otherwise, I'll tack it up before taking it off the machine.

I used a Lincoln 225AC Buzz Box with 1/8" 7018AC rod for the previous repair (in the cold).

Thanks for keeping up with this,
E
 
Top