• Thank you for visiting HeavyEquipmentForums.com! Our objective is to provide industry professionals a place to gather to exchange questions, answers and ideas. We welcome you to register using the "Register" icon at the top of the page. We'd appreciate any help you can offer in spreading the word of our new site. The more members that join, the bigger resource for all to enjoy. Thank you!

Loose Quick Attach

climb.on

Well-Known Member
Joined
Jan 28, 2017
Messages
47
Location
St. Paul, MN
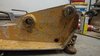
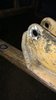
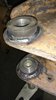
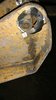
My quick attach is loose with all my attachments, but I can't figure out what is worn out. I'd say there is 1/2" to 3/4" (depending on the attachment) of play between the pin and the rectangular hole in the attachment, when engaged. With all the slop I am mangling the pins and the rectangular holes in the attachment. I couldn't even open the quick attach the other night until I did a bunch of filing on the pin (in the dark - fun) because the pins wouldn't retract due to all the dimples and peaning on the pins. The Case replacement parts are spendy and I don't want to just start blindly throwing parts at the problem.

Should the tapered part, or the round part, of the pin engage the back of the rectangular hole in the attachment? I could weld a plate on each attachment to make the rectangular hole smaller, or weld a shim on the top of the machine's quick attach mount, so the pins engage deeper into the rectangular hole. Any idea where the problem is here?
 

GaryHoff

Senior Member
Joined
Feb 25, 2009
Messages
810
Location
Alberta, Canada
Occupation
Heavey Equipment Mechanic
Hard to accurately determine the issue over the internet, but here is a few things I have seen:
1. The top edge of the quick attach is bent out, (on the attachment side). Pretty common on lower grade attachments.
2. The attachment is not a proper fit for your quick attach. Slight differences between who manufactured the attachment.

With the pins fully engaged, the taper part of the pin should fit in the hole. The tapers are to help keep the attachment tight to the quick attach, the lever springs help with this.
Connect the bucket to the machine, and don't engage the lock pins. Check how much gap is between the bucket and the bottom of the quick attach. Should be minimal amount of gap. Shim or build up as needed. The rectangular hole should also have a slight taper too it, to match the lock pins.
 

climb.on

Well-Known Member
Joined
Jan 28, 2017
Messages
47
Location
St. Paul, MN
Great. Now that I know how they are supposed to engage, I can go about shimming and adjusting them so they actually do. My pins won't engage with those holes no matter how long they are. If they were 12" long they would just slide through the hole and still have slop in them. Thanks!
 

seville009

Well-Known Member
Joined
Apr 5, 2008
Messages
220
Location
CNY
Are the top and bottom pins of the quick attach greased good? If not, need to keep them greased good - world of difference. I was having problems with mine until I realized that. No clue why I didn't think about greasing them to begin with. Hopefully that will fix your issue.
 

climb.on

Well-Known Member
Joined
Jan 28, 2017
Messages
47
Location
St. Paul, MN
They became hard to operate, and grease took care of that, but the clearance issues remain. Here are some pictures that show what I am talking about. I think it's a combination of the attachments points being wallowed out a bit and the tapered pins being worn.

IMG_5435.jpg IMG_5436.jpg IMG_5437.jpg IMG_5438.jpg
 

wosama931b

Senior Member
Joined
Sep 24, 2011
Messages
444
Location
Fayetteville, NC
Occupation
Real Estate Broker/ Ret.
You can see the wear , a good welder is what you need .
Also check out the springs and pins , good luck .
 

climb.on

Well-Known Member
Joined
Jan 28, 2017
Messages
47
Location
St. Paul, MN
They are in the locked position in these pictures, so they should be compressed, I believe. The springs probably are worn out too though. Not sure that makes much difference to all the slop in the system though.
 

62oliver

Well-Known Member
Joined
Nov 25, 2016
Messages
104
Location
NWO
I would weld a strip on top of the plate where you got your finger sitting to tighten it up. Is that a home made attach plate? Some are made with generous dimensions.
 

Georgia Iron

Senior Member
Joined
May 6, 2012
Messages
873
Location
USA - Georgia
Occupation
Concrete building slab and grading contractor
Yep a good welder is correct. I would flip the bucket over and weld a piece bar across the bottom of the slot, put it in tight maybe an 1/8" closer than you would think you need to the pin will lock in and it will have some extra to hold as it wears out. My case attachments do not have slots that are that deep. So it needs to be modified to fit correctly.
 

climb.on

Well-Known Member
Joined
Jan 28, 2017
Messages
47
Location
St. Paul, MN
Well I finally got around to welding that plate on. I was surprised just how much slop needed to be taken up. It was a pretty easy fix.
IMG_6778.JPG IMG_6779.JPG
 
Last edited:

climb.on

Well-Known Member
Joined
Jan 28, 2017
Messages
47
Location
St. Paul, MN
Now I'm chasing the next loose connection... The lower pivot pin on the quick attach is pretty sloppy too, but after inspection I'm not sure new bushings and a new pin will fix this one. I pulled a pin and measured everything. The bushings on the boom are ~1.385", the pin is 1.235, but the hole in the quick attach, that has no bushing is a bit wallowed and it measured 1.35". I'm not sure what the specs are supposed to be, but even if I replace the pin and bushing, it seems like there will still be a bunch of play between the new pin and the holes on each side of the quick attach. Any ideas how to take up the play at that location?

Are these pins normally greasable? Mine is cross drilled with a zerk in the end. I wonder if the PO added that.
IMG_6782.JPG IMG_6783.JPG IMG_6769.JPG
 

DIYDAVE

Senior Member
Joined
Feb 18, 2007
Messages
2,416
Location
MD
You could have it line bored, and put a bigger pin in, or take an adjustable reamer, and ream out all the holes, and do the same thing. Hand reaming is hard work, and both sets of holes, left and right should be done, to ensure that the old pin don't wear the new one. If you line bore, you can get bushings, and use a new OEM pin...
 

climb.on

Well-Known Member
Joined
Jan 28, 2017
Messages
47
Location
St. Paul, MN
Line boring looks expensive. Looks like it's the best fix, but maybe not when you the cost is factored in...
 

62oliver

Well-Known Member
Joined
Nov 25, 2016
Messages
104
Location
NWO
Yes, it is not cheap but it will be like new. On the other hand, if this machine is just for home use, grease it lots and it will last you for ages. (Grease it lots either way haha)
 

jacobd

Well-Known Member
Joined
Apr 2, 2017
Messages
147
Location
North carolina
I went through the same thing with my 430. Ultimately I ended up hacking out and welding in new pin bosses where they attach to the ear. Unfortunately this won't work for you because yours is all one cast piece that you can't "take apart."
My advice is to find someone with a milling machine, or possibly a large lathe, that can bore the holes oversize and press in a bushing. I was going to go this route with mine but I abandoned it once I figured out the dimensions of my pin bosses were exactly the same as a standard size of DOM tubing. Line boring is overkill imo because all the bores don't need to be lined up together, just the pairs on each end so the pins will slide in.
 

Attachments

  • pinbossreplacement.jpg
    pinbossreplacement.jpg
    2.9 MB · Views: 35
  • pinbossreplacement (3).jpg
    pinbossreplacement (3).jpg
    2.5 MB · Views: 34
  • pinbossreplacement (2).jpg
    pinbossreplacement (2).jpg
    2.4 MB · Views: 35
  • pinbossreplacement (4).jpg
    pinbossreplacement (4).jpg
    2.5 MB · Views: 32

DIYDAVE

Senior Member
Joined
Feb 18, 2007
Messages
2,416
Location
MD
Jacobd, the expense of line boring is the main drawback, I agree. That's why I suggested using an adjustable reamer, I've done it, but it sure takes a lot of time, and is a real PITA, if there are any obstructions, near the hole, that keep you from turning the tap handle all the way around! Here is a picture of an adjustable reamer:

https://www.google.com/search?q=adj...AhVtTd8KHdufBtQQ9QEILzAC#imgrc=J1qRuwCWCmm9HM:

Some have varying length guide bushings, that make the job easier. You will need a bigger pin, though...;)
 

climb.on

Well-Known Member
Joined
Jan 28, 2017
Messages
47
Location
St. Paul, MN
I used an adjustable reamer on a bronze bushing to remove a couple thousands once...this wouldn't be much more than that right? LOL. I think it would take forever to ream enough to accept a bushing. Im sure it can be done, but I'll live with it before I go through that. You think a mag drill would work? Mainly the issue I think would be if I have enough depth to bore through both holes? I could finish with a hand reamer if necessary.
 
Top