• Thank you for visiting HeavyEquipmentForums.com! Our objective is to provide industry professionals a place to gather to exchange questions, answers and ideas. We welcome you to register using the "Register" icon at the top of the page. We'd appreciate any help you can offer in spreading the word of our new site. The more members that join, the bigger resource for all to enjoy. Thank you!

Leaking Final Drive

sdavies2000

Well-Known Member
Joined
Oct 22, 2022
Messages
76
Location
canada
If the pin doesn’t have to come out before taking the nut off, should I just leave it in there? Should be no reason to remove it from the nut then. Just reinstall the nut with the pin in it when I’m putting things back together?
 

Diesel Dave

Senior Member
Joined
Sep 29, 2022
Messages
1,058
Location
Ontario Canada
Yes ,use the edge of a hole. Don’t get carried away, with 2 good slaps it should be evident if the nut is going to spin off freely or not. The only reason this generally works is some bearing preload has been lost due to normal bearing wear and takes some load off of the nut.
If it doesn’t move at all then at this point you will have to build the socket.
As has been said before by other contributors , if the nut starts to bind or lock up STOP !
I believe it was 92U 3406 who previously posted an effective way to cut the nut.
 

Diesel Dave

Senior Member
Joined
Sep 29, 2022
Messages
1,058
Location
Ontario Canada
You can drill a close line of small holes, say 1/8" or 3/16", through the nut from the spindle outwards to the edge. Repeat 180 degrees across on the other side of the nut, then smack the areas you drilled with a sharp chisel and it should crack it in half. Just take care not to drill into the material under the nut. You'll also fill the main bearings with metal so replacement is advised.
 

sdavies2000

Well-Known Member
Joined
Oct 22, 2022
Messages
76
Location
canada
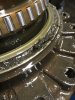
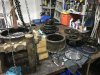
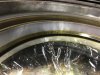
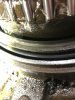
Well the nut came pretty easily With the punch.although it never came to a point where it just spun off. As soon as it came off, the spindle and motor dropped 2” and hit the bench with a thud. Scared the poop outta me. If anyone decides to do this like me, don’t make this mistake. Make sure you block it up before removing the nut! I was so preoccupied with the nut, I totally forgot to support the underside. She would have spun off easily had this been done.
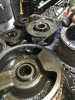
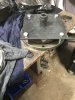
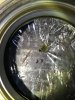
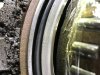
Can someone explain to me the function and purpose of each seal type? You have the big o rings as well as the metal to metal surfaces.
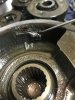
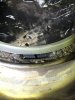
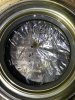
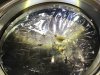
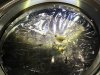
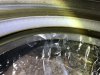
How do I remove the seal that’s around the spindle without getting dirt and crap down in there?am I exposing the hydraulic side once that comes out?? There was also a “paste” I’m picking at in one of the pictures, not sure what that is.
 

Attachments

  • 505EA0C8-000A-489B-96FD-5F957BFB70FD.jpeg
    505EA0C8-000A-489B-96FD-5F957BFB70FD.jpeg
    1.5 MB · Views: 37
  • E4878D80-0D7F-4985-A5D5-A88A8266A5F8.jpeg
    E4878D80-0D7F-4985-A5D5-A88A8266A5F8.jpeg
    1.5 MB · Views: 35
  • AE93B8A8-961B-45D8-827A-501EDA6F6254.jpeg
    AE93B8A8-961B-45D8-827A-501EDA6F6254.jpeg
    1.7 MB · Views: 40
  • 51F1EB66-51CF-4F19-A00F-F5182F4EFE78.jpeg
    51F1EB66-51CF-4F19-A00F-F5182F4EFE78.jpeg
    1.5 MB · Views: 38

sdavies2000

Well-Known Member
Joined
Oct 22, 2022
Messages
76
Location
canada
More pictures. The last one shows the seal I’m not sure how to get out without dirt getting down in there.
Also started making up the tool to reinstall nut. Just bolts with the threaded section cut off
One of the o rings was split as well.
If anyone wants pictures of anything else, let me know
 

Attachments

  • 7C53C79B-B7C3-44AD-AC26-895534D0162F.jpeg
    7C53C79B-B7C3-44AD-AC26-895534D0162F.jpeg
    3.1 MB · Views: 36
  • F27C3515-3CD5-458F-9EA0-66D9156735E3.jpeg
    F27C3515-3CD5-458F-9EA0-66D9156735E3.jpeg
    1.4 MB · Views: 36
  • 4D429503-7B9E-4788-8B92-07562E5A3BAC.jpeg
    4D429503-7B9E-4788-8B92-07562E5A3BAC.jpeg
    1.8 MB · Views: 38
  • BD444D6D-B1FF-45DD-BE6F-75F5011DD131.jpeg
    BD444D6D-B1FF-45DD-BE6F-75F5011DD131.jpeg
    1.8 MB · Views: 36

Nige

Senior Member
Joined
Jun 22, 2011
Messages
29,280
Location
G..G..G..Granville.........!! Fetch your cloth.

92U 3406

Senior Member
Joined
Jan 3, 2017
Messages
3,146
Location
Western Canuckistan
Occupation
Wrench Bender
Website is being glitchy AF right now so I can't zoom in on any pics.

That metal paste is just accumulated wear particles. If the gears and other hard parts are still in reusable condition then just clean it up and don't worry about it.

No need to worry about dirt getting into the hydraulics, the motor is a sealed unit. Just pop the duo cone assemblies out and clean up all the crud. May need to get into the groove the toric sits in with a wire brush on a die grinder to get any rust and debris off the surfaces.
 

92U 3406

Senior Member
Joined
Jan 3, 2017
Messages
3,146
Location
Western Canuckistan
Occupation
Wrench Bender
If the proper install tool for the duo cone seal is not available to you, a length of synflex air line between the toric ring and the flange of the metal face seal will help keep the toric ring from rolling up on you.

It can be a bit of a chore to get them installed without the proper tool but it is doable. Just take your time.
 

92U 3406

Senior Member
Joined
Jan 3, 2017
Messages
3,146
Location
Western Canuckistan
Occupation
Wrench Bender
The root cause of your leak is right there. That isn't an O-Ring, it's what is known as a Toric Ring and it provides the "spring force" to keep the two metal face seal rings in contact with one another. Lose the spring force, no contact, seal leaks..........
The faces of the metal rings are worn out as well BTW.

View attachment 278619
Also looks like there's a crack in the one metal ring in the first batch of photos.
 

sdavies2000

Well-Known Member
Joined
Oct 22, 2022
Messages
76
Location
canada
I hadn’t made a decision on the main bearings themselves yet, but they don’t seem bad? Pictures of the races attached.

Great eye! I hadn’t noticed that crack yet. There’s actually two cracks in that ring. No crack in the sprocket side which had the bad toric ring.

Nige, thanks for the explanation.that makes perfect sense, such a simple but clever design. Thanks for posting the link to willies instructional too, that’s an amazing resource to someone that’s never done it before.
That video helps a lot too.
 

Attachments

  • EAF001D3-9AF1-494C-8E46-C237B2534525.jpeg
    EAF001D3-9AF1-494C-8E46-C237B2534525.jpeg
    2.1 MB · Views: 27
  • 3704DED2-2FA8-43C6-9A34-E205D443003D.jpeg
    3704DED2-2FA8-43C6-9A34-E205D443003D.jpeg
    1.9 MB · Views: 24
  • 80FCA4C6-70B9-4D28-966F-6BA2B9A92BF8.jpeg
    80FCA4C6-70B9-4D28-966F-6BA2B9A92BF8.jpeg
    1.8 MB · Views: 26
  • 216D97D4-DFFF-403B-9227-F607D15EB3B5.jpeg
    216D97D4-DFFF-403B-9227-F607D15EB3B5.jpeg
    1.7 MB · Views: 24

sdavies2000

Well-Known Member
Joined
Oct 22, 2022
Messages
76
Location
canada
More
 

Attachments

  • C7ECB831-154D-4390-BE3B-904D21F6C3DC.jpeg
    C7ECB831-154D-4390-BE3B-904D21F6C3DC.jpeg
    2.5 MB · Views: 22
  • F7962693-4120-4E09-AF36-C5EC39134E77.jpeg
    F7962693-4120-4E09-AF36-C5EC39134E77.jpeg
    2.7 MB · Views: 22
  • B82C892F-744F-4D80-A82F-8B70CF9E3207.jpeg
    B82C892F-744F-4D80-A82F-8B70CF9E3207.jpeg
    2 MB · Views: 20
  • EF7BA269-A9A6-4BA1-8BD8-DE12816C3E8C.jpeg
    EF7BA269-A9A6-4BA1-8BD8-DE12816C3E8C.jpeg
    1.5 MB · Views: 21

Nige

Senior Member
Joined
Jun 22, 2011
Messages
29,280
Location
G..G..G..Granville.........!! Fetch your cloth.
Nige, thanks for the explanation.that makes perfect sense, such a simple but clever design. Thanks for posting the link to willies instructional too, that’s an amazing resource to someone that’s never done it before.
Sometimes it's hard for people without experience to get their heads around the fact that the Toric Rings are fixed in position on the ramps and actually grip the ramps and "roll" to a certain extent as they are being installed. See this thread, in particular Post #8, for more info on how those seals work and why: -
1. Everything has to be cleaned with alcohol before installation and the same alcohol is the only permitted "lubricant" to use during installation.
2. The surfaces of the ramps on both the metal ring and on the housing MUST be rough otherwise the Toric Ring will not grip on them as designed when the seal is being installed.

https://www.heavyequipmentforums.com/threads/941-bottom-rollers-rebuilds.74258/
 

Nige

Senior Member
Joined
Jun 22, 2011
Messages
29,280
Location
G..G..G..Granville.........!! Fetch your cloth.
Bearing races look questionable to me based on the pictures. Being this far into it I'd replace them.
I'd say they are more than questionable. Check out the marks of the rollers on the bearing cups. Those surfaces should be bright like a mirror, not dull. If you had a new bearing in your hand at this moment you'd see the difference straight away.
New bearings (cups & cones) needed.
 
Top