• Thank you for visiting HeavyEquipmentForums.com! Our objective is to provide industry professionals a place to gather to exchange questions, answers and ideas. We welcome you to register using the "Register" icon at the top of the page. We'd appreciate any help you can offer in spreading the word of our new site. The more members that join, the bigger resource for all to enjoy. Thank you!

Something Broke in the Final Drive !!

chambie

Active Member
Joined
Mar 13, 2010
Messages
26
Location
Rome PA
Hello..
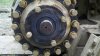
I have an 87 Komatsu D37-P2. I was doing some dozing the other day, and the right track bound up. I put it in reverse and it was free. Went about 6 ft and it bound up again. Put it in forward and it was free. Went 6 ft and it bound up again. Thought maybe i had a rock wedged in it. Got off .. looked , nothing found. Reversed it again and it was free. Figured i better get closer to the house.. Forward again, but noticed not much steering. ( not that it was great before ) Touched the left pedal and the right final drive started making noise. Sounded like it was skipping on the splines or something. Drove it 20 yds. and parked it, and noticed oil running out on the ground. Upon closer inspection, i found a hole in the final drive housing near where i assume the bearing sets on the pinion shaft, with a piece on metal poking out of it... that isn't supposed to be there ! Looking for opinions and thoughts from you guys. I'm looking at doing the work myself. I have never worked on a dozer before other than changing some rollers and fluids. I only have the basic hand tools. Do i need anything special to get it apart ? And is there a good place to get parts from ? I'm sure i can't afford OEM parts from a dealer... Any help and insight would be appreciated.

Thanks,
Lindsay
 

D3DaveC

Well-Known Member
Joined
Sep 12, 2010
Messages
178
Location
Lake country
I had the same problem on a D3C Cat. It was the pinion gear. I didn't force anything so didn't damage anything else. Did the work myself with aftermarket pinion and saved huge money.
 

Scrub Puller

Senior Member
Joined
Mar 29, 2009
Messages
3,481
Location
Gladstone Queensland Australia
Yair . . . chambie. Doesn't sound good mate. Hope you can get it sorted.

Chambies misfortune is a classic case of what I always used to tell my operators . . . if you hear of feel something strange stop, inspect, feel for hot-spots, smell for burning paint, check filters or strainers for metal, evan take out drain plugs and check for metal.

Most unusual sounds or feels aren't going to go away and stopping in time on the spot . . . don't try and get the bugger back to the shed . . . can save thousands of dollars.

By the time a component has busted a housing it becomes a major fix.

Cheers.
 

Nige

Senior Member
Joined
Jun 22, 2011
Messages
29,310
Location
G..G..G..Granville.........!! Fetch your cloth.
IMO it's going to take a bit more than basic hand tools to get that final drive apart for inspection. I'm no expert on Komatsu by any means but usually the sprocket wheel on that style of tractor takes a hydraulic puller to get it off. There may be used parts kicking around for that model, so high-priced OEM is not your only option.

Based on the hole in the case and what's most likely a piece of gear tooth sticking out of it this could add up to some big $$$$.
 

chambie

Active Member
Joined
Mar 13, 2010
Messages
26
Location
Rome PA
Thanks for the info. I was hoping the hole in the case could be welded instead of replacing it. The piece sticking out is sorta round.. I have no idea what it is. It doesnt look like a ball bearing,more like a roller or something. I can't say im looking forward to tearing it apart, just because of my lack of knowing what i'm getting into. But i'll never know whats up till i do !
 

nutwood

Well-Known Member
Joined
Apr 28, 2012
Messages
134
Location
Tasmania
If it's any help, I had to do a final drive/steering clutch repair on a Fiat AD7 as my first ever dozer repair. Prior to my purchase, the machine had had new steering clutches professionally installed. Unfortunately they omitted to bend over the lock tabs on the pinion nuts. Nut came off, flange flogged about on pinion shaft, chewed out the key way, let copious quantities of oil into the clutches and eventually ground to a halt.
This was my first experience of dozer repair and despite the pessimists, I did the job single handed where it stopped. Main hassles were that everything is big and heavy. I purchased a 1" socket drive and individual sockets for the sizes required. If I was doing it now, I'd purchase a set, they've come down in price thanks to China. Some of the torques required were quite high, 700 ft/lb is more than you usually encounter but a 140lb mechanic swinging on a 5' pipe gets the result. Breaking the tracks required oxy equipment, which I had, a 14lb sledge hammer, and a lot of time. I also had to custom make some special tools. Pullers, C spanners and a spring compression tool for the clutches. I had a FEL to lift the heavy stuff which was a big help.
It sounds like a lot of drama but it wasn't really, just took time. The costs involved weren't overly high. The pinion shaft and flange were save-able. Plenty of meat, just needed re-machining. Bearings, seals etc were standard dimensions. Only expensive stuff was the special seals on the track drive sprocket and the clutch plates. Most stuff on dozers is good, thick, heavy metal and can usually be welded and/or machined
That was eight years ago and I've just done the job again to renew the clutch plates. All was in good order except that the tapered shaft connections weren't tight, despite the 700 ft/lbs. Apparently the trick is to get someone to swing on the bar and then lay into the back of the socket with a sledge hammer to seat the tapers in. I've done that this time and it was surprising how much further the nuts did up. Over half a turn on a 1.5mm pitch thread. That's a lot on a tapered shaft!
 

chambie

Active Member
Joined
Mar 13, 2010
Messages
26
Location
Rome PA
Thanks for the great info Nutwood. That was info i was hoping to hear from someone. My biggest concern is breaking the tracks. My chain is worn, so finding the master may be tricky. no oxy here but have access to it. Thanks again for the great info !! I appreciate it
 

nutwood

Well-Known Member
Joined
Apr 28, 2012
Messages
134
Location
Tasmania
No problem chambie. It's all down to what you feel up to. Interestingly, the couple of operators I spoke to before tackling my task, those who told me to abandon any thought of fixing it myself, have both now replaced steering clutches on their own machines and done the jobs themselves. They come and borrow the tools I used to do my job. Gains me a carton of beer every time and any amount of satisfaction!!
One quick afterthought, before you do anything to disable your machine, make sure you lift the blade up and place it down on something slippery. I use a length of H beam. That way you can put a jack under the tracks to rotate them back and forward to access things. If the blade's in the dirt you'll find it difficult. Don't underestimate the effect of a bit of oil on the spot where the blade slides either. When you're swinging on a jack, inching it forward, it makes a big difference!
Breaking tracks is no big deal. It's hard work but it's doable. Heat and big hammers break most things!
 

Jeembawb

Well-Known Member
Joined
Apr 1, 2012
Messages
173
Location
Muckay, Australia
Hey chambie

Metal doesn't always need to be welded to be repaired (this is from someone that can pretty much weld anything (humble much?)) - but a true life story - my dad did a job for a mate (who wanted a cheap magic fix) who had driven his mitsubishi truck into some floodwaters and popped a conrod out the side of the block - luckily the "missing piece" was still there lodged against the engine mount or something - so after the conrod / piston / liner got replaced - he cleaned up the broken piece from oil etc and used "JB Weld" (the stuff is magic) to "glue" it back in - That was early 2008 & has been in use since then - my dad bought that truck off the other bloke 3 months ago & is parked up on my farm waiting for a purpose again (in fact my neighbour borrowed it today to tip some loads of granite around his place).
JB Weld might fix that hole in your casing if you have the other piece or similar - worth a crack mate.
 

chambie

Active Member
Joined
Mar 13, 2010
Messages
26
Location
Rome PA
Yes .. JB Weld is good stuff !!! I've started tearing the dozer apart. Have the the tracks off, sprocket off, and the big ass nut on the shaft off. I'm guessing now is when i need a puller.The hub looks like it's maybe pressed on the shaft. Is that correct ? And if so, what kind of puller might i need ? Would Auto Zone or someone like that have something i could rent to get it off ? Or do i need a special puller ?

Thanks in advance !!
Lindsay
 

nutwood

Well-Known Member
Joined
Apr 28, 2012
Messages
134
Location
Tasmania
Progress being made! Any chance of an image or two?
Sometimes a stock puller will do the job but apart from obvious stuff like bearings, I've usually ended up making pullers to suit the problem. Do you have a manual? They often have pictures of the correct tool.
 

chambie

Active Member
Joined
Mar 13, 2010
Messages
26
Location
Rome PA
I have a manual with the parts breakdowns is all . Not a repair manual. I'll get a pic today and get it up here. Thanks !! What would you make your own pullers out of ?
 

nutwood

Well-Known Member
Joined
Apr 28, 2012
Messages
134
Location
Tasmania
I have a manual with the parts breakdowns is all . Not a repair manual. I'll get a pic today and get it up here. Thanks !! What would you make your own pullers out of ?

Steel:D
Seriously though, it depends what the challenge is. If you're trying to pull something where you can hook legs behind it, or clamp a grab in behind, you're probably better off with a conventional puller set.
I never seem to have those sorts of problems come my way so I've developed a range of techniques over the years. I used to make one, break it, then make it stronger etc, etc until I got the job done. These days, I've got better at assessing the problem (or sick of doing the job twice!) so they usually work first time.:thumbsup
A basic pulling task comprises a centre shaft and some sort of round thing on it. Generally the manufacturer will have made some provision for dismantling and there'll be some means of getting hold of the object you wish to pull off, usually two or three threaded attachment holes. Sometimes it's possible to screw through those holes on to the surface behind (suitably protected with a bit of scrap) and push it off without a puller at all.
The alternative is you need to pull it off. My basic puller these days comprises a piece of steel plate, ranging from 1/2" through to 1 1/2", depending on application, a threaded hole in the centre and non threaded holes to correspond with the attachment holes. I favour a coarse thread with a bit of slop in it for the centre bolt. Means you can tap it with a hammer to break things free. With a fine thread you might get a bit more power from the thread but they're too tight and the tapping doesn't work. The coarse thread still exerts a good force and then a tap with a 4 lb hammer exerts a lot more. Mostly I tap to 7/8" UNC, simply because that's my biggest tap.
However you do it, be kind to those attachment holes. Strip them and you're in trouble. I've seen the results where someone put a piece of flat bar over the centre shaft and tried to use the attachment holes to pull against.:eek: Not a pretty sight!
 

Scrub Puller

Senior Member
Joined
Mar 29, 2009
Messages
3,481
Location
Gladstone Queensland Australia
Yair . . . all good advise there from nutwood I reckon. Next step up for pulling sprockets on tapered splines and the like is to use an ordinary ten to fifty ton hydraulic jack. Most will work on their side provided the puller is assembled with the pump on the bottom.

As nutwood mentioned most sprockets/flanges that need pulling will be provided with three attachment holes. I use appropriately sized high tensile threaded rod through these and a circle of (say) inch plate drilled with three generous clearance holes at the same pitch circle as the holes in the sprocket.

The threaded rods are assembled to the sprocket (ensuring there is at least a full nut behind the sprocket) the plate is slipped onto the rods and the nuts run down to position it to the dimension of the closed jack.

Provided the pump is down the jack can go in either way. If you have the jack base against the end of the shaft always use a piece of plate to spread the load across the base of the jack.

With the jack in place give it a couple of pumps to take up the slack. Now adjust the nuts on the puller plate to get all the rods the same length.
This will take a bit of messing around but you need to get them close and then check the jack for centred and that every thing is square.

Most assemblys of this type have the sprocket or the flange retained by a large fine thread nut and it is assumed that it is removed? If so dismantle the jack again and run it on to within about an eigth of an inch of the sprocket or flange. It is absolutely vital that this is done.

This type of pulling with the forces involved is inherintly dangerous and if you havn't done it before you should proceed with caution. The set up as described is fine but substitute a piece of mild steel threaded rod and potentialy there's a problem, jack off centre maybe a problem.

The biggest mistake you can make though is leaving off that retaining nut. I have seen it several times and what usualy happens is that every one gets a hell of a fright and that fine retaining thread gets badly damaged . . . in the worst case I saw a bloke badly hurt when the whole assembly popped of the end of the shaft.

Back to the pulling. Put a bit of pressure on and step back and check that every thing is square. If it's all okay keep on pumping till close to maxing on the jack. If it doesn't come "ring the bell" as we used to say by giving the sprocket or whatever a good whack with a fourteen pound hammer . . . they usualy pop with a helluva bang.

Best of luck . . . and be carefull.

Cheers
 

chambie

Active Member
Joined
Mar 13, 2010
Messages
26
Location
Rome PA
https://www.heavyequipmentforums.com/attachment.php?attachmentid=91448&d=1338587411

I got it off !!! I ended up using a 3 arm puller that i borrowed from a friends garage. It just fit !! he laughed when i told him what i was up to, and said he had 2 pullers that were in the garage when he took it over, that he had never used. Said they were laying under a bench for the last 30 years !! I stuck it on the hub.. cranked it up tight, and then "rang the bell " !! That mother came off right now i tell ya !! Glad i wasn't standing in front of it !! So .. i'm down to pulling the bolts that hold it to the frame and sliding it off. Naturally the bolts won't budge with just a socket and ratchet... or breaker bar. haven't put a piece of pipe on it yet... i think i'll try and get an impact from work and see if that works for me ! So close .. yet so far !! Thanks for all your advice !! It's perfect !!

Lindsay
 

Attachments

  • Dozer Hub 2.jpg
    Dozer Hub 2.jpg
    47.4 KB · Views: 356
Last edited:

nutwood

Well-Known Member
Joined
Apr 28, 2012
Messages
134
Location
Tasmania
Well done.:) How come it never works that way for me:(
One of my most useful tools for working on machinery is a 5' length of 1 1/2" steam pipe. Don't know where I'd be without it!
 
Top