Welder Dave
Senior Member
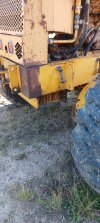
I picked up the ripper from RB today and it's bigger than I thought. Has 1" plate in the main frame. I thought it might be too narrow by a 1/4" but pounded a 4x4 in-between the uprights and it moved out wide enough. Much better than a bunch of grinding.
Looking at a similar ripper there was a tag that said a 1/2" gap is typical between the mounting lugs on the grader and the mounting lugs on the ripper. The mounts on the back are close to this but the mounts on the side have about a 5" gap. I wouldn't think it would matter too much since the bolts take the stress and I could just use longer bolts. Will a wider gap and longer bolts put more stress on the bolts? The mounting plates are 3/4" and I think the bolts are 1 1/4" grade 8. The grader frame comes to where the rubber latches are. Of course I have to grind those off. If they were back 3/8" I could leave them on. No big deal.
The grader frame has some 2" square lugs on the sides that go around the frame. My first thought is they are to help hold the frame from falling down when installing the grader. Could there be another reason for them? I could weld tabs for them to sit on if necessary but maybe it doesn't matter?
The mounting holes appear to be a tight 1 3/8" so I'm thinking the bolts should be 1 1/4". I don't think they make 1 5/16" bolts? If I used 1 3/8" bolts I'd need to take a die grinder to the holes.
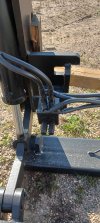
I think the block the hoses go to is a lock valve to hold the ripper in position. Is there anything to be aware of when hooking up the hoses?
Lastly I have an extra valve on the steering pedestal but I think the lines go to the front of the grader. The control valve doesn't move though so I'm not sure if the cable is seized or there's another reason for the lever to be stuck/seized. If I can free it up would it be better to use it for the ripper or get some more new solenoids and use a valve that was for a snow wing?
Looking at a similar ripper there was a tag that said a 1/2" gap is typical between the mounting lugs on the grader and the mounting lugs on the ripper. The mounts on the back are close to this but the mounts on the side have about a 5" gap. I wouldn't think it would matter too much since the bolts take the stress and I could just use longer bolts. Will a wider gap and longer bolts put more stress on the bolts? The mounting plates are 3/4" and I think the bolts are 1 1/4" grade 8. The grader frame comes to where the rubber latches are. Of course I have to grind those off. If they were back 3/8" I could leave them on. No big deal.
The grader frame has some 2" square lugs on the sides that go around the frame. My first thought is they are to help hold the frame from falling down when installing the grader. Could there be another reason for them? I could weld tabs for them to sit on if necessary but maybe it doesn't matter?
The mounting holes appear to be a tight 1 3/8" so I'm thinking the bolts should be 1 1/4". I don't think they make 1 5/16" bolts? If I used 1 3/8" bolts I'd need to take a die grinder to the holes.
I think the block the hoses go to is a lock valve to hold the ripper in position. Is there anything to be aware of when hooking up the hoses?
Lastly I have an extra valve on the steering pedestal but I think the lines go to the front of the grader. The control valve doesn't move though so I'm not sure if the cable is seized or there's another reason for the lever to be stuck/seized. If I can free it up would it be better to use it for the ripper or get some more new solenoids and use a valve that was for a snow wing?