• Thank you for visiting HeavyEquipmentForums.com! Our objective is to provide industry professionals a place to gather to exchange questions, answers and ideas. We welcome you to register using the "Register" icon at the top of the page. We'd appreciate any help you can offer in spreading the word of our new site. The more members that join, the bigger resource for all to enjoy. Thank you!

New to me 955K

FW190D9

Well-Known Member
Joined
Apr 1, 2017
Messages
61
Location
Texas
Thanks Tinkerer! Next project is a 1/4 scale TA 152 with a 3 cylinder inline 4 stroke. Wingspan will be 144" . Going to compete at Top Gun in Florida with that one.
E.
 

Attachments

  • JG-301-Stabsschwarm-Ta-152-lg.jpeg
    JG-301-Stabsschwarm-Ta-152-lg.jpeg
    75.4 KB · Views: 35
  • IMG_2947.JPG
    IMG_2947.JPG
    1.9 MB · Views: 39
Last edited:

Tarhe Driver

Well-Known Member
Joined
Nov 16, 2015
Messages
248
Location
Savannah, GA
Occupation
Comm. Real Est Appraiser-Retired cargo/helo pilot
I am still impressed with the old CH64 and CH47 Sikorsky's. Not nearly as impressive as the Mil series of heavy lifters but still impressive.

The CH-47 Chinook is built by Boeing, not Sikorsky. After over 50 years, it still an army staple, albeit after many upgrades and newer models. The CH-54A and CH54B (Flying Crane/Tarhe) are Sikorskys, and are no longer in the Army system. I have a bit of time in the Crane, much less in the Chinook. Lift abilities in all are somewhat balanced against the fuel on board, as max gross weight means exactly that.
The MI-26 is a hoss of a helicopter.

Neill
 

Tarhe Driver

Well-Known Member
Joined
Nov 16, 2015
Messages
248
Location
Savannah, GA
Occupation
Comm. Real Est Appraiser-Retired cargo/helo pilot
My mistake, Been away from av equipment way too long!!
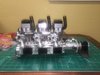
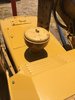
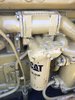
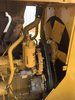
No, no, no, DMiller. I apologize to you if in any way my earlier post sounded if I were trying to correct you. I appreciate your bringing up cargo helicopters, for I, a pencil-pushing lurker who so greatly enjoy your and others' posts, so seldom have a chance to contribute to this wonderful forum, that hss been made so by you and others.

Neill
 

FW190D9

Well-Known Member
Joined
Apr 1, 2017
Messages
61
Location
Texas
Now that the rad is done, I can get after those other pesky problems that need attention. The fan was in rough shape after striking who knows how many objects in its life. All 6 blades were curled up at the edges and starting to crack. I heated up each individual blade, pounded it flat and got all the ripples out and straightened each blade before lightly trimming the edges. I took a length measurement of the worst blade and made all the others match. Hopefully it wont be too far out of balance.
 

Attachments

  • IMG_4278.JPG
    IMG_4278.JPG
    1.4 MB · Views: 36
  • IMG_4279.JPG
    IMG_4279.JPG
    1.1 MB · Views: 34
  • IMG_4280.JPG
    IMG_4280.JPG
    835 KB · Views: 33

FW190D9

Well-Known Member
Joined
Apr 1, 2017
Messages
61
Location
Texas
The hood was in rough shape as well. Several big cracks and the hinges on both access doors were bent all to hell. Gave these areas a little attention as well. hammered all the bumps out of the radiator and oil fill door and put new stainless hinges on both.

E.
 

Attachments

  • IMG_4282.JPG
    IMG_4282.JPG
    1 MB · Views: 39
  • IMG_4283.JPG
    IMG_4283.JPG
    928.7 KB · Views: 38
  • IMG_4284.JPG
    IMG_4284.JPG
    929.3 KB · Views: 37
  • IMG_4287.JPG
    IMG_4287.JPG
    874.1 KB · Views: 37

DMiller

Senior Member
Joined
Feb 21, 2010
Messages
16,571
Location
Hermann, Missouri
Occupation
Cheap "old" Geezer
Have similar issues on Fat Allis, the old machine has seen some rough days where the fan hit the screen shrouding. I have used motorcycle wheel balancing equipment to check fan balance to get it within reason, can use hub and all but have to remove the support shaft to set it up. Then all you need is a shaft or cones that will fit snug to the hub bearings, two jack stands and patience.
 
  • Like
Reactions: DB2

FW190D9

Well-Known Member
Joined
Apr 1, 2017
Messages
61
Location
Texas
Thanks DMiller. I balance my model props the same way. Sand a bit off the heavy blade till it stays put in any position in 360 deg. The other thing Ive got going is that my water pump is gear driven separately from the fan. If its out of balance it will kill the bearings on the fan support but wont affect the water pump.

E.
 

DMiller

Senior Member
Joined
Feb 21, 2010
Messages
16,571
Location
Hermann, Missouri
Occupation
Cheap "old" Geezer
On the Whopty Choppers! We are in the fly zone for the ANG here, they follow close to the river from STL to FLW and the Jeff City NG port. Usually see 2-6 Blackhawks in a week but today two Chinooks flew by. They stay around a thousand feet above high points but not much more keeping commercial traffic zones clear.
 

FW190D9

Well-Known Member
Joined
Apr 1, 2017
Messages
61
Location
Texas
Finally got the nose bolted up. Took it all the way down to the ranch only to find it didnt fit! The new K core is 1" longer than the L core that was installed. Turned out the bottom radiator tank would hit the loader frame. I brought it back to the shop and made 1" spacers for where the upper core mounts are and got 4 longer bolts. This moved the radiator up 1" in the frame. Now I know why the upper hood inspection door has a relief for the radiator cap! Anyhow, Bolted it up and filled with water and coolant. No leaks! Started it and ran it for a while to confirm thermostat operation. Everything working as it should. Even the hood got some love with a complete strip and re-paint. Really tempted to take it out and kill some mesquite trees but might have to address a leaky cylinder first.
Pics
Evan Q.
 

Attachments

  • IMG_4315.JPG
    IMG_4315.JPG
    1.3 MB · Views: 53
  • IMG_4318.JPG
    IMG_4318.JPG
    594.8 KB · Views: 52
  • IMG_4319.JPG
    IMG_4319.JPG
    778.6 KB · Views: 51

FW190D9

Well-Known Member
Joined
Apr 1, 2017
Messages
61
Location
Texas
Big thanks to Kshansen for providing all the part numbers for the oil filter base thing. Got it all installed and it works great! Easy oil changes from now on.

E.
 

Attachments

  • IMG_4316.JPG
    IMG_4316.JPG
    978.8 KB · Views: 52
  • IMG_4317.JPG
    IMG_4317.JPG
    997.1 KB · Views: 51

sealark37

Well-Known Member
Joined
Jun 3, 2012
Messages
120
Location
Davidson, NC
Occupation
Retired pilot, old equipment mechanic
I was soo impressed. I was following a thread started by a FW190 OWNER, and then a former Tarhe driver chimes in. It is plain that I hang around the right places. I am still impressed, even though the FW is 1/4 scale. It is still very nice. I did not realize that there were any Tarhe drivers still among us. Keep us in the loop as you work on your 955. Regards, Clark
 

FW190D9

Well-Known Member
Joined
Apr 1, 2017
Messages
61
Location
Texas
Thanks Clark! Will do. I think the next project Ill tackle after the cylinder repack will be the exhaust system. Several of the manifold to head gaskets are blown out and most of the parts are heavily pitted. Ive already started getting parts together for it. Gonna be interesting for sure!
E.
 

Attachments

  • IMG_4320.JPG
    IMG_4320.JPG
    977.7 KB · Views: 43

DMiller

Senior Member
Joined
Feb 21, 2010
Messages
16,571
Location
Hermann, Missouri
Occupation
Cheap "old" Geezer
Cat used to sell a epoxy/metal filler compound that will machine like steel. Used in small quantity we used to refill the movement erosion wear on 3208 injector pump to engine block surfaces. If still available could use to fill head to manifold pitted erosion. Check with the parts guys.
 

FW190D9

Well-Known Member
Joined
Apr 1, 2017
Messages
61
Location
Texas
Thanks DMiller. Ill pick some up if I need it. I already have a new manifold and elbow. Still need the coupler between the elbow and turbo.
E.
 

kshansen

Senior Member
Joined
Mar 11, 2012
Messages
11,162
Location
Central New York, USA
Occupation
Retired Mechanic in Stone Quarry
Not to wish bad luck on you but those exhaust studs like to snap when removing nuts! I would heat those nuts till red before trying to turn them. Then after they do break I have had good luck holding a nut against the head and welding it to the broken stud let it cool a bit then try turning. If it starts to turn then stops soak with penetrate or as Nige always suggested while it is still hot melt some candle wax into it.

Another trick with a broken stud is to hold a washer, in this case a 3/8 inch, next to the head and weld to the stud and washer then use a little bigger nut and weld that to the stud and washer. Sometimes it takes a few tries but most times they will come out.

Only once did we have to get Cat out with a special drill guide and cobalt drill bit on a 3408. That one had run for over a year with the manifold leaking, some bosses can be like that!
 
Top