2stickbill
Senior Member
I'd take a bet thats what everyone was thinking...lol..course had to be me that threw in the pic...:naughty
Yea but you know the old saying?
It's a tough job but sone body has to do it.


I'd take a bet thats what everyone was thinking...lol..course had to be me that threw in the pic...:naughty
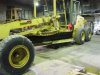
At times you can see the Possum on the Grader under a shade tree asleep.Some call it an operator.
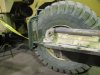
A frog???
You grader people sure are, um...different, G4m. :yup
Ok...so where's the 'possum on a grader? :lmao
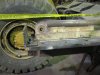
I've stopped mid-day and reversed my edges so I wouldn't end up with that problem. I'll swap 8" edges 6-8 times in their life.
I agree that would be the best way to do it, but if the center is worn down quite a bit more than the ends, and you reversed the blades the center would catch before the ends. Make it harder to grade a road until they evened up. But...if reversed when wear in the center is noticed then it would work great.
When my blades start to wear in the center I put them on the grindstone to even them up. Grindstone = pavement...lol
pavement works great until you start a ditch fire on a hot sunny day. been there done that.:Banghead
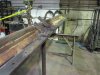
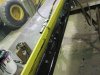
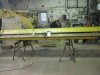
ointheadbuddy barry's other grader which is a rental machine came back with the frog woren off the moldboard. a quick call to jade in edmonton and the new frogs arrived. so on monday i'll be welding them on the moldboard. any tips on this???? also the grader is a 1996 740a champion.
thansk
KoO
Published Author