• Thank you for visiting HeavyEquipmentForums.com! Our objective is to provide industry professionals a place to gather to exchange questions, answers and ideas. We welcome you to register using the "Register" icon at the top of the page. We'd appreciate any help you can offer in spreading the word of our new site. The more members that join, the bigger resource for all to enjoy. Thank you!

How to separate glass from door frame (Takeuchi TB260)

crazydane

Well-Known Member
Joined
Jun 3, 2021
Messages
64
Location
Afton, Virginia
I've been slowly fixing up my recently purchased 2018 TB260 and one of the last things I'm trying to fix is the main door. I got a new lower hinge since the original one was "off" even after I straightened it out as best I could. However, the door still binds really tight when closing and I have come to the conclusion the door frame is not true.

So I want to remove the glass from the frame and see what I can do to fix up the frame. There are only 2 bolts holding the glass to the frame where the handle comes across the front of the door.

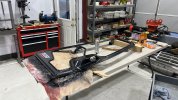
Here's a shot of the door with the 2 bolts removed:

IMG_6148.JPEG

Glass appears to be held tight to the frame with some sort of adhesive and does not pry away from the frame just using my hands. Is there a trick to separating the glass from the frame? Like maybe using a heat gun and slowly working my way around the perimeter while trying to pry the glass away from the frame?

Here's a shot showing how the frame is pretty far from true, this is with the gasket seal removed and the door closed:

IMG_6149.JPEG

So I'm really hoping its possible to remove the glass without breaking it so that I can work on the frame itself. I looked at just getting a new frame, but its insanely priced at around $2,700!

Thanks!
 

jbernielh

Well-Known Member
Joined
Nov 25, 2016
Messages
72
Location
victoria bc
prying is a guarantee'd way to break it
I'd suggest you take the door off and take it to a windshield place.. they can use a wire and cut the seal and get the glass off for you.. then you can straighten the frame and decide if you want to clean the surfaces and reseal/reinstall yourself or just have them do it..
 

crazydane

Well-Known Member
Joined
Jun 3, 2021
Messages
64
Location
Afton, Virginia
Thanks for the advice. As much as I like to DIY stuff, I agree that I'm better off having this particular job done by a pro. Good point about using a wire to cut the seal. While I could probably tackle that myself, I'd rather have someone with experience do it.
 

skyking1

Senior Member
Joined
Nov 3, 2020
Messages
7,741
Location
washington
you cut it with a blade. It takes time.
Seriously that door looks fine. Nice machine. I'd keep playing with it incrementally.
 

crazydane

Well-Known Member
Joined
Jun 3, 2021
Messages
64
Location
Afton, Virginia
Pulled the door this morning. I believe I found the main issue. Top hinge:

IMG_6155.JPEG

Bottom hinge (bent inwards towards the glass):

IMG_6156.JPEG

I was tempted to try this:

IMG_6157.JPEG

But decided not the risk it.

Front edge of door:

IMG_6158.JPEG

So two areas to straighten out, especially near the bottom. Rear edge looks a lot better with just a little work to be done near the top hinge.

Right now the door will close, but you have to push to very hard to latch and its under a lot of tension then, so I do want to get it corrected.

When I took delivery of the machine, they left the door open as they were afraid the window would have broken during transport otherwise.
 
Last edited:

skyking1

Senior Member
Joined
Nov 3, 2020
Messages
7,741
Location
washington
yes I would bend on the hinges as shown with a wrench. I would not pull the glass and strighten the door. Been there done that. Keep working the hinges and it will close OK.
 

crazydane

Well-Known Member
Joined
Jun 3, 2021
Messages
64
Location
Afton, Virginia
@skyking1 If I wasn't dealing with tempered glass I would have probably kept trying that but decided I didn't want to risk exploding the glass.

I took the door to a auto glass guy (one man shop) and he looked it over. He noticed the part of the frame where the hinges are, is actually twisted and the frame itself is putting a lot of pressure on the glass. He's going to attempt to carefully remove the glass pane using one of his custom made cold blades and hope it it doesn't shatter in the process. Given how the frame is constructed, he can't use one of his power tools to cut the urethane.

Assuming he's successful, I'll pick up the frame and work it to get it straight, then take it back for him to put the glass back in. $240 is the estimate he gave for everything.
 

skyking1

Senior Member
Joined
Nov 3, 2020
Messages
7,741
Location
washington
I destroyed the glass and bent the door on our 35, and have been all through that. We sliced the adhesive with long blades. It takes time. Then I really crudely straightened the door until it closes nicely, and we made new glass and installed it. It is helpful to know a glazier. :)
 

jbernielh

Well-Known Member
Joined
Nov 25, 2016
Messages
72
Location
victoria bc
I used my oscillating saw with a scraper type blade to remove the seal on my back window in my 304.. worked like a hot damn.. fortunately (or more to the point unfortunately) the window was already shattered so it was easy to work at.... the downside too is the way they flush mount the glass makes it awkward to get any tool under the glass to cut the seal.. 240 for everything is a pretty good deal in my opinion considering what that piece of glass would cost..
 
Last edited by a moderator:

crazydane

Well-Known Member
Joined
Jun 3, 2021
Messages
64
Location
Afton, Virginia
He's going to call me in the morning and let me know how it went.

But yeah, a new OEM piece is right around $300. I've been getting all my parts from equipmentshare as I found them to have the best prices.

oem_glass.jpg

I'm on a first name basis with my sales guy at this point, lol. Probably dropped close to 2 grand with him over the last few weeks getting this machine all back to like new condition.

Interior fully detailed at this point:

IMG_6051.JPEG

It started out looking like this:

IMG_5737.JPEG

Been spending most of my free time lately sanding and priming the dipper arm and links, those were rough looking as well before I started.

IMG_6163.JPEG

Also just got the bucket cylinder rod back from being re-chromed. It was leaking pretty bad and the seal was shot. Its nice and leak free now.

I know its not a rare vintage car, but I like to be thorough when I purchase a piece of equipment before I start using it.
 

jbernielh

Well-Known Member
Joined
Nov 25, 2016
Messages
72
Location
victoria bc
I'm smiling to myself because I did just what your doing from a cosmetic standpoint when I first got my 304.. it was 3 years old with 400 hrs and the interior was absolutely filthy.. mechanically it was in great shape... I put it in my shop and spent about a week.. stripped it out inside.. lots of super clean and hot water and when I was done it looked like it was in the show room... took a couple months of working in the bush, lots of dust and mud and before long you wouldn't have even known I'd touched it..

oh well... it felt good for a while
 

keif

Well-Known Member
Joined
Mar 8, 2020
Messages
117
Location
USA
I was amazed the dust in the hvac area of the 260 I bought used. The “air filters” are total crap. I’d like to replace them with car filters instead.
 

crazydane

Well-Known Member
Joined
Jun 3, 2021
Messages
64
Location
Afton, Virginia
You aren't joking those 2 filters are total crap and won't block anything!

@jbernielh I bet you're right the "newness" will wear off soon enough like I did on my other machines. Although I this might compel me to get those cleaned up after going trough all this. At least it will be parked inside from now on. It likely spent all 6 of its years outside on job sites or in the rental yard. Pretty sure it was a rental before, as I found this sticker still on it when I got it:

IMG_5738.JPEG

I also saw outlines of stickers on both sides of the boom.
 

crazydane

Well-Known Member
Joined
Jun 3, 2021
Messages
64
Location
Afton, Virginia
Guy at the glass shop called me and he was able to separate the glass pane without breaking it!

Heading over there to pick up the frame to see what I can do the straighten it out and get it to open and close smoothly and then take it back over for him to urethane the panel back on.
 

keif

Well-Known Member
Joined
Mar 8, 2020
Messages
117
Location
USA
If you still have the machine apart I’d add some sound deadening where ever you can. I love the 260 and think it’s better than any of the similar sized machines I’ve run, but it is loud inside the cab.
 

crazydane

Well-Known Member
Joined
Jun 3, 2021
Messages
64
Location
Afton, Virginia
I do have it back together, but I've gotten pretty good at taking it apart, so if the noise is objectionable, I won't hesitate to tear it down again. :)

Yeah, I spent a few months comparing Kubota, Yanmar and Takeuchi 5-6 ton machines and kept coming back to the TB260. Bucket break out and hydraulic flow was no comparison to the others.

I have had it for a couple of weeks now and have yet to "break ground" with it. Getting close though. Got the door frame as straight as I can get it and painted the perimeter where I cracked the paint getting it true.

IMG_6179.JPEG

I'll drop it back off at the glass guy tomorrow when I go pick up my hydraulic coupler for this thing.

Finally completed painting the boom and stick today:

IMG_6177.JPEG

That poor little John Deere 260B looks like a toy compared to the TB260 (funny how they have the model numbers). Guy is coming to pick it up this weekend. Hope I won't regret selling it. I don't think I have any project on the horizon that will require something small like the 260B on my sub compact tractor. I got shovels in case I do end up needing to dig in a confined space. :D

IMG_6178.JPEG

Hope to install the AIM coupler over the weekend. Getting very close!
 

Attachments

  • IMG_6179.JPEG
    IMG_6179.JPEG
    366.5 KB · Views: 4
Last edited:
Top