• Thank you for visiting HeavyEquipmentForums.com! Our objective is to provide industry professionals a place to gather to exchange questions, answers and ideas. We welcome you to register using the "Register" icon at the top of the page. We'd appreciate any help you can offer in spreading the word of our new site. The more members that join, the bigger resource for all to enjoy. Thank you!

Help wanted with track tension spring Cat d4d

brucew

Well-Known Member
Joined
Dec 11, 2013
Messages
62
Location
Mundubbera Qld. australia
Opps......I see my post was a little late. Already compressed!
Yes it is already to go I just have to put the old cylinder back in and with new seals at the idler end and it should be ready, the only problem I have at moment is I have managed to break one of the bolts on the stopper and I would say the other bolt will probably break too when I go put any decent pressure on it.I have it all soaking in mixture of diesel and Onerex think that is how you spell it supposed be penetrating lubricant etc but nothing seems to be loosening up as of yet.
 

DMiller

Senior Member
Joined
Feb 21, 2010
Messages
16,557
Location
Hermann, Missouri
Occupation
Cheap "old" Geezer
Ought to invest in a little scrap salvage for the tin shields to cover those back up keep the dirt and build up out of them for longevity.
 

brucew

Well-Known Member
Joined
Dec 11, 2013
Messages
62
Location
Mundubbera Qld. australia
Thank you for your reply but yes I do have most of the shields that goes on it just had to take them off as couple of them had to be welded up where it had rusted out too.I think that actually contributed a bit to the problem in that we did the final drive on this side where I have had all the problems and there was virtually no rust in then and we have only done a couple of hundred hours if that since then but one job we did do was clean the silt out of a small dam we had on our property and we ended up with silt all through the tracks as you do and obviously we should have washed it down which I always try to do but because the shields were in place and after a few hours work most of mud had shaken off it was just one of those jobs that didn't get done.Here is some pics of the shields now all ready just about to go back onDSC00280.JPG DSC00280.JPG
 

DMiller

Senior Member
Joined
Feb 21, 2010
Messages
16,557
Location
Hermann, Missouri
Occupation
Cheap "old" Geezer
Good choice
I have shields and track guide/stone guards for mine as well, just finding time to clean up and remove the broken bolting to reinstall
 

brucew

Well-Known Member
Joined
Dec 11, 2013
Messages
62
Location
Mundubbera Qld. australia
Thought it would be a good time to update you all on the progress with tension spring assembly at last it is all back in the dozer getting the bolts out of the stopper where it attaches to the frame turned out to be just a hound of a job didn't think I was ever going to get there, managed to break both bolts even though one had been soaking in penetrating fluid for a week, no amount of heating and welding bolts to them, nothing. In the end had to pretty much drill them right out until I could punch in one side then turn it out from there. Ran a tap down and put recon tension spring assembly back in new bolts etc and all good. Once again many thanks to you all who replied just never ceases to amaze me the number of people that are so helpful on this site. Here are a couple of picsIMG_0112.JPG IMG_0113.JPG 
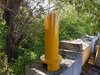
First pic is the new tension assembly in place the second is the other side with the guards all in place
 

Metalman 55

Senior Member
Joined
Feb 6, 2013
Messages
1,301
Location
Ontario
Looks good! We all breathe a sigh of relief when the recoil spring is back in place safe n sound for sure! When we removed the bolts on the retainer shoes on my machine, if I remember correctly the stubborn ones that didn't want to move we put some heat to, then let them cool completely & they came out ok. How did you compress your spring? We made up this home made spring assembly & it worked ok for us.
 

Attachments

  • Spring Compressor1.jpg
    Spring Compressor1.jpg
    7.5 MB · Views: 33

DMiller

Senior Member
Joined
Feb 21, 2010
Messages
16,557
Location
Hermann, Missouri
Occupation
Cheap "old" Geezer
Much better with guards back, protect the springs from loading up. Just need to remember to remove and clear the region every so often.
 

brucew

Well-Known Member
Joined
Dec 11, 2013
Messages
62
Location
Mundubbera Qld. australia
Didn't have to compress the spring metalman it was already done in the workshop in Toowoomba before not exactly sure how they did it it was obviously had been used but the thread appeared to have been newly threaded up in a lathe with a new nut on end of it. When I put it in there was about a 1/2 inch gap between the stoppers. Was scratching my head for a bit on how to loosen off the nut as my 3/4 drive socket just wasn't quite long enough. I had the right size socket just wasn't a deep socket. I know I could have picked one up in town but, for something I can just about be sure I will never need again, I decided to make up my own long socket out of scrap steel and it all worked had the spring hard up against the stoppers no trouble. It came on a half pallet, I think they called it, rods welded on to small pieces of pipe at each end to keep it all safe and protect the thread at the nut end really neat and I would say perfectly safe.You can see by the pic of the new tension assembly I have just cut the 2 rods off but the piece of pipe is still covering the nut.Really happy with it all.
 

brucew

Well-Known Member
Joined
Dec 11, 2013
Messages
62
Location
Mundubbera Qld. australia
Yes DMiller bad blue on my part not cleaning it but as I have owned and operated for the last 31 years I can honestly say there has only been one or two mistakes like that so I don't think I have done too bad. It has come time I think for a new owner so that will be my next project and that is to sell it.
 

ScottNC

Well-Known Member
Joined
Nov 7, 2015
Messages
119
Location
southeast US
I am late to the show. Having a D4D and having had the track adjusters apart I couldn't help but notice something in the first set of photos; the adjuster was fully extended while cutting the tension spring coils. There is a good 4-5" of adjuster shaft showing behind the head of the adjuster where the grease fittings reside. Mine would not collapse due to dirt build up which may be the case here.
 

brucew

Well-Known Member
Joined
Dec 11, 2013
Messages
62
Location
Mundubbera Qld. australia
I am late to the show. Having a D4D and having had the track adjusters apart I couldn't help but notice something in the first set of photos; the adjuster was fully extended while cutting the tension spring coils. There is a good 4-5" of adjuster shaft showing behind the head of the adjuster where the grease fittings reside. Mine would not collapse due to dirt build up which may be the case here.
No Scott nc everything was all hosed out with high pressure water spray most people over in Oz as far as I am aware call them a Gernie ,I do anyway.I had already taken side arm going to the idler off as well as making sure there was no pressure from any grease was all released.In other words the adjuster shaft was just sitting there.Such a shame because there was only 2 things really wrong with the whole assembly and that was the braces at back were all rusted which meant to take the pressure off the spring was to tighten the big nut on the end but the thread was all rusted out as well and it just couldn't be done that way. Doesn't really show up in the pics too well but the base where the spring sits up against had to be all straightened back to where it should be before I could start welding the new braces in.
 

ScottNC

Well-Known Member
Joined
Nov 7, 2015
Messages
119
Location
southeast US
No Scott nc everything was all hosed out with high pressure water spray most people over in Oz as far as I am aware call them a Gernie ,I do anyway.I had already taken side arm going to the idler off as well as making sure there was no pressure from any grease was all released.In other words the adjuster shaft was just sitting there.Such a shame because there was only 2 things really wrong with the whole assembly and that was the braces at back were all rusted which meant to take the pressure off the spring was to tighten the big nut on the end but the thread was all rusted out as well and it just couldn't be done that way. Doesn't really show up in the pics too well but the base where the spring sits up against had to be all straightened back to where it should be before I could start welding the new braces in.

Ahh, missed that part. Curious, I too pulled the outer half of the wishbones; How much fun did you have getting the bolt holes to line up for reassembly? Put my problem was that I was alone, out in the boonies with minimal tools.
 

brucew

Well-Known Member
Joined
Dec 11, 2013
Messages
62
Location
Mundubbera Qld. australia
Ahh, missed that part. Curious, I too pulled the outer half of the wishbones; How much fun did you have getting the bolt holes to line up for reassembly? Put my problem was that I was alone, out in the boonies with minimal tools.
Yes I have had trouble in the past what I did this time was made up a mechanical adjuster out of pipe and a large nut and bolt and pushed the idler to somewhere near where it would normally run and put a G clamp on the frame. Obviously I had the luxury of being right next to my so called workshop and it would not have been as simple out as you say out in the boonies. Been there and done that one in the past not easy.
 

brucew

Well-Known Member
Joined
Dec 11, 2013
Messages
62
Location
Mundubbera Qld. australia
Too Purdy to use!! Should work very well!
Thank you DMiller yes not perfect but very happy with how it has come up have got a video of it working but it is apparently to big to display on this site. However here is the tree, big old dead ironbark that was right beside our driveway, first pic is of the tree on the ground, second where I covered up the hole that it left. The tree just came out easy as.IMG_0135.JPG IMG_0136.JPG
 
Top