• Thank you for visiting HeavyEquipmentForums.com! Our objective is to provide industry professionals a place to gather to exchange questions, answers and ideas. We welcome you to register using the "Register" icon at the top of the page. We'd appreciate any help you can offer in spreading the word of our new site. The more members that join, the bigger resource for all to enjoy. Thank you!

1968 Case 580CK head gasket??

RadRob

Active Member
Joined
Mar 13, 2013
Messages
26
Location
Louisiana
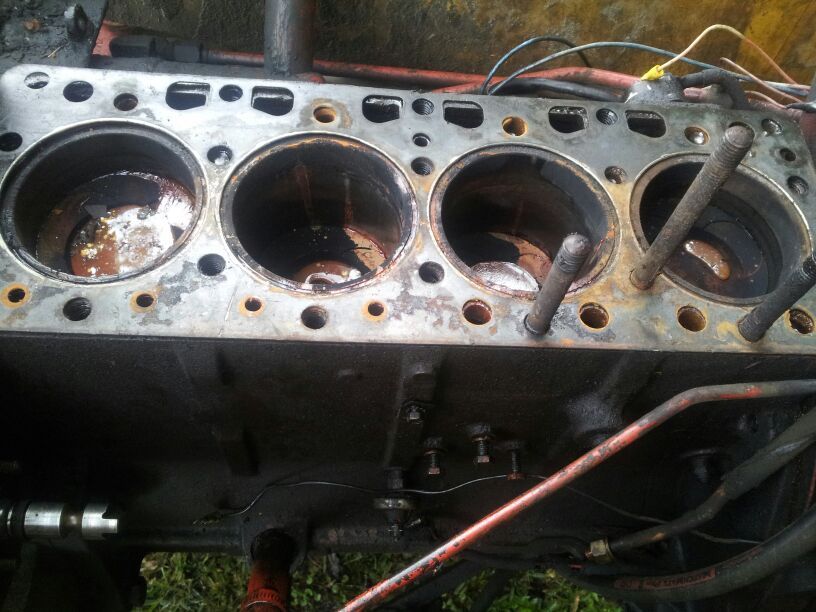
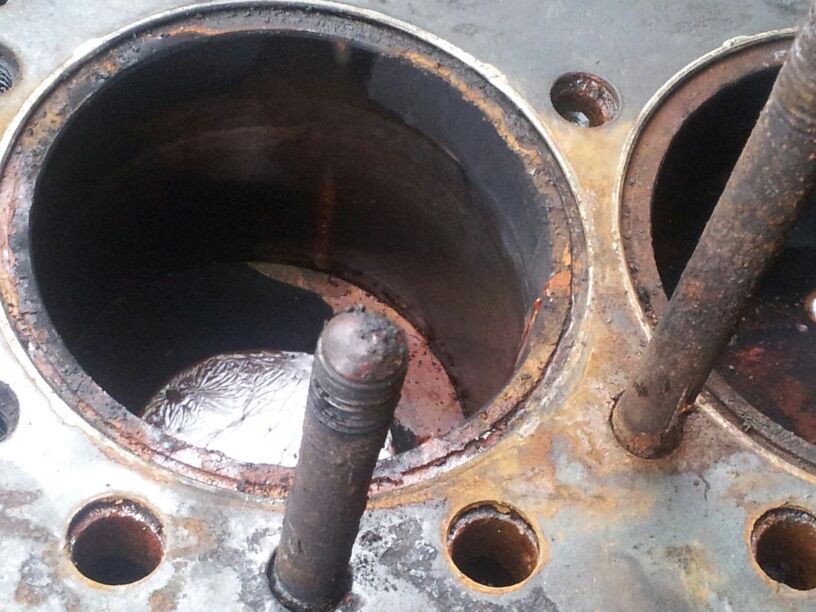
I have it tore down to replace it but I'm not sure the last guy used the right gasket. According to the book I should have fire rings and this one doesn't and seems to be oversized around the sleeves. It seems like the gasket is the same outer size as the sleeve and with the gasket in place it looks like it would leak. The gasket in there has the metal crush ring around the sleeve but it just doesn't look right to me.

I hope someone can help before I order the wrong one.
 

Juskatla

Senior Member
Joined
Dec 12, 2009
Messages
579
Location
Black Creek B.C.
Occupation
Retired
I'd suggest that you call Dale Weiss at Tractorstuff and he will know the difference. I don't have his number here but you can look it up. Dale has helped me with my overhaul project and made sure I got the correct parts. On my 188 rebuild, I did not use the gasket with separate fire rings, but the sleeves were replaced, so maybe no longer necessary with what the shop put in.
 

RadRob

Active Member
Joined
Mar 13, 2013
Messages
26
Location
Louisiana
Thanks Juskatla

I just got off the phone with Dale. He says the later model engines(1st used eng ser# 2656844) can used an after market gasket with the ring built in. He also reminded me to put the hollow bolt in the last hole for the rocker train. I didn't know he owned the place when I asked for him but he took his time and researched everything. Very nice guy to deal with.
 

Juskatla

Senior Member
Joined
Dec 12, 2009
Messages
579
Location
Black Creek B.C.
Occupation
Retired
I have been told that Dale once owned a Case dealership and eventually moved into the business he has now. He is very experienced with these machines and can supply either Case/CNH or quality aftermarket parts at reasonable prices. I think he has a supply of used take off pieces if you have something missing. I live on the west coast of Canada and my parts have always arrived promptly via USPS.
 

RadRob

Active Member
Joined
Mar 13, 2013
Messages
26
Location
Louisiana
I picked up the new gasket set and it's the same thing that was in there but it still doesn't look right to me. Everything I've read says this gasket should work and has been being used for years. My local auto parts guy crossed the case# 1349089C1 to a Fel-Pro# HS 8269 PT


The reason I say it doesn't look right is there seems to be too much space between the crimped fire ring on the gasket and the sleeve. Also the sleeve has a groove that protrudes above the block and has carbon build up so that means it's not touching the head but it's close. The head bolts were loose to me when I pulled it, maybe with the proper torque it will seat the gasket fire ring better. Here's a few pics, it looks like the leak was between 3 & 4.
20170419_141959.jpg

20170419_141945.jpg

Here's a better pic of the sleeve groove and gasket
20170419_142049.jpg

Here's the sleeve protrusion above the block
20170419_142245.jpg


I guess I'll go with it and start doing clean up to get it back together, I may send the head to get worked and check for cracks too.
 
Last edited:

thepumpguysc

Senior Member
Joined
Mar 18, 2010
Messages
7,535
Location
Sunny South Carolina
Occupation
Master Inj.Pump rebuilder
Off topic but in my wheel house.. while the inj.pump is off.. run your finger inside the brass pilot tube in the front.. if you feel any grooves, get the pump repaired now, while its off the engine..
Otherwise it'll start filling up the crankcase w/ fuel.
I hope you tied the throttle lever back to wide open before you took it off??
 

RadRob

Active Member
Joined
Mar 13, 2013
Messages
26
Location
Louisiana
I didn't tie it back and just went check the weights, all seem in place when I turn the pump with a screwdriver. I also checked the brass tube and it's good, I did rebuild it about 3 years ago so it should be good still=hopefully.
 

Tinkerer

Senior Member
Joined
May 21, 2009
Messages
9,369
Location
The shore of the illinois river USA
Be sure to do a meticulous job of cleaning that top deck. DO Not get too aggressive and remove any metal. NONE. Those sleeves are supposed to protrude above the deck. There is a way to measure that protrusion. It is extremely important they all protrude the EXACT same amount. If they don't you will have a big time problem getting the head gasket to seal. By the looks of those studs there has coolant seeping around them.
 

56wrench

Senior Member
Joined
Dec 4, 2016
Messages
2,116
Location
alberta
It is hard to see but the sleeve(liner) protrusion is actually measured at the outer flange of the liner and not the large raised area in your picture. On an old, high hour engine it will likely be about 0- .002". If its less than .001" it may eventually cause compression leakage. You may want to do a re-torque after the engine has been run and again after a few hrs use if the liner protrusion is less than .001". It may help squeeze a few more hours out of the old girl until an overhaul is required. The carbon on that raised portion of the liner is normal because the cyl head does not contact that part of the liner, only the outer flange area above the crimped fire ring part of the head gasket. If the liner has a small raised bead on the outer flange, be careful not to gouge it while cleaning because it is there to help seal the fire ring.
 

Tinkerer

Senior Member
Joined
May 21, 2009
Messages
9,369
Location
The shore of the illinois river USA
sleeve measure.png This is the only method that should be used to measure the cylinder protusion.
This photo was provided by a true master Case mechanic named Phil. Unfortunately for us he has not posted anything for a long time
 

RadRob

Active Member
Joined
Mar 13, 2013
Messages
26
Location
Louisiana
Thanks guys, I've been cleaning it up some and called for prices on a head job. I don't think I'm putting that much money into this old thing. I'll lap the valves and clean her up and go from there.
 

Tinkerer

Senior Member
Joined
May 21, 2009
Messages
9,369
Location
The shore of the illinois river USA
In your first post you said the gasket didn't look right. It is fine . Look at Phil's photo and you can see real well how the steel ring in the head-gasket sets on the sleeve flange. If the prices on having the head redone arn't real bad I would advise you let them do it. They will chck for excessive valve guide wear which is important when it comes to controlling blow-by.
 

RadRob

Active Member
Joined
Mar 13, 2013
Messages
26
Location
Louisiana
They quoted $350-1k and I'm not dumping that much into this head, I need the head gasket fixed and use that money in other places. I don't use this machine daily and I can handle a little rough running machine for the little work it does.

Next problem: The valve guide seals that came with this set is different from what's in there, someone put umbrella seals in and I can't find a P/N for new ones. Has anybody used these and have a p/n?
 

Tinkerer

Senior Member
Joined
May 21, 2009
Messages
9,369
Location
The shore of the illinois river USA
Umbrella seals are not uncommon in those engines. #26 in the photo is the OEM style. I fully understand about spending a lot of money on the head when it is a seldom used machine. I wouldn't either in that situation.
seal.png
 

RadRob

Active Member
Joined
Mar 13, 2013
Messages
26
Location
Louisiana
That's the same p/n in my book and it's just the o-ring type. I researched a few sites and many people are saying just measure the valve diameter and go to Napa and they can look up an umbrella seal and order them. There's two types, one is snug on the valve and rides up and down with the valve and the other is called positive and it attaches on the valve guide and the valve slides through it as it moves, both are supposed to reduce smoking when the engine is running. John Deere has been using them since the 60's.

There's also discussion about umbrella seals will wear out the valve guide faster due to the limited amount of oil that the seals allow to the guide. I don't see this being a problem, the valves will suck some oil down the guide and on older engines it will clear up some of the exhaust smoke. Some engines only have them on the intake valve and some engines use a high temp material for exhaust valves to handle the heat better.


I'm putting the old seals back in, I cleaned them up and they're still pliable and will work. I lapped the valves yesterday and didn't notice any slop in the valve guides so it should be fine. Fingers crossed of course.
 

RadRob

Active Member
Joined
Mar 13, 2013
Messages
26
Location
Louisiana
Well it was going smooth putting the head back together BUT... I had 1 injector that I couldn't get out so I used a 1/4" extension and drove it out, I won't be using that one again. I also had a different injector someone put in that didn't match so I went hunting and found that Case has them for $190 each while Ebay has them for $24 each. WOW what a mark up Huh! At that price it's gonna be all new injectors.

I put the head on and while torquing it down found a stripped stud, GRRRR!!! Now I have to figure that out. It's close to where my leak was so that could be the culprit that caused all this. There's studs in this block instead of bolts and this stud was only screwed in about 6 threads so I may be able to clean up the remaining threads with a tap. I'll get 2 new studs from the bolt place, I also found a bolt with washers on it for a head bolt. The City mechanic really rigged this thing up. I have to give it to him through, he kept the machine running and that's what he was there for. Maybe he figured it was gonna be scraped soon anyway. I also noticed he removed the linkage for the right side brake, OH Boy is this thing gonna be fun to get completed!!!!

Rob
 
Top